


Sewing Essentials for Beginners Guide
So, you’re ready to start sewing. Welcome! It’s a fantastic skill to have. The first thing to know is you don’t need a sewing room bursting with gadgets to make something amazing. Just like learning to cook, you start with a good knife and a cutting board, not a whole professional kitchen.
Your First Steps in Sewing (Without the Stress)
Walking into a craft store for the first time can feel a little overwhelming. There are walls of mysterious-looking tools and a whole new vocabulary to learn. But here's the secret: at its core, sewing is just about joining fabric together. You only need a few solid, reliable tools to do that beautifully.
This guide is designed to cut through the noise. We're going to focus on the absolute must-haves—the workhorses you'll reach for again and again. Forget the specialty gizmos that look cool but end up collecting dust. By investing in quality basics, you'll save yourself a lot of frustration and money. A truly sharp pair of scissors will make a bigger difference to your projects than a box full of fancy presser feet you might never even touch.
The key to getting started in sewing isn't about buying everything—it's about buying the right things. A small, well-chosen toolkit is all you need to build your confidence one stitch at a time.
To keep things simple, we'll break down the essentials into three main jobs they help you do:
- Cutting & Measuring: This is all about precision. Getting this right from the start is what sets your projects up for success.
- Stitching & Securing: These are the bits and pieces—from pins to thread—that literally hold your work together.
- Pressing & Finishing: You'll be surprised what a little heat and steam can do. These simple tools are the key to giving your handmade items a polished, professional look.
With this handful of essentials, you’ll be more than ready to tackle your first few projects and really get a feel for the magic of creating something from scratch.
Choosing Your First Sewing Machine

Your sewing machine is the heart of your sewing space. It’s the single most important tool you'll buy, the reliable engine that will power every creative idea you have. I know walking into a store or browsing online can feel overwhelming with all the options, but finding the right one is simpler than you think.
For beginners, the choice really boils down to two main types: mechanical and computerized. Mechanical machines are the classic workhorses—you control them with physical knobs and dials. Computerized models feature LCD screens and buttons for selecting stitches, and often come with helpful automated functions.
When you're just starting out, reliability is so much more important than a long list of bells and whistles. Look for a sturdy, user-friendly machine that you can learn on without feeling overwhelmed. It's a massive industry—the global sewing machine market hit an estimated USD 7.1 billion last year, and electric models are incredibly popular. This proves their place as one of the most important sewing essentials for beginners, largely because their automated features make learning much smoother. You can explore more market trends and insights about this growing field.
Key Machine Features for Beginners
It’s easy to get distracted by machines that boast hundreds of fancy stitches you'll probably never use. Instead, focus on the practical features that will make a real difference in your day-to-day sewing.
- Adjustable Stitch Length and Width: This is non-negotiable. It gives you complete control, letting you create a tiny, tight stitch for delicate fabrics or a long, strong one for heavy-duty seams.
- A "Free Arm": This is a clever feature where you can slide off part of the sewing bed to expose a smaller, narrow arm. It’s absolutely essential for sewing anything cylindrical, like hemming a pair of pants or setting a sleeve.
A great beginner machine should feel empowering, not complicated. It needs to master the basics flawlessly before you ever worry about advanced decorative stitches.
What to Prioritize in Your First Machine
If you only remember one thing, let it be this: choose a machine with a solid metal frame, not a plastic one. A heavier machine is a more stable machine. It won't vibrate or dance across your table as you sew, which is crucial for getting those nice, straight stitches that build your confidence.
Also, check what accessories come in the box. A good starter machine will include a few basic presser feet, like a zipper foot and a buttonhole foot. With just these simple attachments, you'll be ready to tackle a huge range of fantastic beginner projects, from your first tote bag to a simple skirt.
Mastering Precision With Cutting And Measuring Tools
If there's one place you can't afford to cut corners (pun intended!), it's with your cutting. Think of it this way: your fabric pieces are like the foundation of a house. If they're cut wonky, nothing else you build on top will line up correctly. Getting this step right from the start is genuinely half the battle, and having the right tools makes all the difference.
First things first, you need a pair of dedicated fabric shears. These are not the scissors you find in your junk drawer! They’re specially designed with ultra-sharp, precision-ground blades that slice through fabric like butter, leaving you with a clean, fray-free edge. Trying to use all-purpose scissors will just chew up your fabric and lead to a world of frustration.
The Power Duo For Straight Cuts
When it comes to speed and dead-on accuracy, especially for straight lines, nothing beats a rotary cutter paired with a self-healing cutting mat. A rotary cutter works like a pizza cutter for fabric, letting you glide through several layers at once with incredible ease. The mat not only protects your table but also has handy gridlines that help you line everything up perfectly.
This combination is a total game-changer for projects that rely on straight, square pieces, like quilting or making tote bags. It's so much faster and more precise than trying to get a perfect line with scissors alone.
Key Takeaway: Your fabric shears are for fabric and fabric only. Cutting paper, tape, or anything else will dull the blades in a heartbeat. Keep a separate pair of craft scissors for your patterns to protect your investment.
To help you decide which tool to start with, here's a quick breakdown:
Essential Cutting Tools Comparison for Beginners
| Tool | Best For | Pros | Cons |
|---|---|---|---|
| Fabric Shears | Curves, intricate shapes, delicate fabrics, cutting single layers. | Excellent control for detailed work; no extra mat needed; good for beginners. | Slower for long, straight cuts; can be less precise over long distances. |
| Rotary Cutter | Long straight cuts, cutting through multiple layers, quilting, patchwork. | Extremely fast and precise; creates perfectly straight edges. | Requires a self-healing mat; has a learning curve for safety; not ideal for tight curves. |
Ultimately, most sewers end up with both, but this should help you pick your first one based on the projects you're excited to start.
Essential Tools For Accurate Measuring
Of course, you can't make a precise cut without an accurate measurement. A flexible tape measure is absolutely non-negotiable for taking body measurements and navigating curves. You’ll also want a clear acrylic ruler, at least 18 inches long. This is your workhorse for drawing straight lines, checking the fabric's grainline, and marking seam allowances.
These simple, inexpensive items are the unsung heroes of your toolkit. As true sewing essentials for beginners, they are the first step toward making sure your projects turn out just the way you imagined them.
The Small Tools That Make a Big Difference
While the sewing machine and a good pair of scissors get all the glory, there's a whole crew of smaller tools working behind the scenes. These are the unsung heroes—the needles, thread, and pins—that really pull a project together. They might seem like minor details, but trust me, getting them right is the secret to avoiding huge headaches like snapped thread and puckered seams.
Think of your sewing machine needle like the tip of a paintbrush; you wouldn't use a massive brush for fine details. A universal needle is a solid choice for getting started, but you'll quickly learn that a fine "sharps" needle on delicate cotton gives you a professional finish that a heavy-duty denim needle just can't match.
Pro Tip: Swap out your sewing machine needle after every 8-10 hours of use. A dull or slightly bent needle is the number one culprit behind skipped stitches, fabric snags, and a ton of frustration. It’s a simple habit that makes a world of difference.
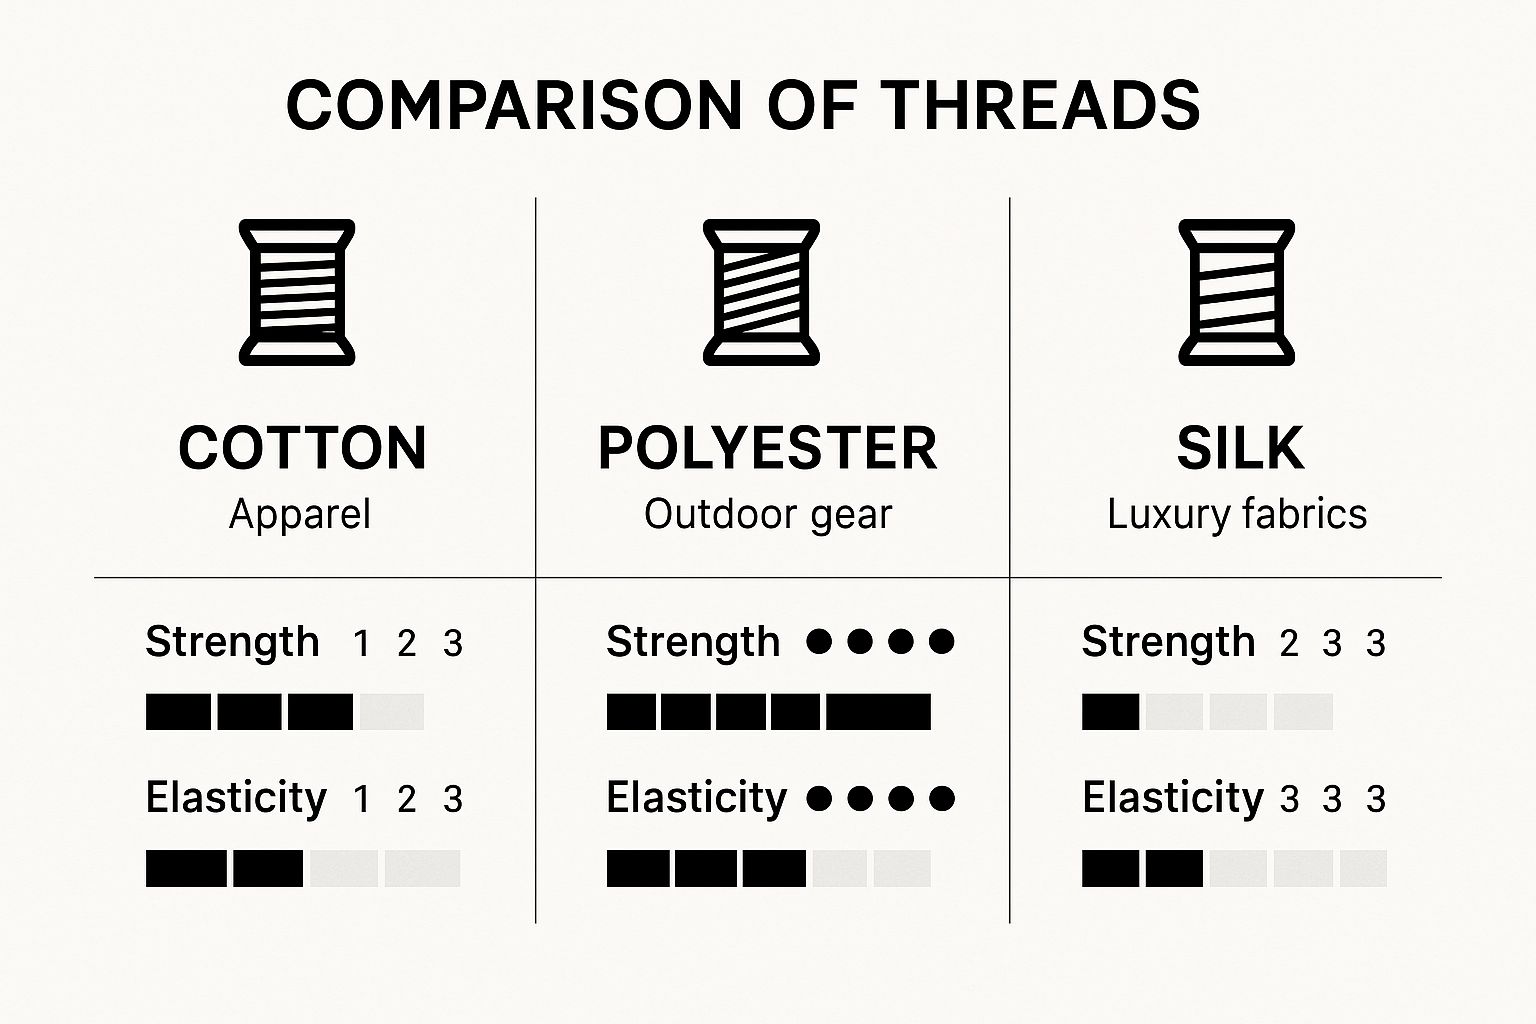
Choosing Your Thread and Pins
Next up is the thread, which literally holds your creation together. As one of the most critical sewing essentials for beginners, the right thread affects both the strength and the appearance of your seams. It's a bigger deal than you might think; the global sewing thread market is valued at around USD 3.69 billion for a reason! You can learn more about the trends in the sewing thread market to see just how vital it is.
For most of your early projects, an all-purpose polyester thread will be your best friend. It's strong, has just enough give to it, and plays nicely with a huge range of fabrics.
Finally, you need a way to hold your fabric in place before you start stitching. This is where pins and clips come in.
- Glass-Head Pins: These are my go-to. Unlike their plastic-headed cousins, the glass heads won't melt into a gooey mess if you accidentally hit them with a hot iron.
- Fabric Clips: These little wonders are a fantastic alternative to pins. They're perfect for holding thick layers (like quilt binding) and essential for delicate materials you can't poke holes in, like leather or vinyl.
Giving Your Work a Professional Finish With Pressing Tools
Here’s a little secret that separates the "homemade" from the "handmade": pressing. Think of it like a chef meticulously plating a dish. Pressing your seams as you sew is what gives your projects that crisp, polished, store-bought look. It’s the difference between a garment that hangs beautifully and one that just looks… well, sewn at home.
Your trusty steam iron is the star of the show here. A good one delivers consistent heat and steam, which helps to meld the stitches into the fabric and flatten seams perfectly. When you press a seam open, you can reduce puckering and wrinkles by up to 90%, giving you a flat, clean line. Of course, you'll need a sturdy ironing board to provide that firm, flat surface for the best results.
While the iron and board are the main players, a few other tools will seriously elevate your pressing game:
- Seam roll: Perfect for pressing long, straight seams (like on pant legs) without leaving an imprint on the right side of the fabric.
- Tailor’s clapper: This simple block of wood is magic on fabrics like wool. After steaming a seam, you press the clapper down on it, and it traps the steam while setting the seam to an incredibly sharp, flat edge.
- Pressing ham: Just like its name suggests, it's a firm, ham-shaped cushion. It's essential for pressing curved areas like darts, collars, and sleeve caps, allowing you to maintain the garment's shape.
As any seasoned tailor will tell you, "A well-pressed seam speaks louder than a thousand stitches." It’s a fundamental step that builds quality right into the fabric of your work.
The Finishing Touches: Marking and Correcting
Before you even get to pressing, you need to mark your fabric accurately. This is where tools like chalk pencils and disappearing ink pens come in. They let you transfer pattern markings for darts, pleats, and buttonholes directly onto your fabric so you know exactly where to sew. The chalk brushes off easily, and the ink typically vanishes with a bit of water or heat, leaving no trace behind.
For instance, marking a dart on a cotton blouse with a white chalk pencil gives you a clear, visible line to follow. This simple step ensures your dart is stitched perfectly, leading to a much better fit.
And what happens when a stitch goes astray? That’s where the humble seam ripper comes in. Everyone makes mistakes, from beginners to experts. A good seam ripper lets you gently unpick stitches without tearing the fabric. It’s an absolute must-have in your toolkit because making a clean correction saves a world of frustration down the line.
Getting comfortable with these pressing and finishing tools from a site like Famcut.com is what will build your skill and confidence. It's these final steps that truly make your projects look polished, professional, and ready to wear with pride.
Building Confidence With Your First Projects
You’ve gathered your tools, and now the real fun begins. It's time to put them to work and bring your ideas to life! The key to getting off to a great start is picking the right first project—something that feels like a win without being overwhelming.
Think of these early projects as your training ground. They're designed to be straightforward, focusing on fundamental skills like sewing straight lines and simple shapes. This is exactly where you want to start.
Great First Sewing Projects
- Pillowcases: This is the perfect project for practicing long, straight seams. You'll also get the hang of folding and sewing a clean, simple hem.
- Tote Bags: A simple tote teaches you how to turn flat pieces of fabric into a functional, 3D object. It’s a great way to practice adding straps and finishing edges.
- Pajama Pants: Find a beginner-friendly pattern with an elastic waistband. This is an awesome first step into making something you can actually wear!
Don't aim for perfection on your first try. The real goal is just to finish. Getting a project done, no matter how small, is a massive confidence boost that will have you excited for whatever's next.
As you work, you’ll see how each tool plays its part. That rotary cutter and mat? They’ll make cutting the square pieces for your tote bag incredibly fast and precise. Your glass-head pins will be your best friend, holding everything in place so the fabric doesn't wiggle around under the needle.
And the steam iron is your secret weapon. Pressing your seams as you go is what separates a homemade-looking project from a professional-looking one. It makes all the difference, giving your pillowcase or tote bag that crisp, finished look. This is how you'll truly connect your new sewing essentials for beginners to tangible results you can be proud of.
Still Have Questions? Let's Clear Things Up.
Diving into the world of sewing tools can feel a little overwhelming at first, and a few common questions always pop up.
One of the big ones is about those all-in-one sewing kits you see everywhere. Are they a good starting point? Honestly, while they look convenient, they’re often packed with lower-quality tools that can make learning more frustrating. It's much better to buy a few key pieces individually—you'll get tools that actually work well and last longer.
So, if you only buy one thing after your sewing machine, what should it be? Without a doubt, a great pair of fabric shears. Clean, sharp cuts are the bedrock of good sewing, and a dedicated pair of scissors makes all the difference. This is one of the most crucial sewing essentials for beginners.
Don't worry, you don't need to break the bank to get started. You can pull together a fantastic starter kit with high-quality hand tools for around $50-$75. The key is to choose quality over quantity. A few reliable tools will serve you far better than a drawer full of mediocre ones, setting you up for success from your very first project.
Ready to start building your perfect sewing kit? Famcut.com has the high-quality tools and supplies you need to get going with confidence. Start shopping our collection today!