


Essential Quilting Tools for Beginners
So, you're ready to dive into the wonderful world of quilting? That's fantastic! Before you start piecing together your first masterpiece, let's talk about gear. Getting the right tools from the get-go is like prepping your ingredients before you start cooking—it makes the whole process smoother, way more fun, and keeps the frustration at bay.
Starting Your Quilting Journey With the Right Gear
Jumping into a new hobby can feel a little intimidating, especially with all the gadgets and gizmos you see online. But here's a little secret: you don't need everything. The key to a great start is a small, carefully chosen set of tools that will truly help you learn the craft.
This guide will walk you through the absolute must-haves for any beginner. We'll focus on the three big areas of quilting:
- Cutting Tools: This is all about getting those clean, precise cuts that are the foundation of every beautiful quilt.
- Sewing and Pressing Tools: These are the tools that bring your fabric pieces together and create those crisp, flat seams that make your work look professional.
- Measuring and Marking Tools: Accuracy is everything in quilting, and these tools ensure your blocks and patterns line up perfectly.
Take it from someone who's been there: investing in a few high-quality basics is far better than buying a giant kit filled with stuff you won't use. Good tools make learning a joy, not a chore, by preventing common beginner hiccups.
It's a great time to be a quilter! The industry is booming, with a market value hitting around USD 5.61 billion in 2025 and expected to grow to USD 9.67 billion by 2035. For you, that means there are more amazing, beginner-friendly tools available than ever before. You can pull together a fantastic starter kit for about $50 to $150. You can read more about the growth of the quilting market if you're curious!
Alright, let's get into the specifics of what you'll want in your quilting toolkit.
Your Top 5 Essential Quilting Tools
To make it even simpler, here's a quick look at the absolute must-haves. If you only buy five things to start, make it these five. They form the core of any quilter's toolkit and will see you through your first several projects with ease.
| Tool Name | Primary Function | Why It's Essential for Beginners |
|---|---|---|
| Rotary Cutter | Cutting fabric | Provides clean, straight cuts that scissors can't match, which is crucial for accurate piecing. |
| Self-Healing Mat | Protecting surfaces | A necessary partner to the rotary cutter, it protects your table and keeps your blade sharp. |
| Quilting Ruler | Measuring and guiding cuts | Ensures every strip and square is perfectly sized, which is the key to blocks that fit together. |
| Quality Cotton Thread | Sewing pieces together | Strong, reliable thread prevents seams from breaking and doesn't create excess lint in your machine. |
| Steam Iron | Pressing seams | Properly pressed seams are flat and accurate, making the final quilt top look polished and professional. |
Getting these essentials will set you up for success right from your very first stitch. Now, let's take a closer look at each one.
The Unbeatable Trio for Precision Cutting
Every great chef has a favorite knife and cutting board they swear by. For a quilter, that essential combination is the rotary cutter, self-healing mat, and acrylic ruler. These three tools are the foundation of accurate patchwork, working together to give you those perfectly straight, clean cuts that make a quilt come together beautifully.

Trying to quilt without this trio is a recipe for frustration. You'll end up with wonky blocks and mismatched seams. Trust me, these aren't just nice-to-haves; they are truly fundamental for any beginner.
Choosing Your Cutting Mat
First up is the self-healing cutting mat. Think of it as the workbench for all your fabric prep. This special surface protects your table from the rotary blade's sharp edge, and just as importantly, it protects the blade itself from getting dull too quickly. When you slice into it, the material magically "heals" itself by closing back up around the cut.
When you’re picking out your first one, size is what matters most.
- A great starter size: An 18x24 inch mat is the sweet spot. It's big enough to handle fabric folded right off the bolt but won't completely take over your sewing space.
- Helpful grid markings: Make sure the mat has a clear one-inch grid, along with angled lines for cutting bias strips and triangles. These markings become your built-in guide for fast, accurate measurements without a lot of fuss.
The Power of the Rotary Cutter
Next is the rotary cutter, which might look like a pizza cutter but is a game-changer for fabric. It lets you slice through multiple layers of material with a speed and precision that you just can't get with scissors.
For anyone starting out, a 45mm blade is the most versatile option out there. It’s perfect for everything from cutting long, straight strips to trimming up smaller, more detailed shapes. The most important feature? A good safety guard that retracts automatically or is easy to use with one hand. These blades are incredibly sharp, so safety is non-negotiable.
A recent quilting trends survey showed that over 85% of beginners use a rotary cutter regularly. Cutting mats and rulers are right there with them, used by about 80% of new quilters. This really shows how central these tools are to the craft, especially in the North American quilting market, which accounts for 39% of global revenue. You can discover more about these quilting trends and see just how essential this trio is.
Finding the Perfect Ruler
The final piece of the puzzle is the acrylic quilting ruler. This is the guide that keeps your rotary cutter on the straight and narrow. These rulers are specifically designed to be thick enough to prevent the blade from hopping over the edge, and they’re transparent so you can see exactly what you're cutting.
A 6x24 inch ruler is what you'll see in almost every quilter's toolkit, and for good reason. It’s the ideal length for cutting strips from fabric folded off the bolt and is long enough for the vast majority of quilting cuts you’ll need to make. With clear inch markings, it helps you measure and cut squares, rectangles, and strips with total confidence, every single time.
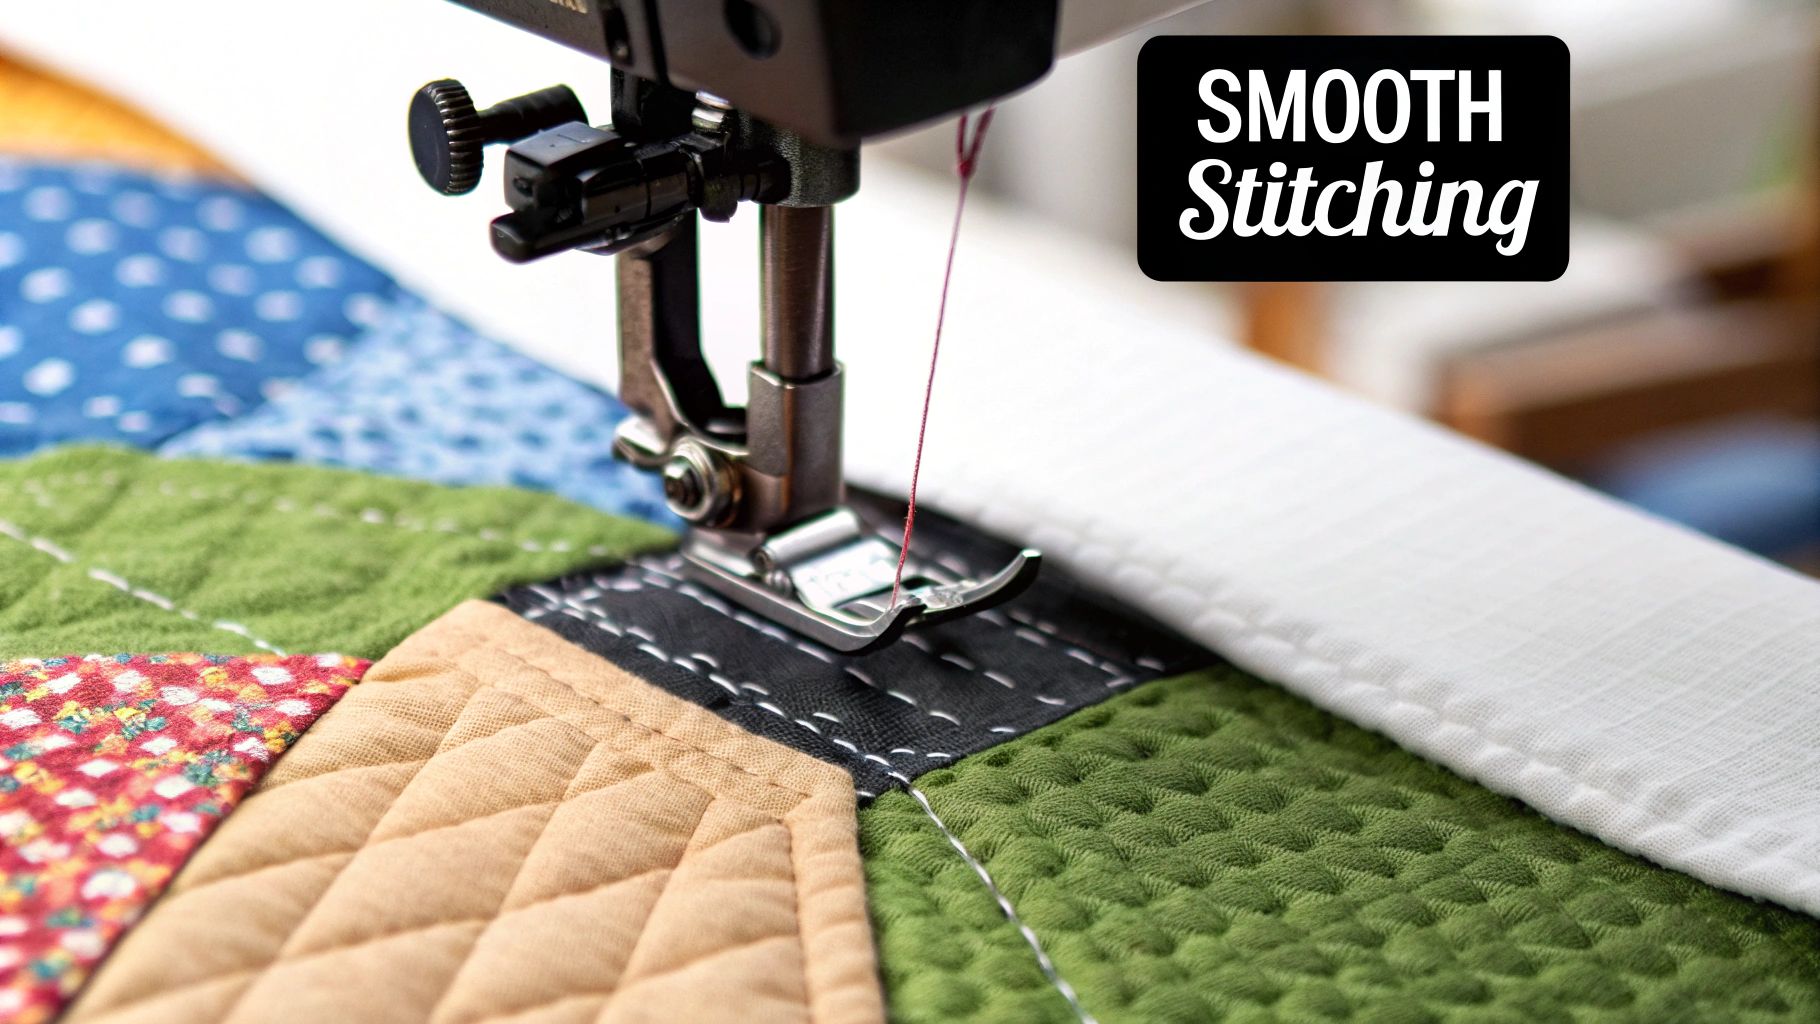
Essential Tools for Sewing and Pressing
Once your fabric is cut and ready, the real fun begins: stitching those pieces together. This is where your quilt starts to take shape, and having the right sewing and pressing tools is what separates a homemade-looking quilt from a professional, polished one.

Let's start small. The humble sewing machine needle and a spool of quality thread are your workhorses. It's so easy to overlook them, but they make a massive difference. A sharp, new needle means no skipped stitches or fabric snags, while a good all-purpose cotton thread will give you strong seams without gunking up your machine with lint.
Holding Your Work Together
Before you can feed anything through the machine, you need to make sure your fabric pieces stay put. This is where pins and clips enter the picture. Ask any group of quilters, and you'll find they have strong opinions on which is better!
- Glass-Head Pins: The classic choice for a reason. They have fine shafts that slide right through cotton without a fight, and the glass heads are a lifesaver because they won't melt if the iron gets too close.
- Fabric Clips: A fantastic modern invention. These little clips clamp onto the edge of your fabric, holding layers together without leaving any pesky pinholes. They’re especially brilliant for securing the binding around the edge of your finished quilt.
Honestly, most quilters I know use a mix of both. Pins are perfect for lining up tricky intersections, while clips are a speedy way to hold long, straight seams together.
Let’s be real—mistakes happen. No matter how perfectly you pin, you'll eventually need a seam ripper. Don't think of it as a sign of failure; it's your quilting "undo button." It gives you the freedom to try things and fix them without ruining your fabric.
The Secret to Flat Blocks
Now for what I consider the most underrated tool in a quilter's studio: a good steam iron. Pressing your seams properly is the absolute secret to getting those perfectly flat, accurate quilt blocks you see in magazines.
A quality iron that kicks out a lot of steam will set your stitches beautifully and convince your fabric to lie perfectly flat. Pair it with a wool pressing mat or a solid ironing board, and get into the habit of pressing after every single seam you sew. It might feel tedious at first, but the payoff is huge—your points will match, your corners will be crisp, and your final quilt top will be a thing of beauty.
Must-Have Notions for Marking and Finishing
Once you've got the big-ticket items like your cutter and sewing machine, it's time to think about the smaller details. In the quilting world, we call these little helpers notions, and they are the secret to taking your project from homemade to beautifully handmade.
These are the tools that handle the finesse work, ensuring every detail is just right.
From marking quilting lines to snipping that very last thread, these small but mighty tools are absolutely essential. They’re what give a quilt its crisp, polished character.
Choosing The Right Marking Tools
Whether you're drawing a sewing line or mapping out an entire quilting design, you'll need to mark your fabric. The key is finding a tool that makes a clear mark and then disappears without a trace when its job is done.
Think of fabric markers like different types of pencils—each one is suited for a specific task.
- Water-Soluble Pens: These are fantastic for light-colored fabrics. They leave a fine blue or purple line that you can easily see, and it vanishes completely with just a spritz of water.
- Chalk Pencils or Wheels: When you're working with dark fabrics, chalk is your best friend. It creates a crisp, temporary line that simply brushes or washes away.
- Hera Markers: This is a pretty clever tool. It doesn't use any ink or chalk at all; instead, it creates a temporary crease in the fabric. It’s a foolproof option because there's absolutely no risk of leaving a permanent mark.
The golden rule of marking is that it must be temporary. Always, always test your marking tool on a small scrap of your project fabric first to make sure it comes off completely.
Essential Finishing Tools
The final stage of quilting is all about cleanup and precision. A small, sharp pair of thread snips (or small scissors) is non-negotiable. I keep a pair right next to my sewing machine at all times.
Having them handy lets you trim threads as you go, which prevents a tangled bird's nest on the back of your quilt and keeps your work neat. These little snips are designed to get super close to the fabric for a clean cut without any danger of accidentally nicking your beautiful stitches.
How to Build Your Beginner Toolkit Wisely
Once you know which tools you need, the next big question is how to get them. Do you grab a pre-made quilting kit, or do you pick out each item one by one? There’s no single right answer—it really comes down to your budget and how sure you are that quilting is your new favorite hobby.
Starter Kit vs Buying Individually
For many newcomers, a starter kit is the path of least resistance. It's a fantastic way to dive in without getting bogged down by choices. These bundles almost always include the essentials, like the revolutionary rotary cutter (a tool that changed the quilting game when it was invented back in 1979). Today, you can find a solid beginner kit for anywhere between $40 and $120. This accessibility is a big reason the craft continues to grow, as you can see from trends in the global quilt market.
Buying your tools individually, on the other hand, puts you in complete control. You can hand-pick a high-quality rotary cutter that feels great in your hand or find a ruler with markings that just make sense to your eyes. This approach lets you build a collection of tools you truly love to use.
So, which path is for you? Let's break down the pros and cons.
| Purchase Method | Pros | Cons | Average Cost Range |
|---|---|---|---|
| Starter Kit | Incredibly convenient and usually cheaper upfront. Takes the guesswork out of what to buy. | Often includes basic-quality items that you might want to upgrade sooner rather than later. | $40 - $120 |
| Buying Individually | You choose the quality and ergonomics of every single tool. You build a kit tailored perfectly to you. | Requires more time, research, and can cost more initially. It's easy to overspend. | $75 - $200+ |
Ultimately, a kit is a low-risk way to get started, while buying individually is an investment in your long-term enjoyment and precision.
Of course, your tools are only one part of the equation; you also need fabric! This chart breaks down a few common choices.
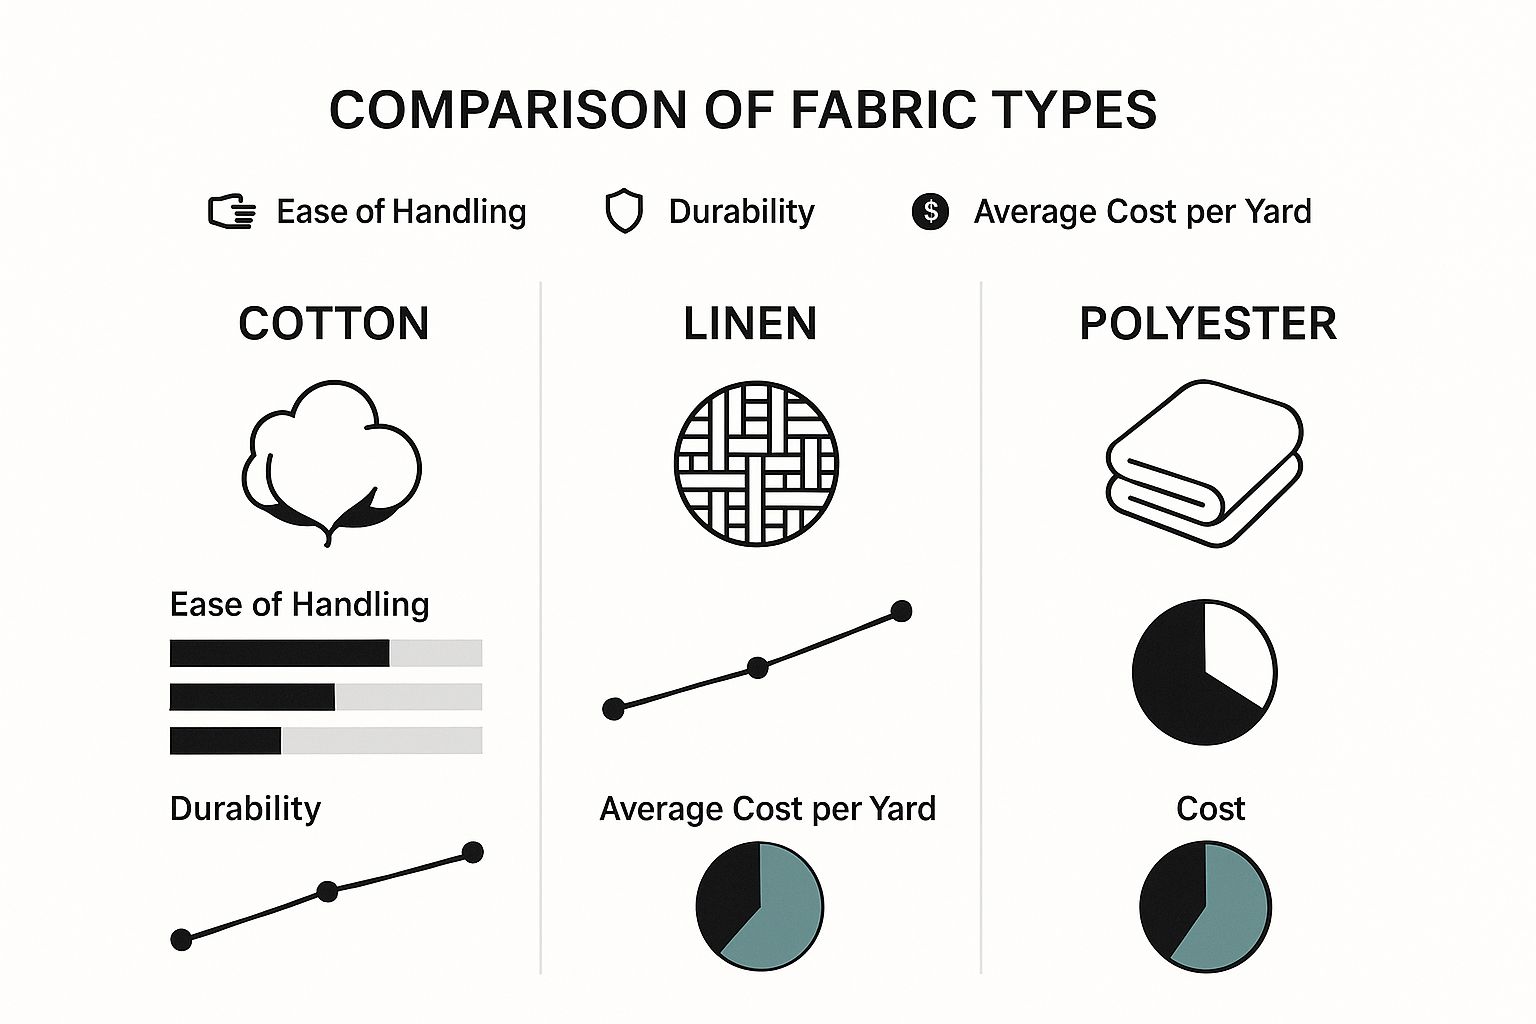
As you can see, cotton is the go-to for a reason. It’s stable, forgiving, and affordable, making it the perfect partner for your first few projects.
Key Takeaway: If you're just dipping your toes in, a kit is a fantastic, low-commitment starting point. But if you’ve already fallen in love with quilting, investing in individual, high-quality tools from the start will save you frustration and serve you well for years to come.
Common Questions About Beginner Quilting Tools
When you're first getting your hands on all this new gear, a few questions always seem to pop up. Don't worry, that's completely normal! Getting these sorted out early will boost your confidence and help you sidestep some common frustrations.
Let's tackle the big one right away: Can't I just use scissors instead of a rotary cutter?
Technically, yes, you can. But I strongly recommend sticking with the rotary cutter, mat, and ruler combo. This trio is the secret to getting the kind of fast, straight, and incredibly accurate cuts you need for your quilt blocks to line up perfectly. Scissors are just too slow and imprecise for this kind of work, and wobbly cuts are a surefire way to get frustrated fast.
So, what size tools should you get? A great starting point for most new quilters is an 18x24 inch self-healing cutting mat paired with a 6x24 inch acrylic ruler. The mat gives you plenty of room to work with standard fabric widths without completely taking over your table, and that ruler is a versatile workhorse you'll use for almost every beginner pattern out there.
Caring for Your Quilting Tools
Getting the right tools is half the battle; the other half is taking care of them. Knowing how to maintain your gear will make your quilting experience so much smoother.
For example, when should you change your rotary blade? The moment it starts skipping threads or you find yourself pressing down harder to get a clean cut, it's time for a new one. There's no magic number of hours or projects—it all comes down to how much you use it. A dull blade is a recipe for ragged edges and pulled fabric. As a beginner, you can expect a single blade to last you through one or two small quilt projects.
A lot of people think you need a fancy, expensive sewing machine just for quilting. The truth is, almost any reliable home sewing machine will do the job beautifully. As long as it can sew a consistent straight stitch, you're good to go. You can always upgrade down the road, but your basic machine is more than enough to get you started.
At Famcut.com, we have all the quilting essentials to get your creative journey started on the right foot. Check out our beginner-friendly cutters, rulers, and mats to build your perfect quilting toolkit today! You can find everything you need at https://famcut.com.