


8 Simple Quilting Patterns for Beginners to Try in 2025
Welcome to the wonderful world of quilting! The idea of cutting up beautiful fabric only to sew it back together can seem daunting, but it's one of the most rewarding crafts you can learn. The key to a successful first project is choosing the right pattern, and that's precisely why we've curated this collection of essential quilting patterns for beginners.
These designs are specifically chosen to teach you fundamental skills without overwhelming you. You'll practice accurate cutting, maintaining a consistent 1/4" seam allowance, and pressing seams, all while creating a stunning finished piece. To truly master quilting, it's invaluable to first understand the foundational principles, such as how stitches fundamentally work. This foundational knowledge makes every pattern that follows much more intuitive.
This guide provides a clear roadmap, moving beyond simple theory to offer actionable steps for each pattern. We will explore classic blocks that have been loved for centuries alongside modern designs with a minimalist flair. There’s a perfect starting point here for every new quilter, whether you're making a baby blanket, a wall hanging, or a cozy lap quilt. Let's dive into patterns that will build your confidence and have you proudly displaying your first handmade masterpiece in no time.
1. Rail Fence Pattern
The Rail Fence pattern is a fantastic starting point for anyone new to quilting. Its beauty lies in its simplicity, using fabric strips sewn together into rectangular blocks. These blocks are then arranged in alternating horizontal and vertical orientations to create a zigzag or step-like design, resembling the rails of a fence. This makes the Rail Fence one of the best quilting patterns for beginners to master fundamental skills like cutting strips, sewing straight seams, and pressing.
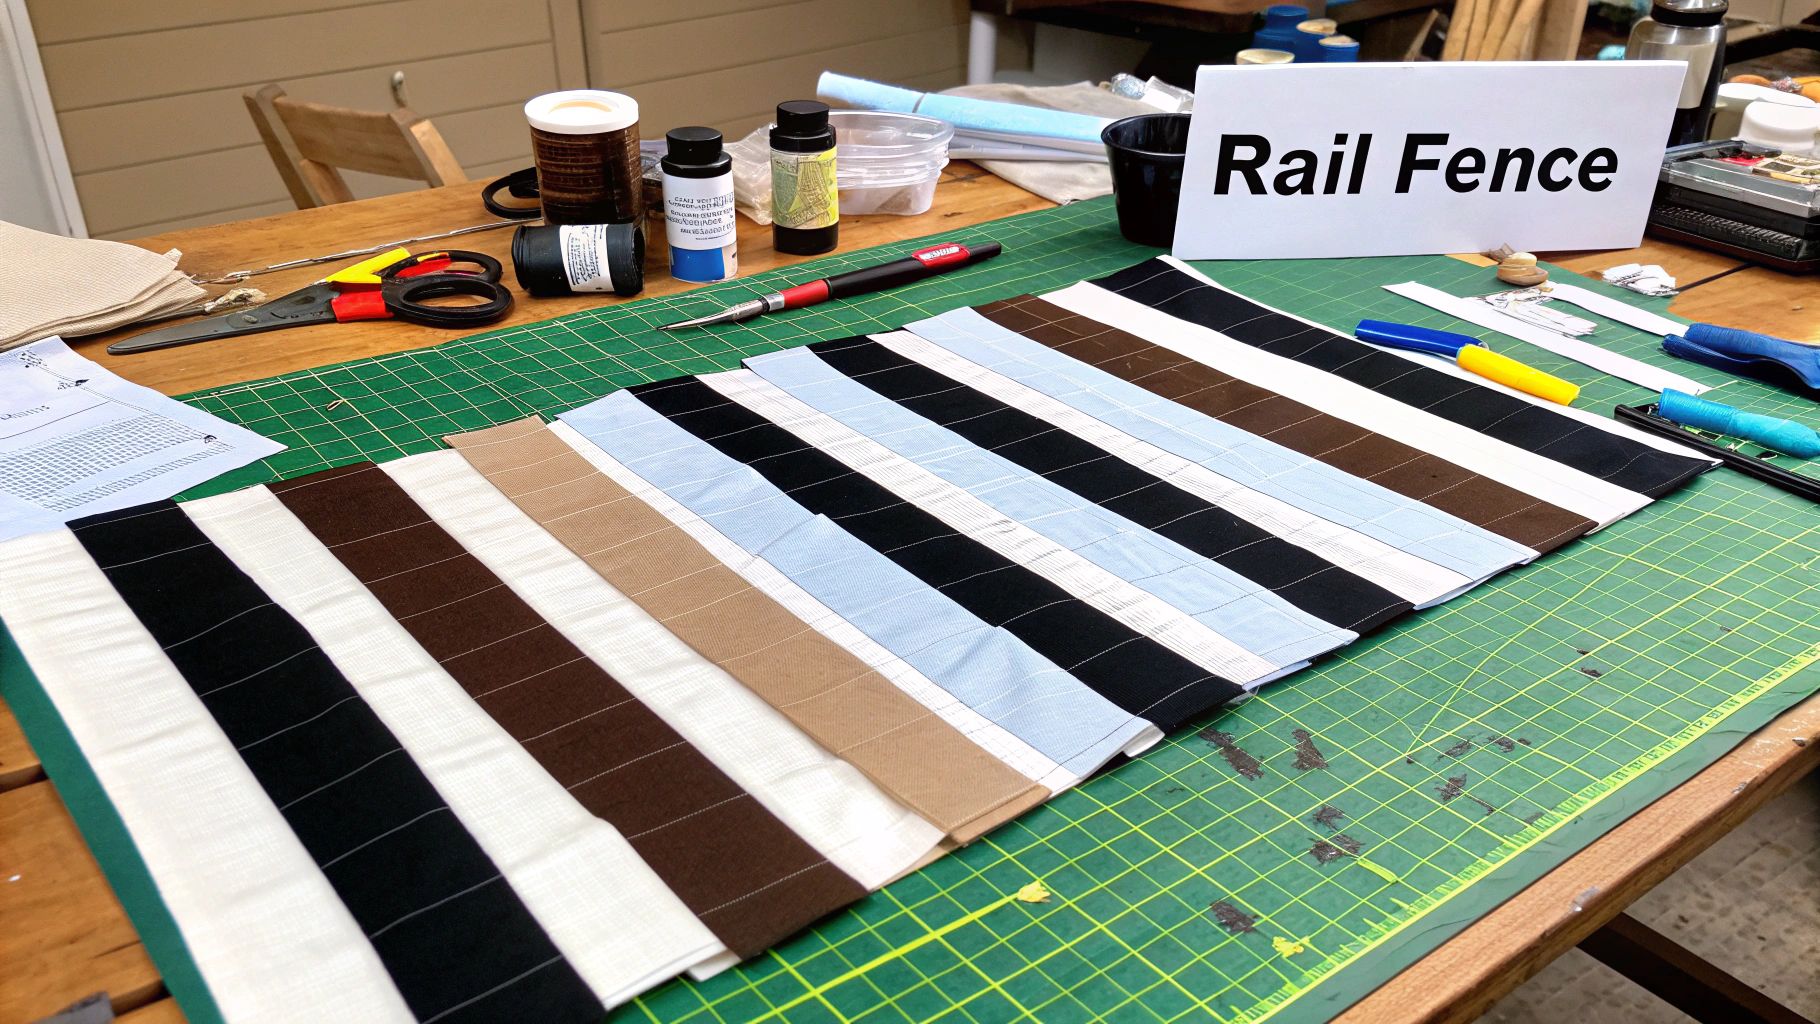
The pattern is incredibly versatile, allowing for both traditional and modern aesthetics. For instance, a classic Amish Rail Fence might use three solid-colored fabrics, while a contemporary version could feature a vibrant jelly roll of batik prints to create a stunning, dynamic effect. It’s also an excellent choice for baby quilts, where you can combine soft pastels for a gentle, charming look.
How to Achieve a Perfect Rail Fence
To get the most out of this pattern, focus on precision and contrast. The visual impact comes from the clever placement of light and dark fabrics.
- Fabric Choice: Select fabrics with strong value contrast (light vs. dark). This is what creates the "fence" illusion. A mix of prints and solids can also add depth and interest.
- Consistent Seams: Use a consistent 1/4" seam allowance for all your strips. This is crucial for ensuring your blocks are all the same size and fit together perfectly.
- Pressing Matters: Press your seams toward the darker fabric. This simple technique prevents the darker color from showing through the lighter fabric, resulting in a cleaner, more professional finish.
- Plan Your Layout: Before sewing your blocks together, arrange them on a design wall or the floor. This allows you to visualize the final pattern and make any adjustments to create a balanced and appealing design.
2. Nine Patch Pattern
The Nine Patch is a cornerstone of quilting and one of the most recognizable quilting patterns for beginners. This fundamental block consists of nine equal squares arranged in a simple 3x3 grid. Its construction teaches the basics of piecing, seam matching, and color value, making it an ideal first project. The beauty of the Nine Patch lies in its ability to create complex-looking secondary designs when multiple blocks are joined together.
This pattern is a true chameleon, fitting into any aesthetic. A traditional Amish Nine Patch might feature deep, solid jewel tones against a black background, creating a stark and beautiful contrast. A modern quilter could use a mix of low-volume prints for the light squares and bold, graphic fabrics for the dark squares, resulting in a fresh and airy design. It's also the foundation for more intricate blocks like the Double Nine Patch or the Irish Chain.
How to Achieve a Perfect Nine Patch
Success with the Nine Patch comes down to accurate cutting and consistent sewing, which creates crisp, matching points where the corners meet.
- Fabric Choice: Use fabrics with a clear distinction between light and dark. This contrast is what makes the checkerboard pattern pop and defines the block's structure.
- Strip Piecing: To save time and improve accuracy, use strip piecing. Sew long strips of your light and dark fabrics together first, then sub-cut them into the three-square segments needed for your rows.
- Pressing for Success: Press the seams of your rows in alternating directions. For example, press seams in the top and bottom rows outward, and the middle row inward. This allows the seams to "nest" together when you join the rows, creating perfectly aligned corners.
- Square It Up: After sewing the block, use a square ruler to trim it to the correct unfinished size. This step is critical for ensuring all your blocks are identical and will fit together flawlessly in the final quilt top.
3. Log Cabin Pattern
The Log Cabin pattern is a deeply traditional and symbolic quilt block, making it one of the most rewarding quilting patterns for beginners. The design is built around a central square, historically red to represent the hearth of the home, with fabric strips or "logs" sewn around it. The block is typically divided diagonally into a light half and a dark half, symbolizing the light and shadow sides of a log cabin. This construction method teaches precise strip piecing and creates stunning secondary patterns when the blocks are combined.
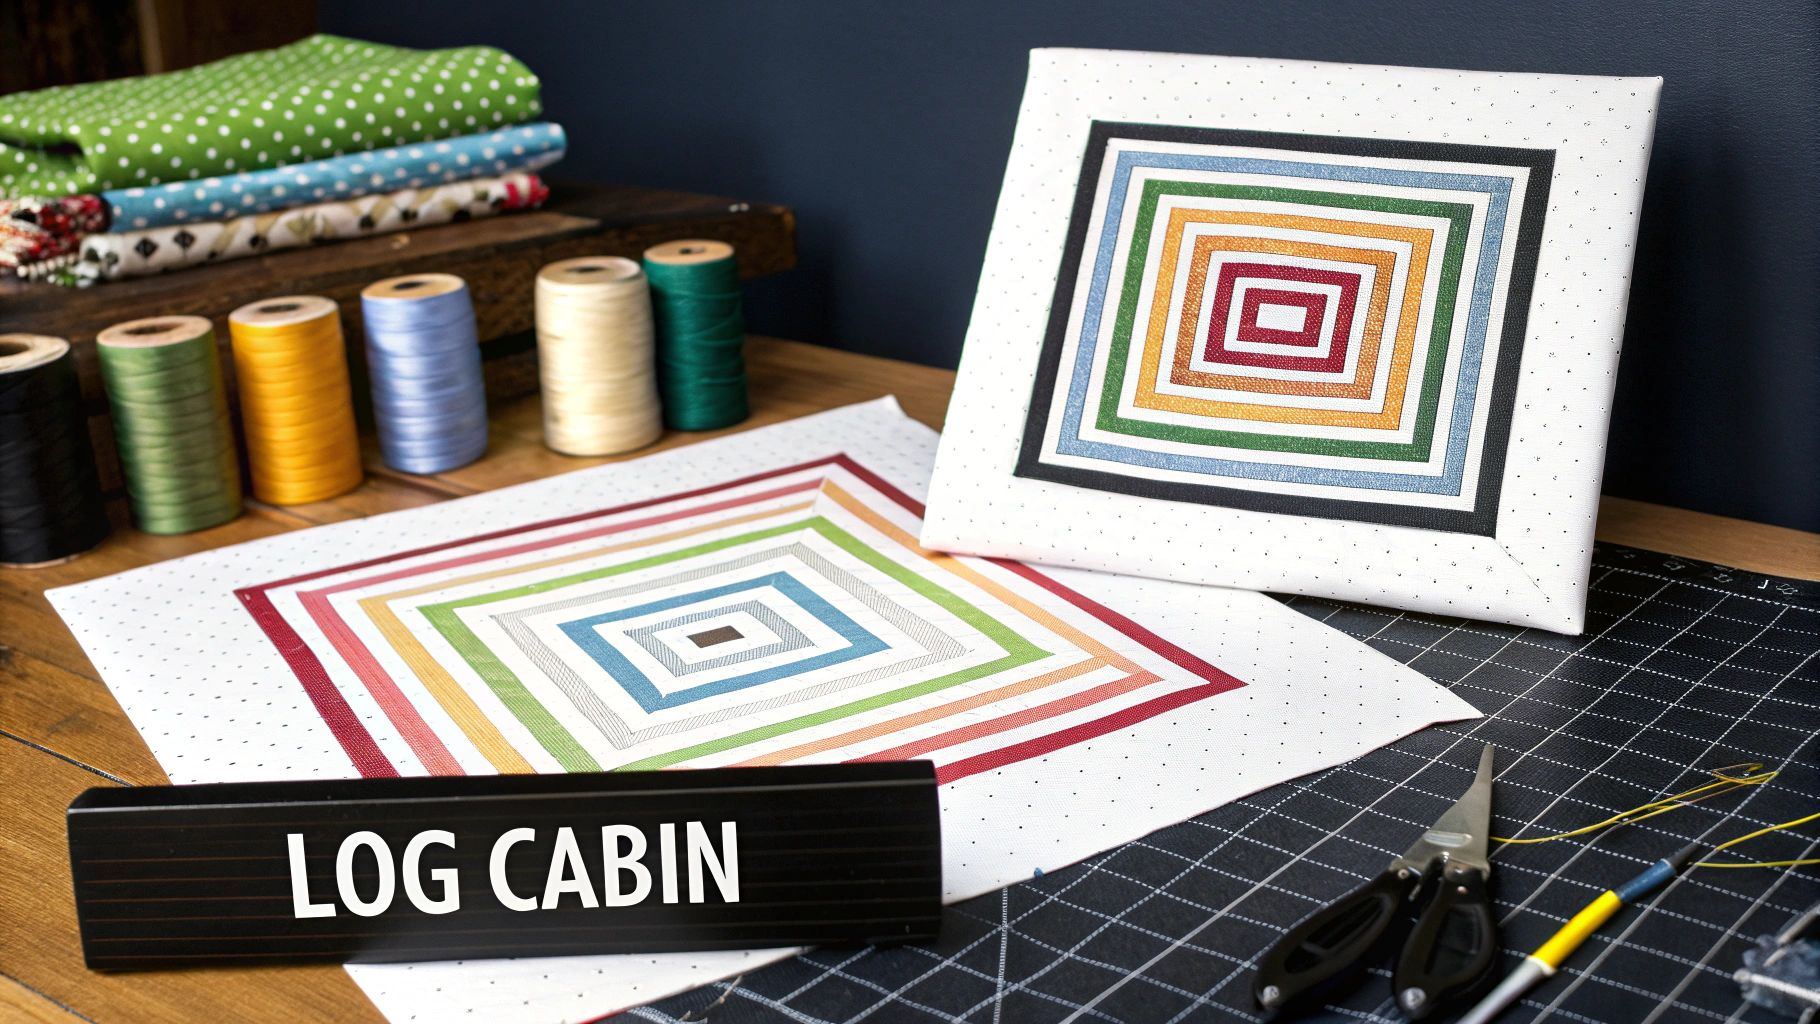
The versatility of the Log Cabin is legendary. Arranging the blocks in different orientations can produce a variety of impressive designs, like the classic "Barn Raising" layout which creates a diamond effect, or the "Courthouse Steps" variation which builds logs symmetrically on opposite sides. Modern interpretations play with negative space and bold color palettes, proving the pattern's timeless appeal for creating everything from wall hangings to cozy bed quilts.
How to Achieve a Perfect Log Cabin
Success with the Log Cabin pattern comes down to accurate cutting and consistent seam allowances, which brings the geometric magic to life.
- Fabric Choice: The classic light/dark split is key to the pattern's visual impact. Using a jelly roll can be a great shortcut, as the strips are already pre-cut. The center square is a great place for a "fussy cut" to feature a specific motif from a print.
- Start with Wider Strips: For your first Log Cabin, use wider "logs," such as 1.5" to 2" finished strips. This makes them easier to handle, sew, and press accurately, building your confidence.
- Press As You Go: Press each seam open or toward the newly added log before sewing the next one. This ensures your block stays flat and your measurements remain accurate throughout the construction process.
- Plan Your Layout: The real fun begins when arranging your finished blocks. Lay them out on a design wall or the floor to experiment with different settings like "Straight Furrows," "Sunshine and Shadow," or "Barn Raising" before sewing them into a quilt top.
4. Flying Geese Pattern
The Flying Geese pattern is a classic and versatile unit that introduces beginners to the world of sewing triangles. This fundamental block consists of a large triangle (the goose) flanked by two smaller triangles (the sky), creating a rectangular unit with a distinct directional point. It’s an excellent way to practice precision piecing, and its dynamic, arrow-like shape can be used to create incredible movement and flow across a quilt top.
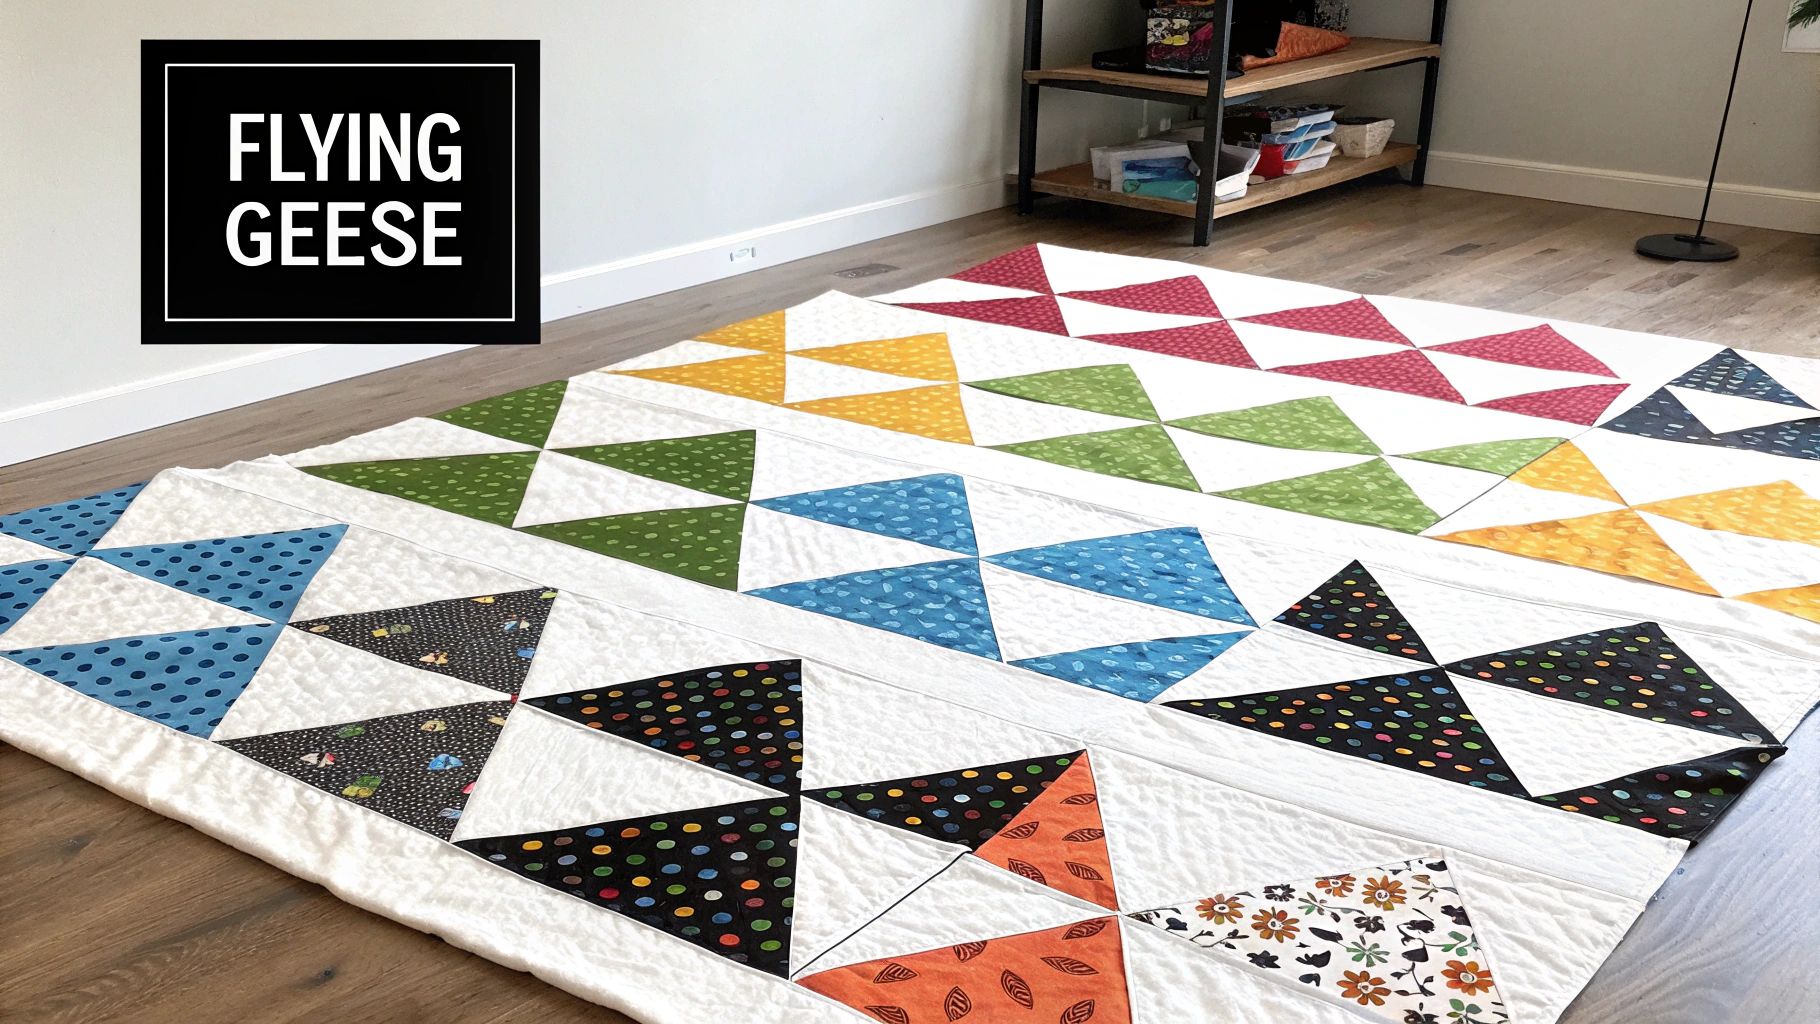
This pattern is a building block for countless designs, making it one of the most useful quilting patterns for beginners to learn. You can arrange Flying Geese in rows to create striking chevron or zigzag borders, group them into larger blocks for a star-like effect, or scatter them across a modern quilt for a sense of motion. They are perfect for framing a central medallion or creating stunning rainbow gradations that guide the eye.
How to Achieve Perfect Flying Geese
Making perfect Flying Geese units is all about accuracy and handling fabric with care. The key is to maintain the sharp point of the large triangle without sewing over it.
- Fabric Choice: High contrast is your friend. Choose a bold fabric for the "goose" and a contrasting one for the "sky" to make the pattern pop and emphasize its directional quality.
- Use the 'No-Waste' Method: To create four identical units at once with minimal fabric waste, try the "four-at-a-time" method. This technique is efficient and helps ensure your units are perfectly matched in size.
- Handle Bias Edges Carefully: When you cut triangles, you create bias edges that can stretch easily. Avoid pulling or stretching the fabric as you sew to prevent distortion and keep your blocks square.
- Trim and Press: After sewing, trim the "dog ears" (the small fabric triangles that stick out at the seams) to reduce bulk. Press seams open or to the side, depending on your preference, to ensure the units lie flat.
5. Simple Squares Pattern
The Simple Squares pattern is the quintessential starting point for any beginner quilter, built entirely from fabric squares sewn together in a grid. Its fundamental nature makes it one of the most effective quilting patterns for beginners to learn the core skills of the craft, such as precise cutting, maintaining a consistent seam allowance, and nesting seams. This pattern provides a solid foundation before moving on to more complex designs.
Despite its simplicity, the Simple Squares pattern is remarkably versatile and can be adapted to many styles. A traditional "Trip Around the World" quilt uses concentric squares of color to create a stunning visual effect, while a modern quilt might use a charm pack of coordinated designer fabrics for a quick and stylish throw. It’s also the perfect format for creating an "I-Spy" quilt for a child, where each square features a unique, recognizable object or character.
How to Achieve a Perfect Simple Squares Quilt
The key to a beautiful Simple Squares quilt is precision in the basics. Paying close attention to cutting and sewing will ensure your grid comes together flawlessly.
- Fabric Choice: Use pre-cut charm packs (5" squares) or layer cakes (10" squares) to save time and guarantee uniformity. Alternatively, select a variety of prints and colors to create a scrappy, eclectic look.
- Accurate Cutting: If cutting your own squares, use a rotary cutter, mat, and ruler. Accuracy at this stage is non-negotiable and prevents issues with block alignment later on.
- Consistent Seams: A perfect 1/4" seam allowance is crucial. Use a 1/4" quilting foot on your sewing machine to maintain consistency across every single seam.
- Pressing for Success: Press the seams of each row in alternating directions (e.g., row 1 to the right, row 2 to the left). This allows the seams to "nest" or lock together when you sew the rows, resulting in perfectly matched corners.
6. Half Square Triangle (HST) Pattern
The Half Square Triangle, or HST, is arguably the most versatile and fundamental building block in quilting. It consists of a single square made from two equal right-angled triangles sewn together along their longest side. Although simple in concept, HSTs are the foundation for hundreds of classic and modern designs, making them one of the most essential quilting patterns for beginners to learn. Mastering the HST opens up a world of creative possibilities, from simple Pinwheels to intricate star blocks.
The true power of the HST lies in its arrangement. Four simple HSTs can form a classic Pinwheel block. Combine them with plain squares to create an Ohio Star or a Churn Dash. Arranging them in rows can produce elegant chevron or zigzag patterns. Modern quilters often use HSTs to create stunning ombre or rainbow-hued quilts, demonstrating the block's incredible adaptability across different styles.
How to Achieve a Perfect Half Square Triangle
Precision is key to making sharp, accurate HSTs that fit together flawlessly. These units have bias edges that can stretch, so careful handling is important.
- Fabric Choice: High contrast is your friend. Pairing a dark or vibrant print with a light solid or low-volume print makes the resulting pattern pop.
- Efficient Methods: Learn an efficient construction method like the "two-at-a-time" or "four-at-a-time" technique. These popular methods, often taught by experts like Jenny Doan, save time and help ensure your triangle pairs are perfectly matched.
- Trim for Accuracy: Always trim your HST blocks down to the correct size after pressing. Squaring them up with a specialty ruler is the single most important step for ensuring your final quilt top lays flat.
- Handle with Care: The long edge of the triangle is a bias edge, which means it can easily stretch out of shape. Handle your HST units gently and avoid pulling or tugging on them as you sew and press.
7. Strip Quilt Pattern
The Strip Quilt pattern offers a modern, minimalist approach that is exceptionally beginner-friendly. Instead of constructing individual blocks, this method involves sewing long fabric strips of varying widths together to create the entire quilt top. This streamlined process eliminates complex block piecing, allowing beginners to focus on the fundamentals of straight seams and fabric handling while producing a quilt with clean lines and contemporary flair.
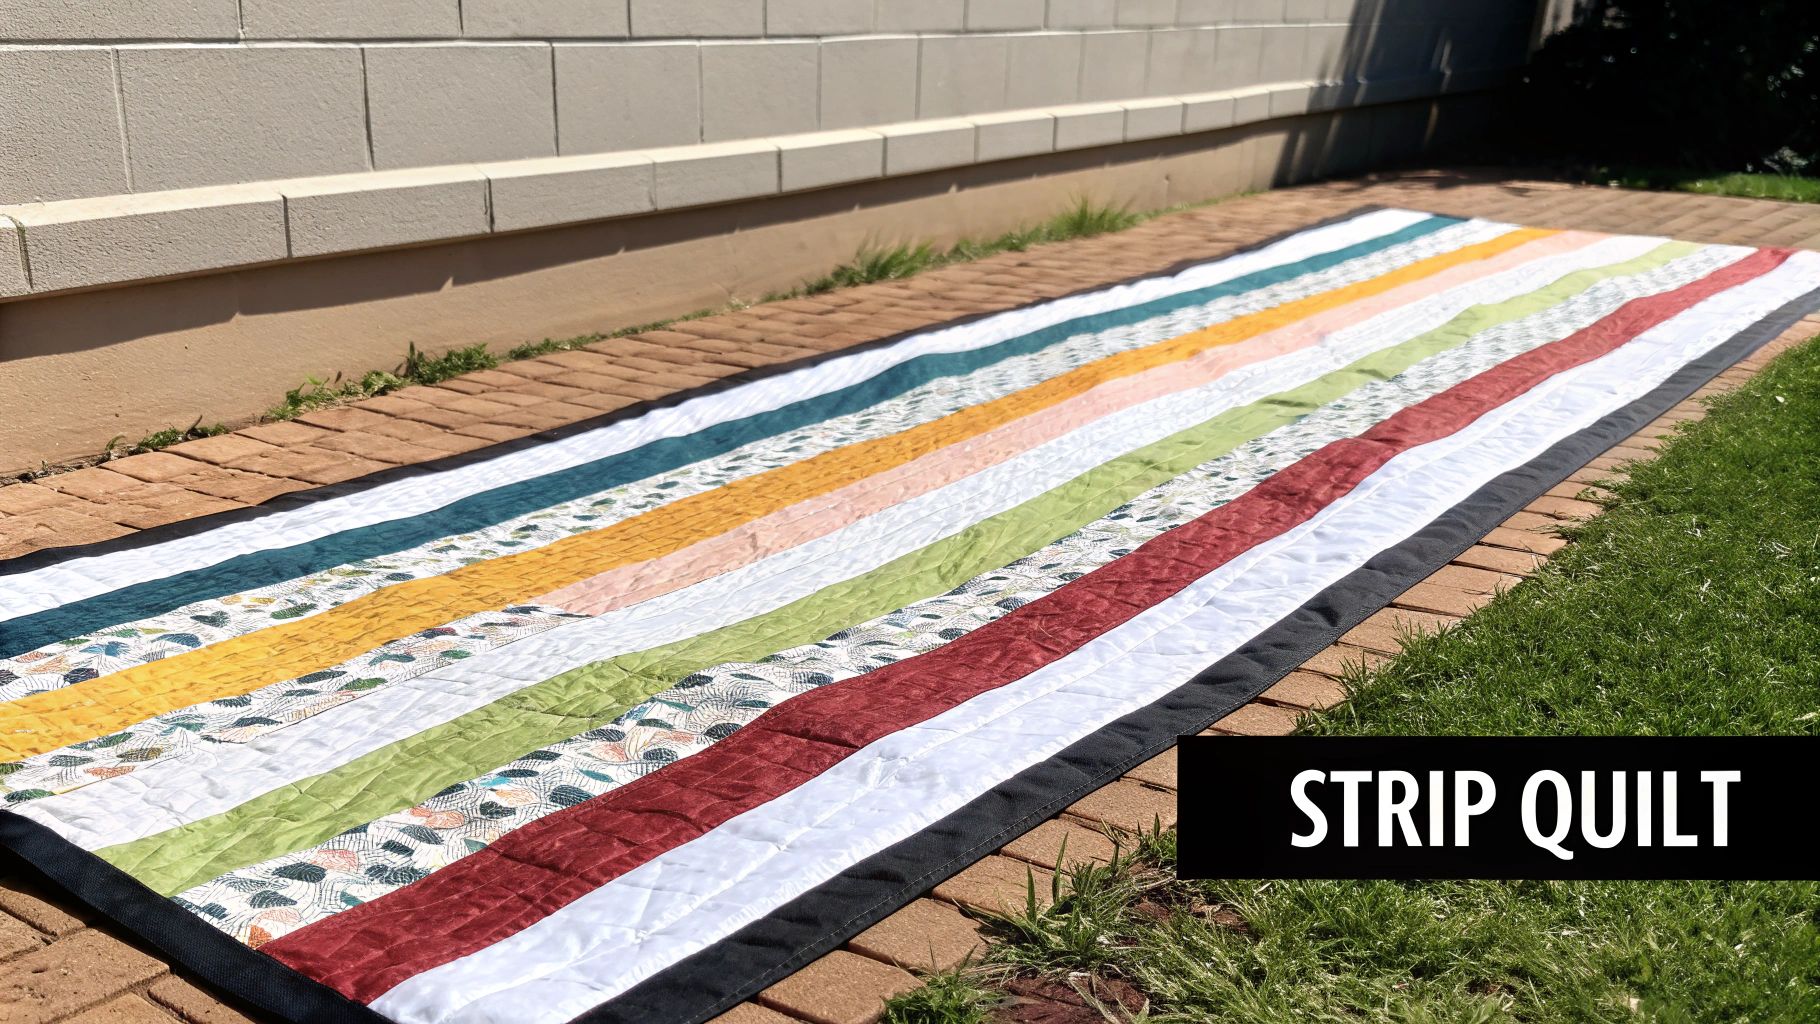
This pattern is a perfect way to use precut jelly rolls, which are bundles of coordinated 2.5-inch strips. The popular "jelly roll race" quilt is a classic example, where strips are sewn end-to-end and then pieced into a quilt top in a matter of hours. The simplicity of the Strip Quilt makes it ideal for projects like modern baby quilts using soft, coordinated colors or bold, contemporary wall hangings that make a strong visual statement.
How to Achieve a Perfect Strip Quilt
Success with this pattern comes from thoughtful fabric selection and consistent technique. The arrangement of colors and widths is what gives the final quilt its character.
- Vary Strip Widths: Cutting your strips in different widths adds significant visual interest and movement to the quilt. A mix of wide and narrow strips creates a dynamic, custom look.
- Create a Color Gradient: For a sophisticated and artistic effect, arrange your fabric strips to create a gradual color transition, or an ombre effect. This can move from light to dark or transition through a rainbow of hues.
- Press Seams Consistently: Press all your seam allowances in the same direction. This simple step makes the final quilting process much smoother, as the needle won't have to navigate bulky, opposing seams.
- Mix Prints and Solids: Combine solid-colored fabrics with prints to add depth and texture. The solids provide a place for the eye to rest, making the printed fabrics stand out even more.
8. Four Patch Pattern
The Four Patch is a foundational block in quilting and a perfect project for those just starting their journey. As its name suggests, this simple block is made from four equal squares of fabric sewn together in a two-by-two grid. Typically, it uses two contrasting fabrics arranged in a checkerboard style, making it an excellent exercise in mastering accurate cutting, piecing, and pressing. Its simplicity makes the Four Patch one of the most essential quilting patterns for beginners to learn.
This fundamental unit is the building block for countless classic and modern designs. You'll find Four Patch blocks at the heart of traditional Irish Chain quilts, creating a beautiful secondary lattice pattern. Modern quilters often use this block with bold, unexpected color combinations or by varying the scale for a dramatic effect. It’s also a common component in sampler quilts, where beginners can practice their skills alongside other basic blocks.
How to Achieve a Perfect Four Patch
Success with the Four Patch block hinges on precision and efficiency. Mastering this simple unit will build skills you'll use in every future quilting project.
- Fabric Choice: Select two fabrics with a clear contrast in value (light vs. dark) or color. This contrast is what makes the checkerboard pattern pop and gives your quilt a dynamic look.
- Strip Piece for Speed: To make multiple blocks quickly and accurately, try strip piecing. Sew two long strips of your contrasting fabrics together, press the seam, and then cut the resulting strip set into smaller segments.
- Nesting Seams: When you sew your two-square units together, press the seams in opposite directions. This allows the seams to "nest" or lock into place at the center, ensuring a perfectly flat block with a sharp, crisp intersection point.
- Chain Piecing: Boost your efficiency by chain piecing. This involves sewing your pairs of squares one after another without cutting the thread in between, creating a long chain of units that you can snip apart later.
Beginner Quilting Patterns Comparison Chart
| Pattern | Implementation Complexity 🔄 | Resource Requirements ⚡ | Expected Outcomes 📊 | Ideal Use Cases 💡 | Key Advantages ⭐ |
|---|---|---|---|---|---|
| Rail Fence Pattern | Low - simple straight seams, strip piecing | Low - 2-3 fabric colors | Striking visual fence rail effect | Beginner projects, scrap usage | Beginner-friendly, fast assembly, forgiving |
| Nine Patch Pattern | Low to Moderate - precise cutting needed | Moderate - accurate 3x3 squares | Classic, versatile 3x3 grid blocks | Learning accurate piecing, versatile quilts | Foundation for complex patterns, quick to learn |
| Log Cabin Pattern | Moderate - many seams, foundation piecing | Moderate to High - multiple strips | Dramatic light/dark spiral geometric designs | Intermediate, scrap utilization, traditional quilts | Hides errors, rich historical meaning |
| Flying Geese Pattern | Moderate - triangle piecing, bias handling | Moderate - precise triangle cuts | Dynamic directional movement in quilts | Borders, sashing, dynamic quilts | Teaches triangle skills, versatile construction |
| Simple Squares Pattern | Very Low - basic square grid | Low - simple squares | Basic grid with emphasis on fabric prints | Absolute beginners, showcasing special fabrics | Quick, minimal waste, fundamental skills |
| Half Square Triangle (HST) Pattern | Moderate - triangle units, bias edges | Moderate - requires precision cuts | Versatile geometric units for complex designs | Triangle construction, varied quilt styles | Foundation for many patterns, multiple methods |
| Strip Quilt Pattern | Low - strip piecing, minimal complexity | Low - fabric strips, minimal cutting | Clean lines, modern minimalist look | Modern quilts, quick projects | Very beginner-friendly, fast, contemporary look |
| Four Patch Pattern | Very Low - simple 2x2 grid | Low - two fabric colors | Basic checkerboard blocks | Beginners, foundation for complex designs | Extremely simple, quick piecing, builds confidence |
From First Stitch to Final Quilt: Your Journey Continues
You've just explored eight foundational quilting patterns for beginners, each a gateway to a rewarding and creative hobby. From the straightforward geometry of the Simple Squares and Rail Fence to the classic appeal of the Nine Patch and Log Cabin, you now have a diverse toolkit of designs to launch your quilting journey. Each pattern we've covered offers more than just a project; it provides a hands-on lesson in essential quilting techniques.
Think of these patterns as your personal quilting curriculum. The Four Patch and Nine Patch introduce you to the core skill of nesting seams for perfect points. The Strip Quilt hones your ability to cut long, straight lines and sew consistent quarter-inch seams. Meanwhile, the Half Square Triangle and Flying Geese patterns build your confidence in handling bias edges and trimming blocks to precise dimensions. Mastering these skills on simpler projects ensures you are well-prepared for more intricate designs down the road.
Key Takeaways for Your First Quilt
The most crucial step is the one you take right now: choosing a pattern and starting. Don't let the pursuit of perfection paralyze you. Your first quilt is for learning, and every stitch, even the imperfect ones, contributes to your growth.
- Embrace the Process: Quilting is a journey of small, deliberate actions that culminate in a beautiful whole. Enjoy the sound of your sewing machine, the feel of the fabric, and the satisfaction of seeing your blocks come together.
- Skill-Building is Cumulative: The precision required for a Simple Squares quilt directly translates to the accuracy needed for a Log Cabin. Each project builds upon the last, steadily growing your skills and confidence.
- Fabric Choice is Your Voice: This is where you infuse your personality into the project. Whether you use a curated fat quarter bundle or scrappy remnants from other projects, your fabric selection makes the quilt uniquely yours.
Your Actionable Next Steps
Feeling inspired? Here's how to move from reading to doing:
- Select Your Pattern: Re-read the descriptions and pick the one that truly excites you. Is it the dynamic movement of Flying Geese or the classic charm of a Nine Patch? Let your enthusiasm guide your choice.
- Gather Your Supplies: Create a specific list of what you need, from fabric yardage and thread to the correct ruler and rotary cutter. A well-prepared workspace makes the entire process smoother and more enjoyable.
- Start Small: Consider making a mini quilt, a pillow cover, or a table runner as your first project. A smaller-scale creation allows you to practice all the steps from cutting to binding without the commitment of a large quilt.
- Join a Community: Share your progress online or with local quilting friends. The quilting community is incredibly supportive, offering encouragement and advice to newcomers.
Ultimately, these quilting patterns for beginners are more than just instructions; they are invitations to create warmth, beauty, and lasting heirlooms. Each quilt you finish will be a tangible record of your time, your skill, and your creativity. Now, pick your pattern, press your fabric, and begin the deeply satisfying process of making your first quilt.
Ready to gather your supplies and bring these patterns to life? For a curated selection of high-quality fabrics, essential quilting tools, and inspiring notions perfect for any beginner project, visit Famcut.com. We have everything you need to support your creative journey from the very first stitch. Find your perfect materials at Famcut.com today