


Quilt Pattern Courthouse Steps: Master This Timeless Block with Easy Steps
The quilt pattern courthouse steps is a stunning and wonderfully symmetrical twist on the classic Log Cabin block. Instead of adding fabric strips in a clockwise or counter-clockwise spiral, you build this block outwards from a central square. You do this by adding pairs of strips to opposite sides at a time, creating a beautifully balanced and eye-catching design. It's an incredibly satisfying method, and honestly, it’s one of my go-to recommendations for quilters at any skill level.
Getting to Know the Courthouse Steps Quilt Pattern
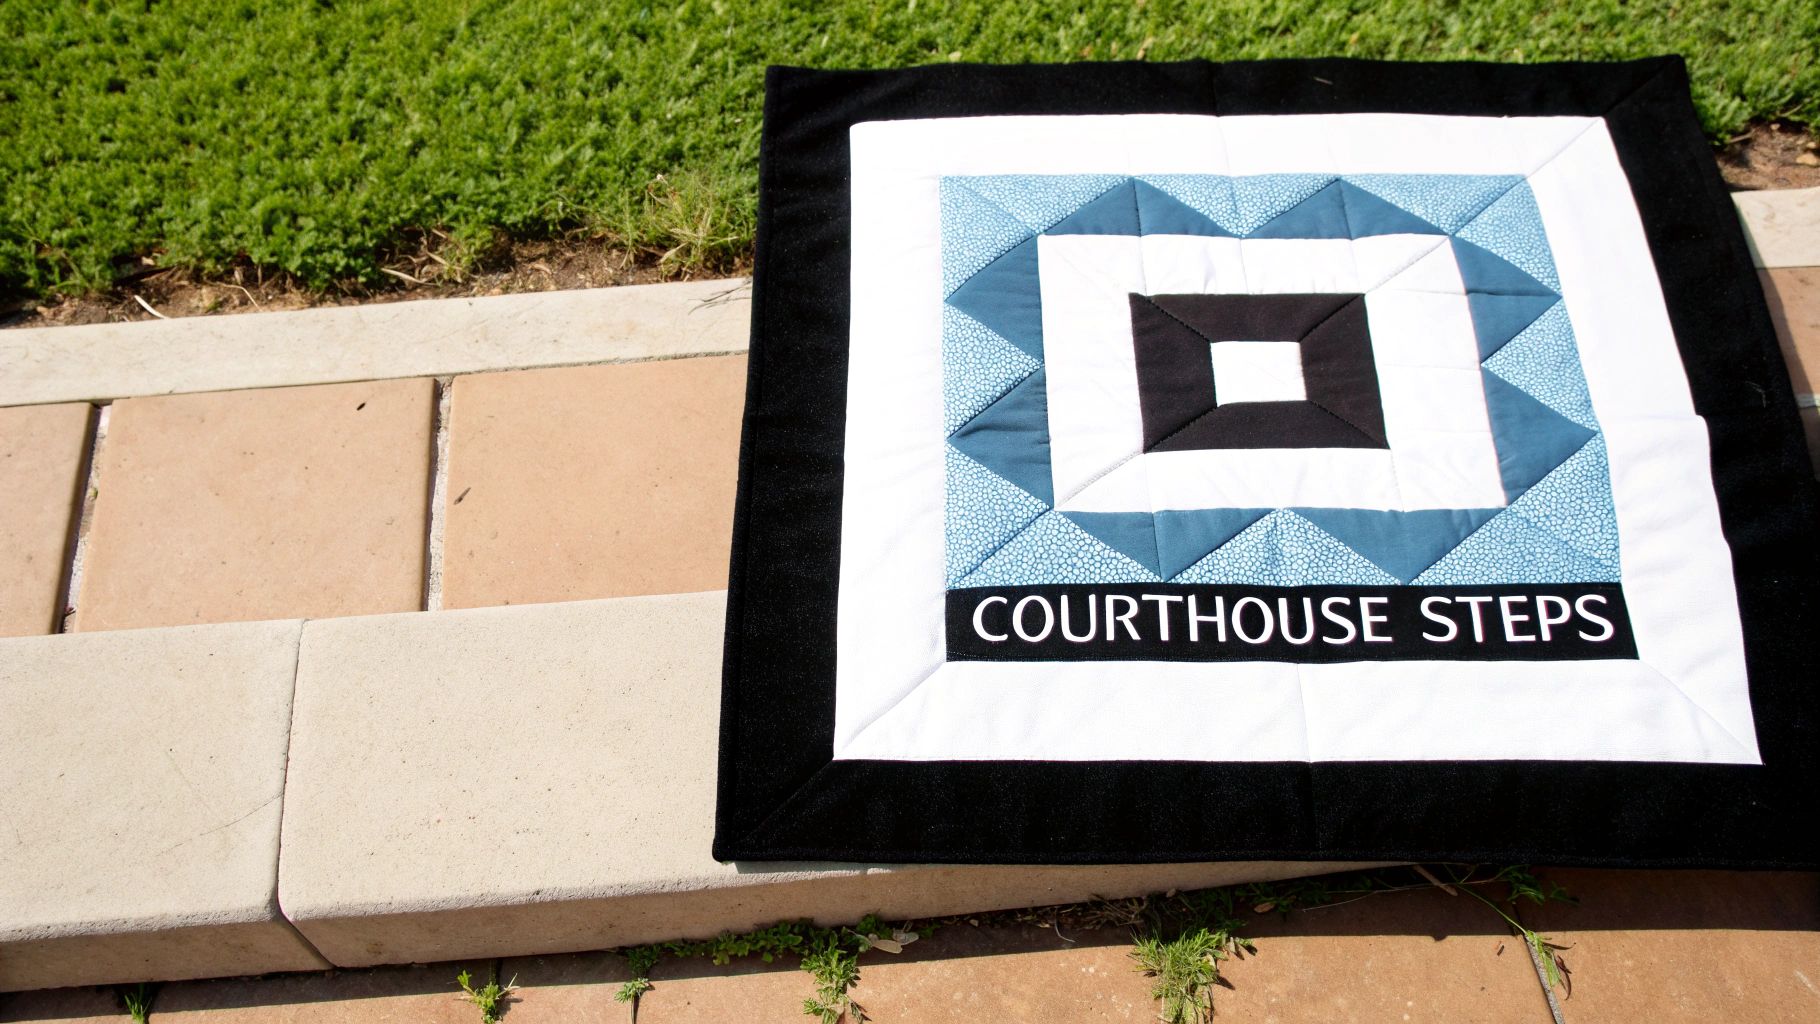
Welcome to the world of Courthouse Steps! It’s one of those timeless quilt blocks that manages to be both simple to construct and visually spectacular. The name itself paints a perfect picture: a central building (the courthouse) with steps rising on all four sides. This imagery is a great way to remember how the block is built and why it has such an enduring appeal.
Think of this guide as your complete roadmap. We'll walk through everything together, from picking out the perfect contrasting fabrics at Famcut to putting in that very last stitch.
A Quick Look at Its History
When we dive into the history of classic quilt patterns, it’s always fascinating to consider the historical significance that gives them such a rich legacy. The Courthouse Steps pattern really gained traction in the mid-19th century, particularly during the American Civil War era from 1861 to 1865. As a spin-off of the beloved Log Cabin block, it came to symbolize the ideas of home, stability, and community for the women who stitched them.
Did You Know? Many of the earliest Courthouse Steps quilts were foundation-pieced on a scrap fabric base and often didn't have a separate batting layer. This was a common way to build quilts back then, especially after the invention of the sewing machine just a few years earlier in 1846, which made piecing much faster.
Why Every Quilter Should Try This Pattern
Year after year, this pattern remains a quilter's favorite. It’s a fantastic choice for your next project for a few really good reasons.
- It’s a great confidence builder. The construction is all straight seams and a simple, repetitive process. Perfect for beginners, but also wonderfully meditative for more experienced quilters.
- The visual payoff is huge. That symmetrical design creates a really powerful graphic effect. The real magic happens when you start arranging your finished blocks—you can create incredible secondary patterns like zigzags, diamonds, and all sorts of optical illusions.
- It's a scrap-buster's dream. This pattern is absolutely ideal for using up those leftover fabric strips you've been saving. You can create a completely unique and vibrant quilt from a pile of scraps you already have on hand.
Choosing Your Tools and Preparing Your Fabric
A gorgeous quilt is born long before you ever sit down at your sewing machine. Honestly, the success of your quilt pattern courthouse steps project has just as much to do with the prep work as it does with your stitching. Getting this part right sets the stage for a smooth, fun, and frustration-free experience.
Think of this as gathering your ingredients before you start cooking. It just makes everything flow better.
Your Essential Quilting Toolkit
Before we dive into the glorious world of fabric, let's make sure your workspace is ready. You don't need a fancy setup, but a few key tools are absolute game-changers for getting those clean, precise cuts that make a quilt sing.
You'll definitely want a sharp rotary cutter, a good self-healing cutting mat that gives you plenty of room to work, and a clear acrylic ruler. If you only get one ruler, make it a 6" x 24"—it's the workhorse of my quilting studio. Also, don't skimp on thread! A quality, 50-weight cotton thread from a great supplier like Famcut makes a huge difference, creating strong seams without adding extra bulk.
And of course, make sure your sewing machine is happy and humming with a fresh needle. I also can't overstate the importance of a good steam iron and a pressing mat. They are your secret weapons for getting those seams to lie perfectly flat.
The Art of Selecting Fabric
Here's the fun part! The Courthouse Steps block is a fantastic playground for color and contrast. The whole design is built on the dynamic relationship between light and dark fabrics, which creates that classic "step" illusion. When you're pulling fabrics from your stash or shopping for new ones, try to think in terms of value—the relative lightness or darkness of a color.
- High Contrast: This is the classic look. Pairing very light fabrics with very dark ones makes the steps jump right off the quilt. It's bold, graphic, and always a showstopper.
- Monochromatic: You can also create an incredibly sophisticated quilt by using different shades of a single color. Picture a block made with everything from a pale, icy blue to a deep, stormy navy.
- Scrappy Style: This pattern is a quilter's dream for busting that scrap bin! A scrappy Courthouse Steps quilt is bursting with personality. The only trick is to sort your scraps into two piles—lights and darks—to maintain that all-important structure within each block.
Here’s a little trick I swear by: arrange your fabric pulls on a table and take a quick black-and-white photo with your phone. It instantly strips away the color and shows you the true value. You'll see right away if your lights and darks have enough contrast to work.
Prepping Fabric for Perfect Piecing
Ah, the great pre-washing debate. While some quilters skip this step, I'm a firm believer in pre-washing. It gets rid of any sizing or chemicals from the factory, takes care of any potential shrinkage before you sew, and prevents heartbreaking color bleeds later on.
Once your fabric is washed and dried, give it a really good press. You want it to be perfectly smooth and flat. This isn't just about making it look nice; it's critical for accurate cutting. A tiny wrinkle can throw off the measurement of a strip, which can lead to a block that just won't square up.
Trust me, spending a little extra time on prep is an investment that will pay off beautifully in your finished quilt.
Assembling Your First Courthouse Steps Block
This is the moment all that prep work pays off. With your center squares and fabric strips cut and ready, we can finally bring the first block to life. The whole process is wonderfully rhythmic and straightforward, really just a matter of sewing pairs of strips to opposite sides of a growing center.
You don't need any complicated techniques here. The beauty of the Courthouse Steps pattern is its simplicity—you just build outward symmetrically. You’ll start with that center square, add your first pair of strips, give it a good press, and then add the next pair. It’s so repetitive that it’s a perfect candidate for chain piecing if you’re making several blocks at once.
The Construction Sequence
Let’s get started. Lay your center square right side up on your work surface.
Grab one of your first light-colored strips and place it right sides together along the top edge of the center square. Stitch this seam using a consistent 1/4-inch seam allowance.
Now, take a second light-colored strip and do the same along the bottom edge of the square, again keeping that crucial 1/4-inch seam. That’s it! You've just added your first pair of "steps."
My Pro Tip: If you're sewing multiple blocks, feed each center square and its top strip through your machine one after another without cutting the thread between them. Once you’re done, clip the threads and repeat for all the bottom strips. This assembly-line method is called chain piecing, and it saves a surprising amount of time and thread.
Pressing and Adding the Next Pair
Time to head to the ironing board. Don't skip this—pressing is what makes or breaks accuracy in quilting. I always recommend pressing the seams toward the darker fabric, which in this case are the strips you just added. This helps reduce bulk and prevents the darker fabric from shadowing through the lighter one.
Once your first two strips are attached and pressed, rotate the block 90 degrees. It's time to add the first pair of dark-colored strips to the remaining raw edges.
Place one dark strip right sides together along one of the sides, making sure it covers the raw edges of your center square and the first two strips. Sew it down. Repeat for the opposite side. Just like that, you've completed the first full round of your Courthouse Steps block.
This whole assembly process flows directly from the careful prep you did earlier.
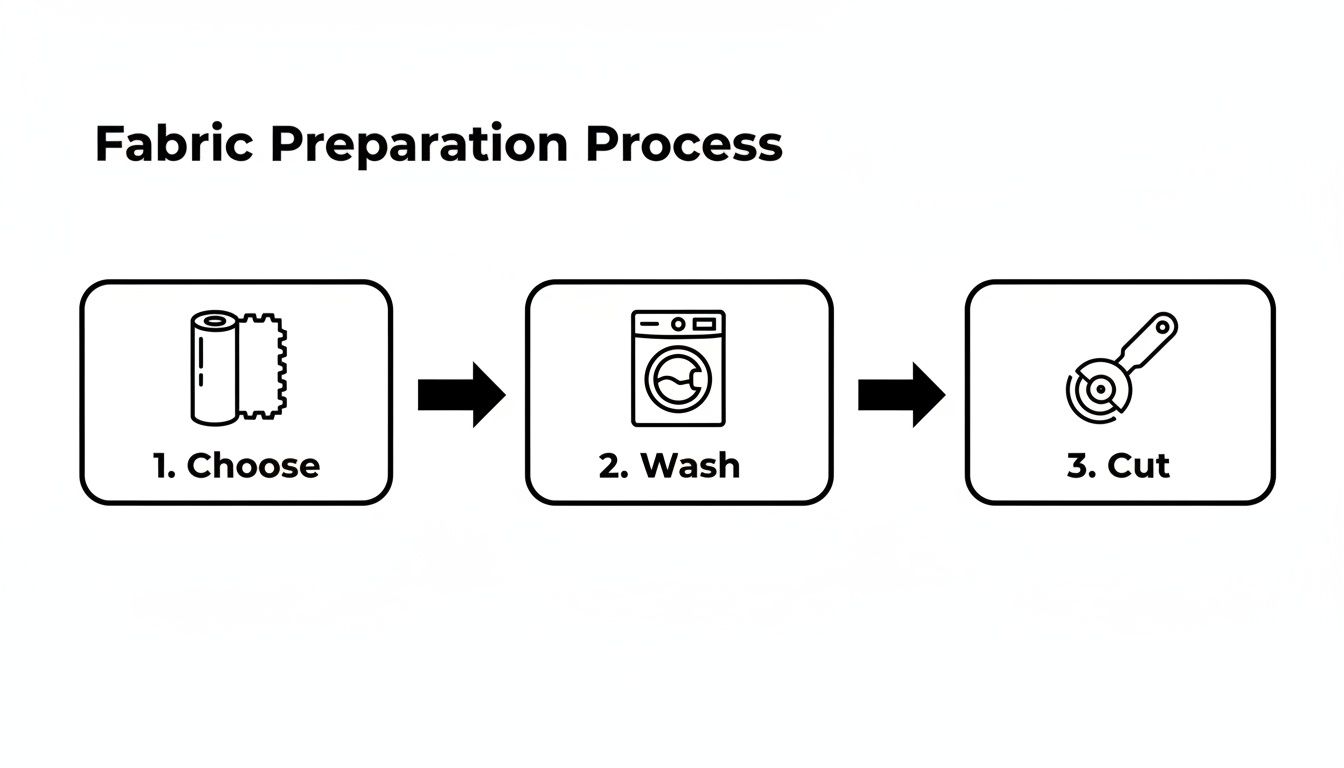
A simple Choose, Wash, and Cut workflow is what sets you up for success, ensuring your fabric is stable and your cuts are accurate before you even sit down at the machine.
Squaring Up for a Perfect Finish
Before you get carried away adding more rounds, you have to "square up" your block. Trust me, this step is non-negotiable if you want a quilt that lies flat and looks professional.
- Why bother? Even with the most careful sewing, fabric can stretch a bit. Squaring up trims the block back to a perfect square, guaranteeing all your blocks will fit together flawlessly later on.
- How to do it: Grab a square quilting ruler. Line up the ruler's markings with the seams of your center square and carefully trim any excess fabric from the edges with a rotary cutter.
After squaring up, you just keep going. Add the next pair of light strips to the top and bottom, press, then add the next pair of dark strips to the sides, pressing after each addition. The key is to remember to square up after completing each full round.
It’s a design that really echoes its 1800s roots, where courthouses stood as community hubs and inspired these symmetrical, sturdy patterns. Courthouse Steps consistently ranks among the top 10 easiest patchwork blocks, with an estimated 80% of Log Cabin tutorials mentioning it as a beginner-friendly alternative. If you're curious, you can discover more about the history and construction of this classic block.
Designing Your Quilt Layout and Piecing the Top
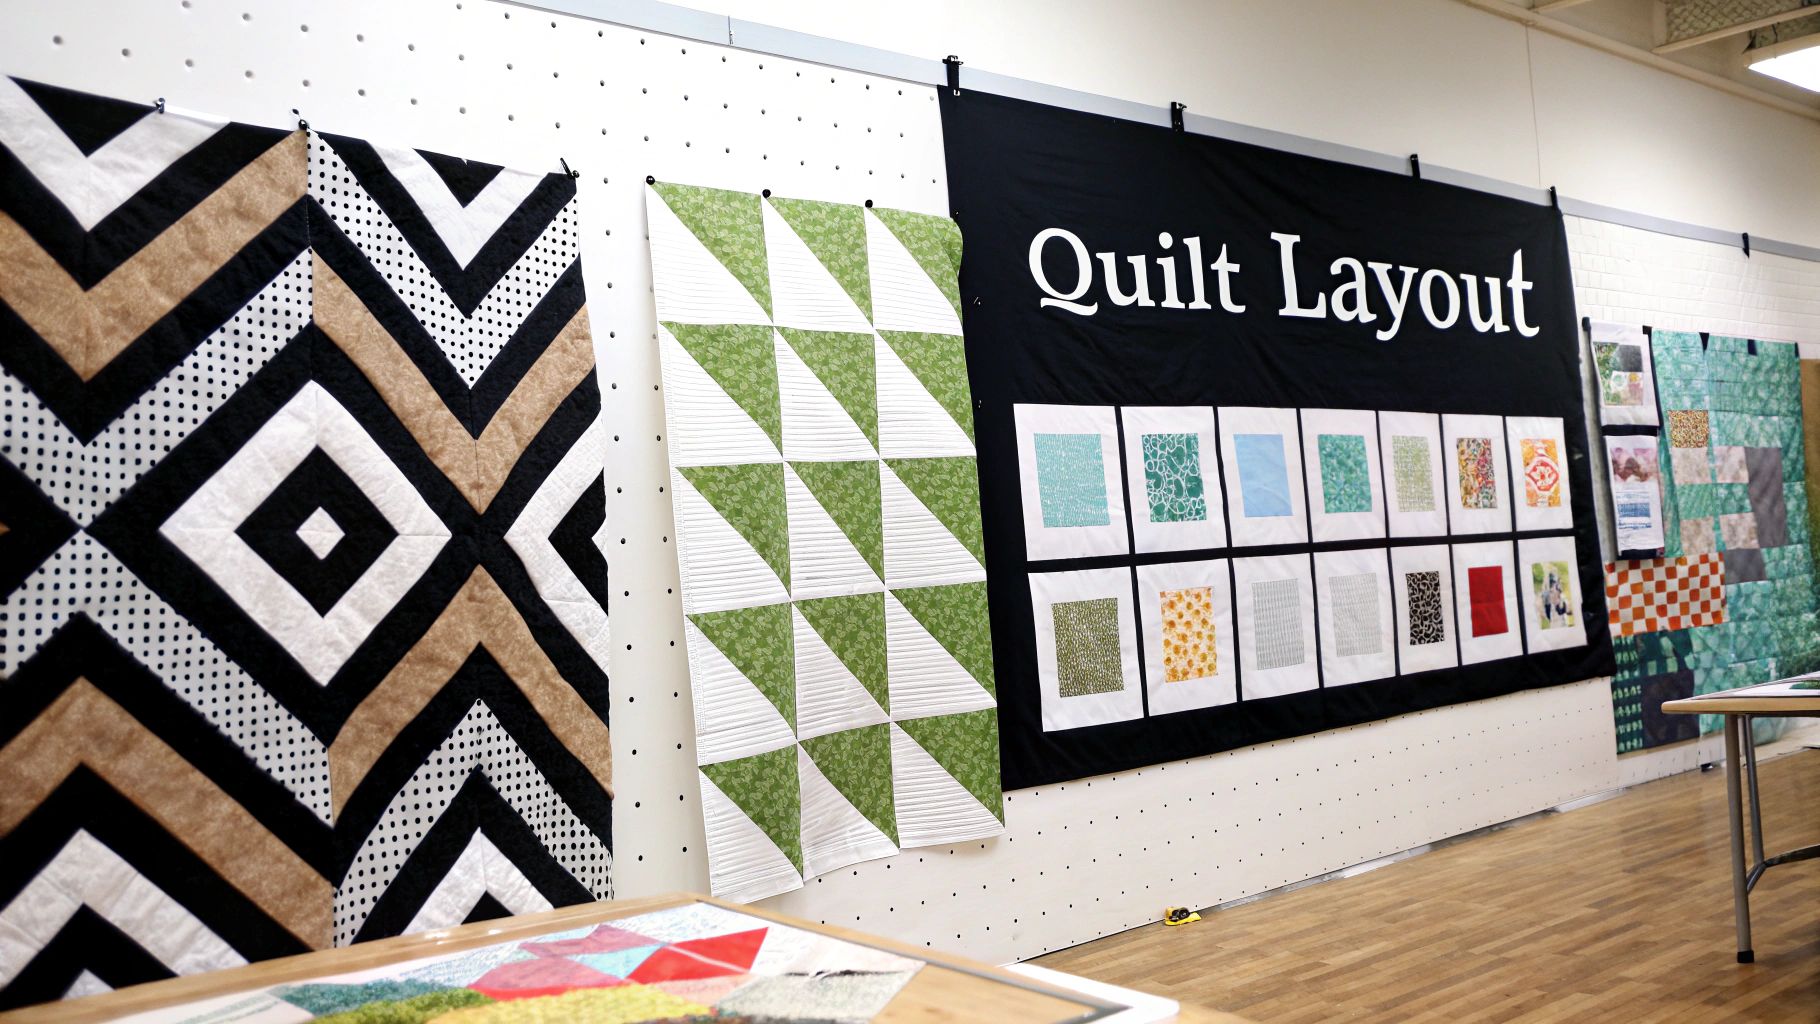
You’ve made a beautiful stack of blocks, and now for the really fun part! This is where your individual pieces start to become a single, stunning quilt. The quilt pattern courthouse steps is a personal favorite because its simple, graphic lines can create some truly amazing secondary patterns when you arrange them together.
The way you orient each block can completely change the final look, so don't feel locked into a basic grid. This is your chance to let your personal style shine.
Exploring Creative Layout Options
One of the best things about this pattern is discovering the new shapes that appear when the blocks meet. Before you even think about sewing them together, lay them all out on a design wall or a clear bit of floor space. Seriously, play with them!
See which of these arrangements sparks your creativity:
- Uniform Alignment: This is the classic approach where all the blocks face the same direction. It creates strong, clean lines running both horizontally and vertically, giving you a very crisp and orderly look.
- Alternating Rotation: This is where things get interesting. Turn every other block by 90 degrees. You’ll instantly see a dynamic, almost woven texture emerge. This one little tweak adds a ton of movement across the quilt.
- Zigzag or Diamond Formations: By carefully planning how the light and dark sides of your blocks meet, you can create bold zigzags or even large, graphic diamonds. It takes a bit more thought, but the visual payoff is huge.
Arranging your blocks is a bit like composing a piece of music. Each block is a note, but the way you arrange them creates the melody. Don't rush this part; it's where the quilt finds its voice.
Adding Sashing and Cornerstones
If you feel like your blocks need a little breathing room, sashing is the perfect solution. Sashing is simply the term for the fabric strips you sew between the blocks and rows.
It’s a great way to make the finished quilt larger, but it’s also another design opportunity. A neutral sashing fabric can make your blocks pop, while a bolder color can help tie all the different fabrics together. For that extra special touch, you can add cornerstones—small squares of fabric that sit right where the sashing strips intersect.
Piecing Your Quilt Top
Once you've landed on a layout you love, it's time to assemble the quilt top. I find the most manageable way to tackle this is to sew the blocks into horizontal rows first, and then sew those rows together.
Start with your first row, sewing the blocks together one by one. Keep that 1/4-inch seam allowance as accurate as you can—it really matters here. As you press the seams for each completed row, try to alternate the direction. For example, press all the seams in row one to the right, and all the seams in row two to the left.
This little trick is a game-changer for the next step. When you place two rows right sides together, the seams going in opposite directions will "nest" or lock into each other snugly. This is the secret to getting those sharp, professional-looking points where your block corners meet. It's the key to a flat, beautiful quilt top.
Finishing Your Quilt Like a Professional
You’ve pieced your quilt top, and it looks fantastic. Now for the magic. These final steps are what turn a beautiful top into a cozy, durable, and truly cherished heirloom. It's time to bring all the layers together.
First up, you'll need to make your "quilt sandwich." This is just what it sounds like: a stack of your backing fabric (wrong side up), your batting, and then your finished quilt top (right side up). I can't stress this enough—take your time here. Smooth out every single wrinkle and make sure all three layers are perfectly flat before you baste them together. Whether you use safety pins, a temporary spray adhesive, or long hand-stitches, a smooth start prevents puckers later.
Choosing Your Quilting Method
With your sandwich basted and secure, the real fun begins. The quilting stitches do more than just hold the layers together; they're a huge part of the final design, adding texture and personality to your work.
- Straight-Line Quilting: For a quilt pattern courthouse steps design, this is a classic choice and for good reason. You can stitch along the seams ("in the ditch") or echo them on either side, which really highlights the geometric beauty of the blocks. It’s a clean, modern look you can easily achieve on your home sewing machine.
- Free-Motion Quilting: Feeling a bit more artistic? Free-motion quilting is like drawing with thread. You can create swooping curves, stipples, or floral motifs that provide a gorgeous contrast to the straight lines of the Courthouse Steps pattern.
If you’re in the Atlanta area and want that flawless, professional finish without wrangling a big quilt through your machine, Famcut offers expert longarm quilting services that can truly make your quilt sing.
The Perfect Batting and Binding
The batting you choose inside your quilt sandwich makes a huge difference. For that traditional, crinkly-after-washing, soft-drape feel, you can't go wrong with 100% cotton batting. If you're making a warmer bed quilt or want a bit more puffiness and definition in your quilting, a wool or polyester blend can be a great option.
And the final touch? The binding. This is the fabric frame that encloses all the raw edges, giving your quilt a clean, durable finish. Mastering those crisp, mitered corners is a rite of passage for every quilter. It’s all about folding the binding strip at a perfect 45-degree angle at each corner.
A well-made binding is the signature of a skilled quilter. Take your time with the corners; it's a small detail that has a huge impact on the finished look.
Interestingly, not all quilts were historically made this way. During the "calico craze" of the late 19th century, some quilts were made with fancy silks and brocades that were only attached at the edges. They skipped the batting and quilting altogether for a much lighter, more decorative piece. You can learn more about these fascinating unique historical quilts.
Before you call it done, don't forget the most important part: the label. A simple piece of fabric stitched to the back with your name, the date, and maybe a little note about why you made it ensures its story will be remembered for generations.
Answering Your Courthouse Steps Questions
Even with a seemingly simple pattern like Courthouse Steps, questions always come up. It's totally normal! Let's tackle some of the most common ones I hear from quilters so you can get back to sewing with confidence.
Think of this as your go-to spot for troubleshooting those little issues that can make a big difference in how your quilt turns out.
What's the Real Difference Between This and a Log Cabin Block?
This is, without a doubt, the number one question. They look so similar, right? The secret is all in the build order.
A classic Log Cabin block is built asymmetrically, almost like a spiral. You add one strip at a time, turning the block after each one, which creates that iconic light-and-dark split down the middle.
Courthouse Steps, on the other hand, is all about symmetry. You work in pairs, adding strips to opposite sides of the center square. First, you'll add logs to the top and bottom, and then you’ll add another pair to the left and right. This method is what gives the block its balanced, "steps" effect, with colors radiating out evenly from the center.
Help! Why Aren't My Blocks Perfectly Square?
Ah, the wonky block. We've all been there. It's one of the most frustrating things in quilting, but the fix is usually pretty simple. Nine times out of ten, the problem is one of two things: your seam allowance is off, or your fabric is stretching.
- Your Seam Allowance: That 1/4-inch seam has to be spot-on, every single time. If you don't have one already, a specialty 1/4-inch presser foot for your sewing machine is a lifesaver. It makes hitting that perfect seam almost effortless.
- How You Handle Fabric: It's tempting to pull your fabric through the machine, but try to resist! Let the feed dogs do their job. Gently guide the fabric, but don't stretch or push it.
- The Golden Rule: The best habit you can build is to "square up" your block after adding each full round of strips. Grab your quilting ruler and rotary cutter and trim it back to perfection. This little step ensures all your blocks will fit together beautifully later on.
A block that starts to go crooked, even by a tiny bit, will only get worse as you add more strips. Squaring up as you go is your insurance policy for a flat, professional-looking quilt top. For me, it's a non-negotiable step.
Can I Use Foundation Paper Piecing for This?
Absolutely! And it’s a brilliant way to guarantee perfect blocks. While this guide focuses on traditional piecing, the Courthouse Steps pattern is historically a perfect candidate for foundation piecing.
Sewing onto a paper or fabric foundation gives you incredible accuracy. It completely eliminates any chance of the fabric stretching and ensures every block comes out the exact size it's supposed to. It’s a fantastic technique if you're a beginner worried about precision or just any quilter who loves a flawless finish.
Ready to dive into your next quilting project? Famcut has all the high-quality fabrics, threads, and tools you need to bring your Courthouse Steps quilt to life. Explore our curated collections today!