


Organizing Sewing Supplies A Pro's Guide
Before you even think about hitting "add to cart" on that perfect set of clear bins, we need to talk. The single biggest mistake I see—and one I've made myself more times than I care to admit—is buying storage solutions before knowing what actually needs to be stored.
Let's get this out of the way now: a successful sewing room isn't built on a foundation of pretty containers. It’s built on a clear understanding of the tools and materials you truly love and use.
The Great Sewing Supply Audit
Think of this first step as a "Great Sewing Declutter." It's less about tidying and more about a strategic inventory check. You're going to get your hands on every single item in your stash and ask some honest questions. When did I last touch this? Do I have a real, planned project for it? Does this still fit the kind of sewing I want to do now?
Answering these questions is what keeps your creative space from turning into a graveyard of good intentions and half-forgotten projects. You're curating your collection, not just shuffling it around.
Breaking It All Down: The Five Core Piles
To keep from getting completely overwhelmed, we're going to break your entire collection down into five manageable groups. I like to lay a big old quilt on the floor or use painter's tape to create zones. It gives you a physical space to see what you're working with.
Here are the five essential categories to sort everything into:
- Fabric: All of it. Yardage, fat quarters, pre-cuts, and yes, even that overflowing bag of scraps you've been meaning to get to.
- Thread & Bobbins: Every spool, cone, and pre-wound bobbin you own.
- Notions & Embellishments: This is the fun stuff! Buttons, zippers, elastic, lace, trims, beads—all those little bits and bobs.
- Tools & Equipment: Your scissors, rotary cutters, rulers, marking tools, seam rippers, and even your machines.
- Patterns: This includes the classic tissue paper patterns in their envelopes and any PDF patterns you've printed out.
The goal isn't just to clean up. It's to create a curated workshop filled with supplies that genuinely inspire you to sit down and sew. Every single item should earn its keep.
Once you have your five piles, you can focus on one at a time. This methodical approach is what makes a massive organization project feel doable and, dare I say, even fun. It’s this initial audit that gives you the roadmap for choosing the right storage later, saving you a ton of time, money, and frustration down the road.
To help you get started, here's a quick reference for how to approach your initial sort.
Your Sewing Supply Sorting Blueprint
This table is designed to be your quick-start guide, helping you group everything logically before you even think about containers.
| Category | Common Items | Initial Sorting Goal |
|---|---|---|
| Fabric | Yardage, fat quarters, pre-cuts (like jelly rolls), scraps, interfacing. | Group by material type (cotton, knit, denim) or project status (WIPs, stash). |
| Thread & Bobbins | Spools of all-purpose, quilting, or specialty thread; cones; bobbins. | Separate by color family. Keep bobbins with their matching thread spools if possible. |
| Notions & Embellishments | Buttons, zippers, snaps, hooks & eyes, elastic, ribbon, lace, beads, bias tape. | Create sub-piles: "Fasteners," "Trims," "Elastics," etc. This makes finding things easier. |
| Tools & Equipment | Scissors, rotary cutters & mats, rulers, measuring tapes, seam rippers, pins. | Group by function: cutting tools, measuring tools, marking tools, pressing tools. |
| Patterns | Commercial tissue patterns, printed PDF patterns, self-drafted patterns. | Sort by garment type (dresses, pants) or by designer/company. |
With your piles sorted, you now have a real sense of your inventory. This clarity is everything. You're no longer guessing what you need to store; you know exactly what you have and how much space it will take up. Now, the fun part can begin.
Taming the Fabric Stash Once and For All
Let's be honest: fabric is the lifeblood of our craft, but it's also the number one culprit behind a chaotic sewing room. Getting your fabric under control is the single most important step toward creating a space that feels functional and genuinely inspiring. When you can see what you have and find what you need, you'll stop buying duplicates and start using the beautiful materials you already own.
This isn't about becoming a minimalist—it's about creating a personal library of your fabrics that's a joy to browse. Whether you have a curated collection or an entire room overflowing with bolts, the right method will change everything. Forget just shoving it into a bin and calling it a day. We need a system that actually works with you.
Before we get into the nitty-gritty of folding, it helps to understand the basic game plan for tackling any part of your stash, especially fabric.

This simple flow—gather, sort, decide—is your foundation. It breaks the massive task down into manageable chunks and prevents that deer-in-the-headlights feeling of not knowing where to start.
Making Your Fabric Stash a Visual Masterpiece
How you store your fabric directly impacts how often you use it. If your materials are visible and neatly arranged, you're far more likely to "shop your stash" before heading to the store. The best method really depends on your space and the size of your fabric cuts.
One of the most popular (and for good reason!) techniques is using comic book boards. Wrapping your fabric around these acid-free boards creates tidy "mini-bolts" that you can line up on a shelf just like books. It's a fantastic way to minimize wrinkles and gives you an at-a-glance view of every single print. For anyone working in a small space, this vertical storage is an absolute game-changer.
Another brilliant option is simply rolling your fabric. This works especially well for larger cuts—think two yards or more—and is perfect for materials that crease easily, like rayon or linen. You can tuck the rolls into cubby-style shelving units or stand them up in deep bins, making it easy to spot the colors and patterns you need.
My personal "a-ha!" moment came when I stopped sorting just by color. Instead, I started organizing by designer or collection first, then by color within that group. Since fabrics from the same line are designed to coordinate, it makes planning a new quilt or cosplay ridiculously fast.
Smart Storage for Any Sewing Space
Your storage strategy has to fit your reality. What works in a sprawling studio won't work in a tiny apartment corner.
- Small Apartments & Corners: Go vertical. Tall, skinny bookshelves like the IKEA Billy are perfect for those mini-bolts. You can also use over-the-door organizers with clear pockets to wrangle fat quarters and pre-cuts.
- Dedicated Studios: This is where you can get creative with repurposed furniture. An old filing cabinet is surprisingly perfect for filing fat quarters. A vintage hutch or dresser can display your prettiest fabrics while hiding less attractive notions in the drawers.
- Budget-Friendly Setups: Don't knock the classics. Clear plastic bins are a go-to because they protect fabric from dust and pests while letting you see what's inside. The key is to fold everything neatly so you don't just create a jumbled mess in a box.
And finally, the scraps. The dreaded scrap bin. Instead of one giant, chaotic container, try sorting them by color into smaller, clear containers or even large glass jars. This instantly transforms your scrap pile from a problem into a usable palette for your next patchwork or quilting project.
Mastering Thread, Bobbins, and Notions
Let's be honest: it’s the little things that cause the biggest organizational nightmares in a sewing room. A bird's nest of tangled thread, a drawer full of mystery buttons, or a missing zipper can derail your creative momentum in an instant. The secret to taming this tiny chaos is creating smart, accessible systems where every last notion has a place to live.
When you can grab the exact shade of thread you need or find the perfect button without a frantic search, you get to spend more time actually sewing. The goal here is simple: make these small essentials just as easy to find and use as your fabric.
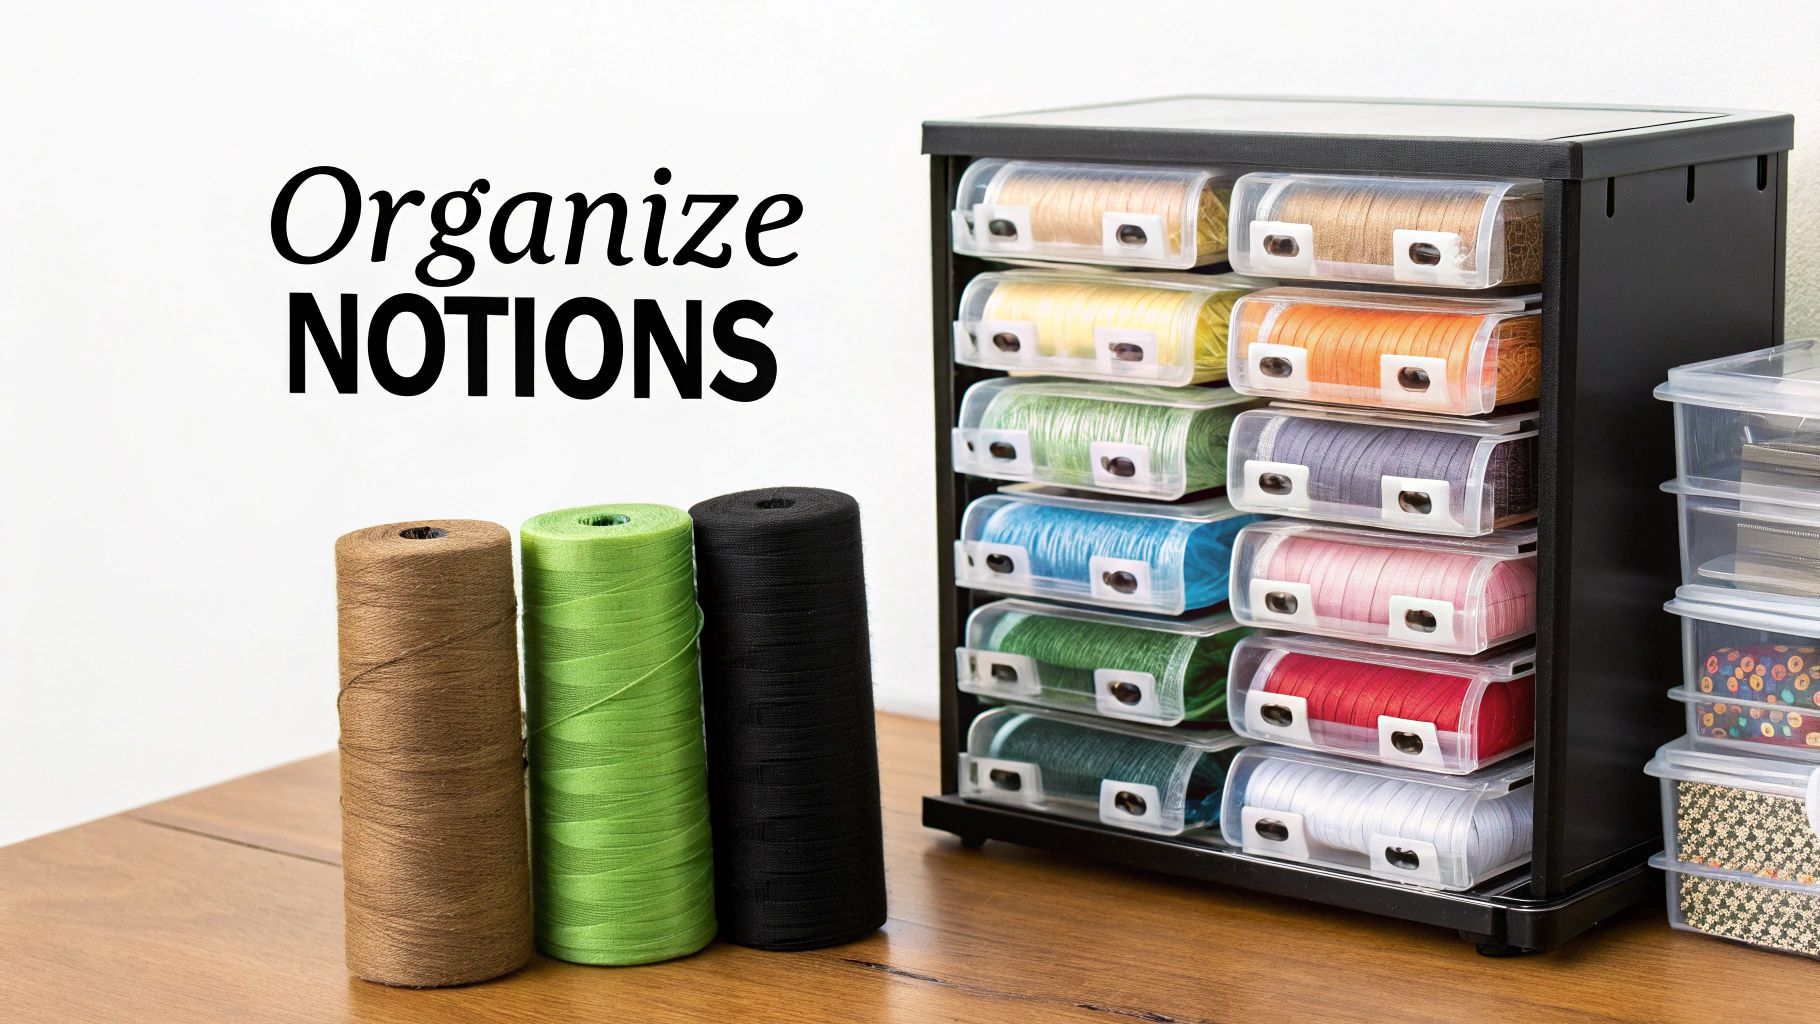
Smart Solutions for Thread and Bobbins
Thread is both a workhorse and a design element, so storing it properly is a must. Many sewists love a wall-mounted thread rack, and for good reason—it turns your colorful collection into a piece of functional art. Being able to see all your colors at a glance makes matching them to your fabric incredibly easy.
If you're worried about dust (or curious pets), clear plastic thread boxes are a fantastic alternative. I’d suggest finding ones with individual spindles for each spool; this keeps them from unraveling and creating a tangled mess. And for bobbins, those little silicone bobbin rings or clear cases are lifesavers. They keep your bobbins paired with their matching thread spools, finally solving the "which black thread is this?" mystery.
Taming the World of Notions
The term "notions" covers a huge range of items, from fasteners and elastic to all sorts of embellishments. Because they come in so many shapes and sizes, a single storage solution just won't cut it. The real trick is to group similar items together and then find containers that actually fit what you're storing.
- Small Drawer Cabinets: These are absolute gold for things like buttons, snaps, and hooks. You can find them at any craft or hardware store. I like to give each type of notion its own drawer and label it clearly.
- Divided Organizers: Think tackle boxes or bead organizers. The ones with adjustable dividers are amazing for zippers, elastic, and trims because you can create custom-sized compartments.
- Magnetic Holders: A magnetic pin bowl is a must-have on my sewing table. You could also mount a simple magnetic strip on the wall nearby to keep pins, needles, and even your seam ripper from vanishing into thin air.
The boom in sewing as a hobby isn't just something we're seeing in our communities; it's a global trend. The sewing thread market alone was valued at $3.79 billion and is projected to hit $4.84 billion by 2034, with North America leading the growth. This shows just how many of us are investing in quality materials, which makes having a solid organization system more critical than ever. You can dive deeper into these market insights over at Precedence Research.
My favorite budget hack for tiny notions? I save and wash out empty tic-tac containers. They're perfect for holding loose buttons, beads, or even hand-sewing needles. They're clear, they're tiny, and they keep things from getting lost in a big drawer.
Tailoring Your System to Your Craft
The "right" way to organize these small supplies really comes down to how you work. Your system should feel like a natural extension of your creative process.
For instance, a quilter might sort all their thread by color family, making it easy to grab various shades of blue for a specific patchwork block. On the other hand, a cosplayer might find it more useful to organize by project. They could keep all the specialty trims, unique buttons, and specific zippers for one costume together in a clearly labeled project box. When you customize your approach, organizing stops feeling like a chore and becomes an intuitive part of your sewing flow.
Designing a Smarter Sewing Workspace
Having an organized stash of supplies is a great first step, but the real magic happens when your entire sewing room is set up for a smooth workflow. A well-designed workspace is what turns those neatly labeled bins into a powerhouse of creativity, cutting down on the time you spend searching for things so you can spend more time actually sewing.
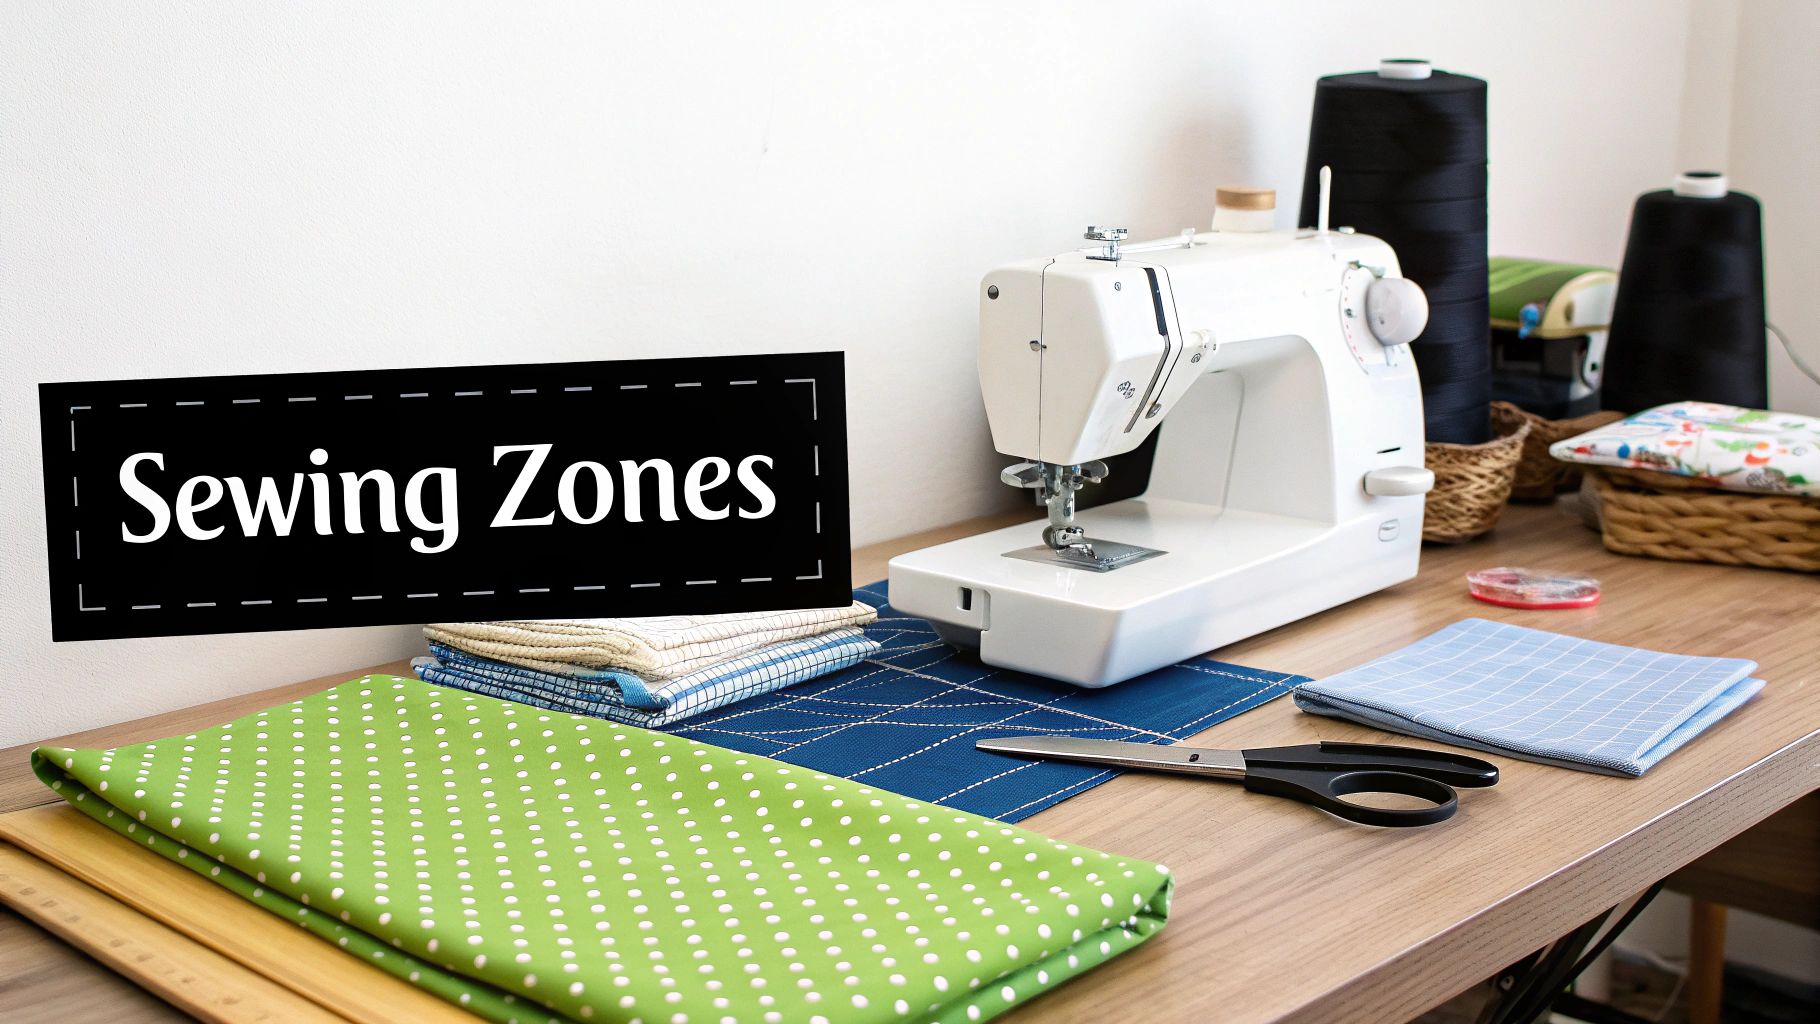
The best way to think about this is by creating distinct "sewing zones." It's a concept borrowed from professional kitchens, where every station has a clear purpose. When you dedicate specific areas for cutting, sewing, and pressing, you build a natural, intuitive flow into your process.
Creating Your Core Sewing Zones
Ideally, you'll want to arrange these zones in a logical sequence, often in a triangle or U-shape. This "work triangle" minimizes the steps you have to take between your most-used stations.
- The Cutting Zone: This spot needs a large, flat surface. I highly recommend a counter-height table to save your back from hunching over. You'll want enough room to walk around it, especially when wrestling with large cuts of fabric for quilts or cosplay costumes.
- The Sewing Zone: This is where your machine lives. Try to position it where you get the best natural light, and add a good task lamp for backup. Keep your must-haves—thread snips, seam rippers, bobbins, and extra needles—right at your fingertips.
- The Pressing Zone: A dedicated, easily accessible ironing station is a total game-changer. Keep it close to your sewing machine so you can press seams as you sew without having to trek across the room.
My workspace completely changed when I put my cutting table and ironing board on casters. The ability to reconfigure my layout for different projects—like a large quilt versus a small cosplay prop—made my small space feel twice as big and far more functional.
Adapting to the Space You Have
The good news is that this zone-based system works whether you have a massive studio or just a small corner. In a big room, you can spread out with dedicated stations.
If you’re working in a smaller area, you'll need to get creative. Exploring clever small space storage ideas can be a lifesaver. Think vertically—wall-mounted shelves and pegboards are your best friends. Multi-functional furniture, like a cutting mat on top of a dresser or a storage cart that can be rolled away, is also a brilliant solution.
It's clear that people are invested in their craft. The global sewing machine market was recently valued at $6.815 billion and is expected to hit $11.027 billion by 2033. In the U.S. alone, the market size was $1.989 billion. With that kind of investment in our machines, it just makes sense to create a workspace that’s ergonomic, efficient, and lets us get the most out of our tools.
Ultimately, organizing your sewing supplies is about more than just the containers; it's about the flow of the room itself. When you put a little thought into your layout, you create a space that truly supports your passion, making the entire process more productive and—most importantly—more fun.
How to Keep Your Sewing Space Organized
You’ve done the hard work—the big sort, the purge, the setup. But let's be honest, the real battle is keeping your space that way. A perfectly organized sewing room can descend back into chaos faster than a bobbin can run out if you don't have some simple, sustainable habits in place.
The trick is to weave maintenance into your creative workflow, rather than seeing it as a totally separate chore you have to tackle later.
This isn't about marathon cleaning sessions. It’s about small, consistent actions that stop the mess from ever getting out of hand. One of the best habits I ever forced myself to adopt is the "10-minute tidy-up" at the end of every sewing session. Before I walk away, I spend just a few minutes putting tools back, folding fabric scraps, and sweeping up threads. It’s amazing what a difference it makes. That tiny ritual prevents a little bit of clutter from becoming a weekend-long cleanup project.
Building Habits That Actually Stick
Keeping your space tidy is all about creating routines that become second nature.
Labeling is your best friend here. It doesn't matter if you use a fancy label maker or just a Sharpie on masking tape—clearly marking every bin and drawer removes the guesswork. When you can see "Zippers" at a glance, you’re far less likely to toss a handful of random buttons in there when you're in a hurry. It makes putting things away almost automatic.
Another game-changer is the "one in, one out" rule. When you bring home a gorgeous new piece of fabric, an old one has to leave. This forces you to constantly evaluate what you really need in your stash, stopping it from overflowing its designated space. It keeps your collection feeling fresh and, more importantly, manageable.
The secret to staying organized is a simple mindset shift. Your sewing room is a workshop, not just a storage unit. Every tool and material should be ready for action, and that only happens when it’s consistently returned to its designated home.
Adapting as Your Stash Grows
It's no secret that the sewing community is booming. The global market for sewing supplies has hit about $5 billion, thanks in large part to a new wave of DIY crafters and the 'maker movement.' As more of us get hooked on this hobby, the need for smart, long-term organization strategies becomes even more important.
As your own collection grows, think about storage that can grow with you. Flexible solutions are key. For instance, things like wardrobe hanging shelves for clever closet organization aren't just for sweaters; they can be easily repurposed to hold folded fabric, project bins, or even patterns.
Ultimately, keeping your sewing space organized isn’t a one-and-done deal. It’s an ongoing practice. By building these simple routines into your creative life, you’ll ensure your sanctuary remains a functional, inspiring place where you can focus on what you really love—bringing your ideas to life.
A Few Common Sewing Organization Questions
Even after you've sorted and stored everything, some tricky items always seem to cause trouble. I get asked about these specific challenges all the time, so let's walk through some practical solutions I've picked up over the years.
What’s the Best Way to Store Sewing Patterns?
Those flimsy tissue patterns can be a real pain to keep intact. My go-to method is to treat them like important files. I slip them into manila envelopes and file them away in a filing cabinet or a simple pattern box. It's a small step that prevents those agonizing rips and ensures all the pieces stay together.
If you’re working with PDF patterns you've printed yourself, binders are your best friend. Slide each page into a clear sheet protector. This keeps everything in order, safe from coffee spills, and makes it super easy to flip through instructions without creating a mess.
Here's a trick I swear by: Instead of cutting the original pattern, trace your size onto something more durable. Medical exam paper or Swedish tracing paper is perfect for this. You can then fold up the original, pristine pattern and store it away for later.
How Can I Organize My Supplies on a Tight Budget?
You really don't need a custom-built studio to get organized. Honestly, some of the best organizing tools are probably already in your house, just waiting to be repurposed. It's how I started, and it works beautifully.
Get creative and look for hidden potential in everyday items:
- Glass Jars: Washed-out pasta sauce or pickle jars are brilliant for buttons, snaps, and beads. They're clear, free, and look great on a shelf.
- Shoeboxes: Don't toss them! They are the perfect size for stashing fat quarters, small cuts of interfacing, or project-specific notions.
- Inexpensive Dividers: A quick trip to the dollar store for some cheap drawer dividers can instantly bring order to a chaotic notions drawer.
The real game-changer is to think vertically. A simple, affordable bookshelf or a few wall-mounted shelves can reclaim a massive amount of desk space without breaking the bank.
My Sewing Space Is Tiny! What Are Your Best Tips?
When you're short on space, your new motto is "go vertical and hide it away." Your walls are prime real estate. A pegboard mounted over your desk is a fantastic way to hang scissors, rulers, and rotary cutters, keeping them within reach but off your work surface. A wall-mounted thread rack is another lifesaver for getting your collection visible and out of the way.
I'm also a huge fan of over-the-door organizers—the kind with clear pockets. They are absolute workhorses for holding all those little bits and bobs that would otherwise end up jumbled in a drawer.
Finally, look for furniture that can pull double duty. Think about an ottoman with built-in storage for your fabric stash or a rolling cart that can hold your current project supplies and then slide neatly under a table. In a small space, every single item has to earn its keep.
Here at Famcut.com, we know that a tidy space fuels creativity. Whether you're building an elaborate cosplay or piecing a beautiful quilt, having your supplies organized and accessible is half the battle. Find inspiration and high-quality materials for your next creation by exploring our collection at https://famcut.com.