


How to Thread a Sewing Machine: Quick, Clear Steps for Beginners
Learning to thread your sewing machine is the first real step toward sewing success. It’s a two-part harmony: you guide the top thread from the spool all the way down to the needle, then you bring up the bobbin thread to meet it. Get this right, and you've laid the groundwork for every stitch you'll ever make.
Your First Step to Perfect Stitches
Welcome to what I consider the most essential skill in sewing. Nailing the threading process is the secret to getting those smooth, beautiful stitches everyone wants, whether you're just fixing a seam or starting a couture-level project. Once you understand how it works, what seems like a complex task becomes a simple, two-minute habit.
Trust me, proper threading isn't just about getting the machine ready—it's your best defense against nests of tangled thread, frustrating jams, and wonky, uneven seams. The whole magic of a sewing machine is how the top and bottom threads lock together perfectly. If you miss even one little guide or set the tension wrong, you're in for a headache. Learning to do it correctly from the start will save you so much time and frustration down the road.
Get to Know Your Machine
Before you even grab a spool of thread, let’s take a quick tour of your machine's key landmarks. Knowing the names of these parts will make following any instructions—mine or your machine’s manual—so much easier.
- Spool Pin: This is the little peg that holds your spool of thread. Simple enough!
- Thread Guides: You'll see a series of hooks, channels, and loops. Their only job is to keep the thread flowing smoothly on its journey.
- Tension Discs: The thread slips between these two hidden discs. They apply a bit of pressure, which is crucial for creating a balanced stitch.
- Take-Up Lever: This is the metal arm that bobs up and down as you sew. It’s the part that actually pulls the thread to form the stitch. Pro-tip: Always make sure this lever is at its absolute highest point before you start threading.
- Needle and Needle Clamp: The final stop for your upper thread before it gets down to business.
Mechanical vs. Computerized Machines
Not sure what kind of machine you’re working with? Most modern machines are either mechanical or computerized. Knowing which one you have helps set your expectations for the threading process.
Let's quickly break down the key differences to help you identify your machine.
Mechanical vs Computerized Sewing Machines at a Glance
| Feature | Mechanical Sewing Machine | Computerized Sewing Machine |
|---|---|---|
| Interface | You'll see physical knobs and dials that you turn to select stitches and change settings. | It has an LCD screen and push-buttons for selecting stitches and accessing functions. |
| Threading | The process is completely manual. You'll likely see helpful diagrams printed right on the machine's body. | These often come with handy features like semi-automatic or fully automatic needle threaders. |
| Complexity | They are built like tanks—durable, straightforward, and focused on the core stitches you'll use most. | They offer a huge library of decorative stitches and often have automated features to make things easier. |
Once you know your machine's type, you'll know what to expect. Mechanical models require you to be a bit more hands-on, while computerized ones often give you a little help at the end. But here’s the thing: no matter what brand or model you own, the basic thread path is surprisingly similar across the board.
Mastering how to thread a sewing machine isn't just about memorizing steps. It's about understanding the logic of the thread path. Once you get the 'why' behind each guide and lever, you can sit down at almost any home sewing machine and thread it with confidence.
Now that you're getting the hang of it, you're ready to put those skills to the test! A great way to practice is to plan your next sewing project, such as a circle skirt, which is a fun and rewarding way to create something beautiful from scratch.
Following the Upper Thread Path
Think of the upper thread path as a specific roadmap your thread follows from the spool all the way down to the needle. Every guide and hook along the way is a crucial checkpoint, designed to control the thread's flow and tension. Getting this path right is the key to strong, even stitches and avoiding those dreaded thread nests.
First things first, and this is a big one: always turn the handwheel towards you until the take-up lever is at its highest point. You'll see this lever—a metal arm with a hook or eyelet—pop up. Doing this opens up the tension discs, making your life infinitely easier. Seriously, forgetting this step is the number one cause of threading headaches.
This visual guide simplifies the whole setup process.
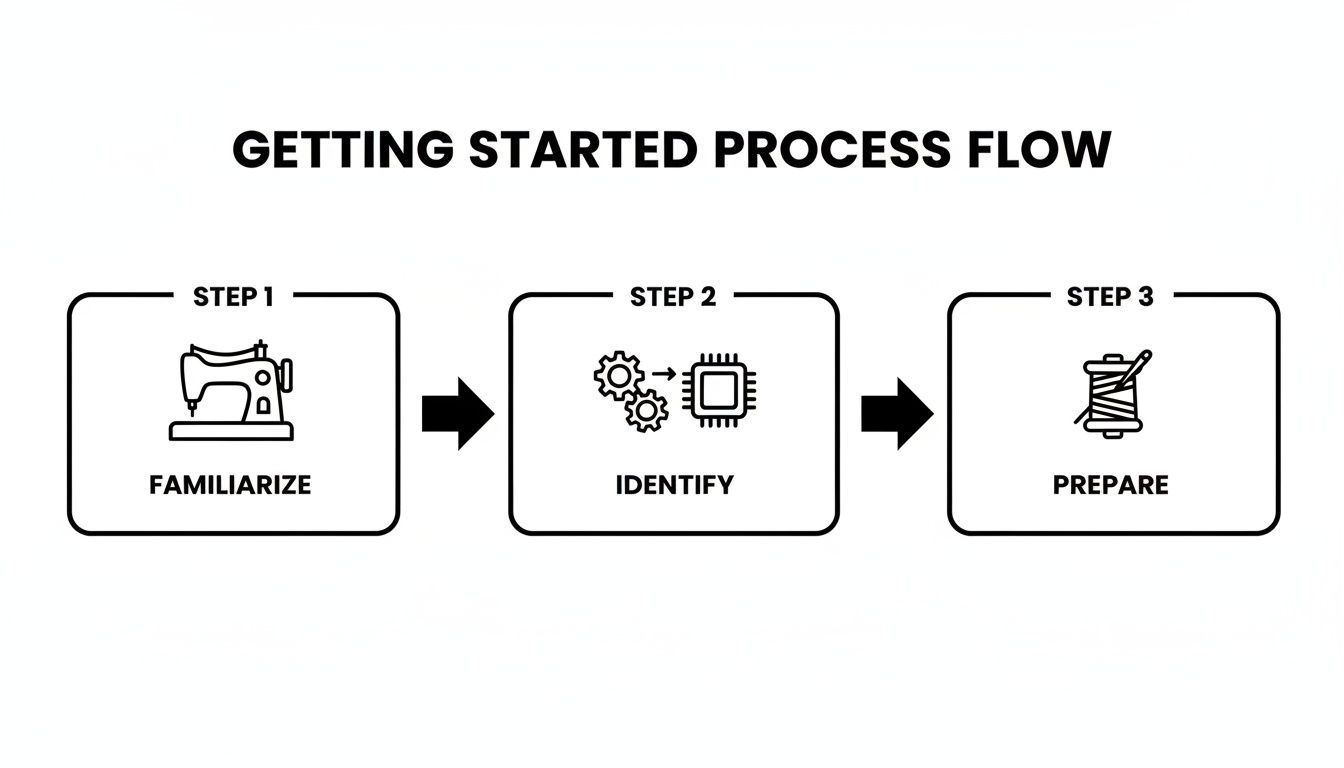
It boils down to three simple actions: getting to know your machine, figuring out what kind it is, and getting your thread ready to go.
Starting at the Spool Pin
The journey begins at the spool pin. Pop your spool of thread on it. Check your machine's manual to see which way the thread should unwind—it actually matters! Then, slide on a spool cap that’s just a bit bigger than the end of the spool. This little plastic disc is more important than it looks; it keeps the thread from jumping off or wobbling around.
Next, you'll see the first thread guide. It’s usually a small metal loop or hook. Its only job is to get the thread under control and point it in the right direction, which is down toward the tension assembly.
The All-Important Tension Discs
From that first guide, you’ll bring the thread down into a channel on the front of the machine. Hidden inside this channel are the tension discs—two metal plates squeezed together. You need to make sure your thread slips right between them. This is the heart of your machine's tension system; it’s what controls the tightness of your top stitch.
Pro Tip: If your thread isn't seated properly between these discs, you'll get a loopy, tangled mess on the bottom of your fabric. We call it "bird nesting," and it's the most common threading mistake by far. To check, just give the thread a gentle tug after this point. You should feel a definite, smooth resistance.
After the tension discs, you'll guide the thread down, around a U-turn at the bottom, and back up the other side of the channel. At the very top, you’ll see the take-up lever we raised earlier.
Mastering the Take-Up Lever
Now, you have to get the thread securely through the eye of the take-up lever. Most modern machines make this easy—you just hook the thread from right to left. The take-up lever is what pulls the thread taut to lock in each stitch. If you miss this step, your machine simply won't sew.
Once you're through the take-up lever, the thread heads back down toward the needle. You're almost there! There will be one or two final thread guides to hit on the way.
- Guide Above the Needle: Look for a small hook or channel just above where you insert the needle. Don't skip it!
- Needle Bar Guide: Some machines have an extra tiny hook located right on the needle bar itself.
These last little guides are easy to miss, but they’re critical for feeding the thread into the needle at the perfect angle. Missing them is a classic cause of skipped stitches and broken threads, especially if you’re sewing fast.
With the thread properly guided, you're finally ready to thread the needle.
Getting Your Bobbin Wound and Set
With the upper thread sorted, it's time to tackle its partner: the bobbin. This little spool is the secret to a strong lockstitch, working from underneath the fabric to tie everything together. Honestly, getting the bobbin wound evenly and placed correctly is just as important as threading the top half of your machine.
If your bobbin isn't right, you're in for a world of headaches. We're talking tangled thread nests, snapped threads, and tension that just won't cooperate. But once you get the hang of it, you'll be swapping bobbins out without a second thought.
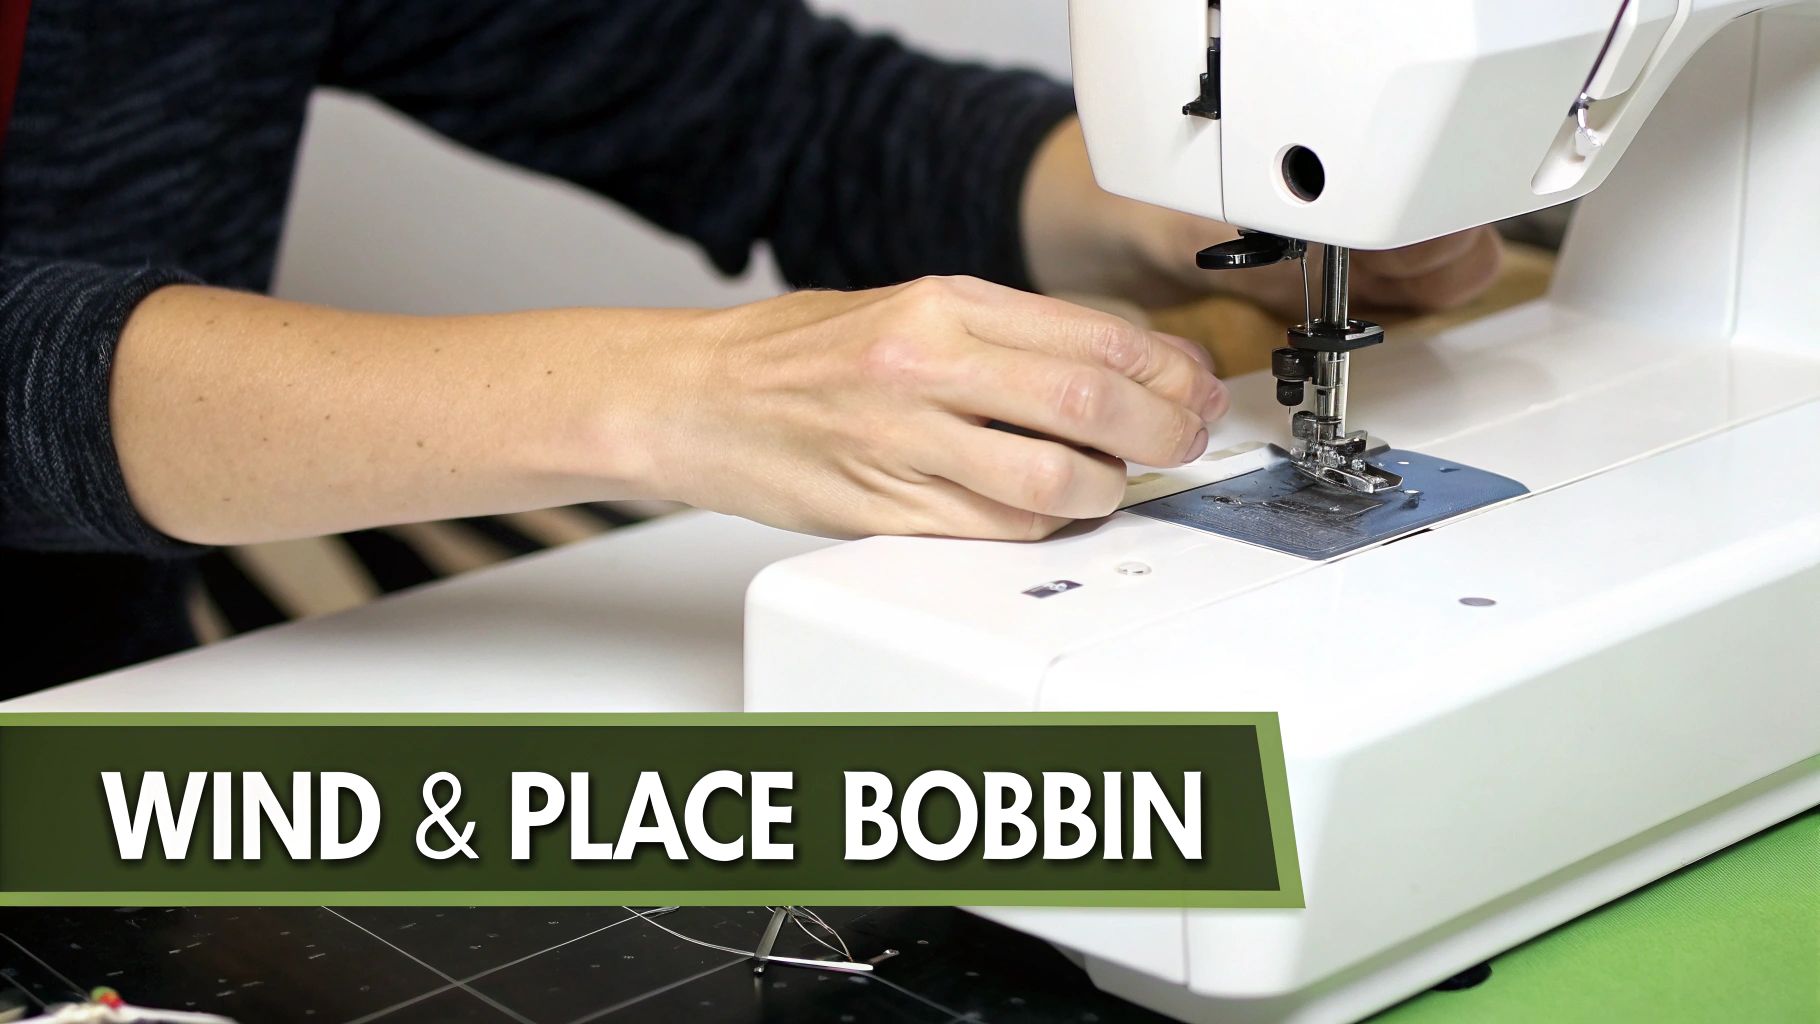
How to Wind a Perfect Bobbin
What you're aiming for is a bobbin that’s smooth, firm, and evenly wound—no weird loops or lumpy bits. Most machines have a bobbin winder right on top.
First, grab the thread from your spool and guide it around the small tension disc made specifically for bobbin winding. Your machine's manual or markings will show you the exact path.
Next, poke the end of the thread through the tiny hole in your bobbin, going from the inside to the outside. Pop the bobbin onto the winder spindle and click it into place. This action usually disengages the needle so it doesn't move up and down.
Hold onto that thread tail and gently press your foot pedal. After a few rotations, stop and snip the tail off close to the bobbin. Now you can hit the pedal again and wind at a steady pace. Many modern machines are smart enough to stop automatically once the bobbin is full.
A bobbin that's wound too loosely is a classic beginner mistake. It might seem fine, but that loose thread can snag inside the bobbin case later, causing an instant jam. You want the wound thread to feel firm, almost like a brand-new spool from the store.
Placing a Top-Loading Bobbin
Top-loading bobbins, often called "drop-in" bobbins, are standard on most newer machines for a reason: they're incredibly easy to use. Just slide off the small plastic cover next to your needle plate to get started.
Take a look at your wound bobbin. The direction it unwinds is critical. For most top-loaders, the thread needs to come off in a counter-clockwise direction. A good way to remember this is to make sure the thread tail looks like the letter "p" for perfect. Drop it in.
Now, guide the thread tail through the little notch in the bobbin case—your machine will have arrows pointing the way. As you pull the thread along the channel, you should feel a tiny click as it slips into the tension spring. Leave a 4-5 inch tail hanging out, put the cover back on, and you’re done.
Installing a Front-Loading Bobbin
You'll find front-loading bobbins on many workhorse mechanical machines and vintage models. This system uses a metal case that you have to take out and put back in.
First, open the shuttle door (that little flap on the front of the machine) and pull the metal case out by flipping its tiny latch.
Hold the empty case in one hand. With this system, you generally want the thread to unwind in a clockwise direction. Pop the bobbin into the case.
The next part is crucial: pull the thread through the small slit on the side of the case, then slide it underneath the tension spring until it pops out of the little opening. Give the thread a gentle tug; you should feel slight resistance. A quick test I always do is to hold the case by the thread tail—it should hang there, but a gentle jerk should let a little more thread out.
Finally, hold the case by its latch and slide it back onto the pin inside the machine until it clicks into place. Close the door, and your bottom thread is good to go.
Understanding your machine’s bobbin system—whether it’s a top-load or a front-load—is half the battle. Just remember to get the direction right and make sure the thread is sitting properly in its tension path. With these steps mastered, you've set the stage for a beautiful, even stitch.
Finishing Up: Threading the Needle and Catching the Bobbin
Alright, you've expertly guided the thread through its entire upper path and your bobbin is sitting pretty. You’re on the home stretch now, with just two quick but crucial steps left before the real fun begins. This is the moment where the top and bottom threads finally meet, setting the stage for every single stitch you're about to make.
For a lot of new sewists, getting that tiny thread through the eye of the needle feels like the biggest hurdle. A little patience and a good trick or two make all the difference, I promise. Once that’s done, you just have to coax the bobbin thread up to join its partner, and you'll be ready to roll.
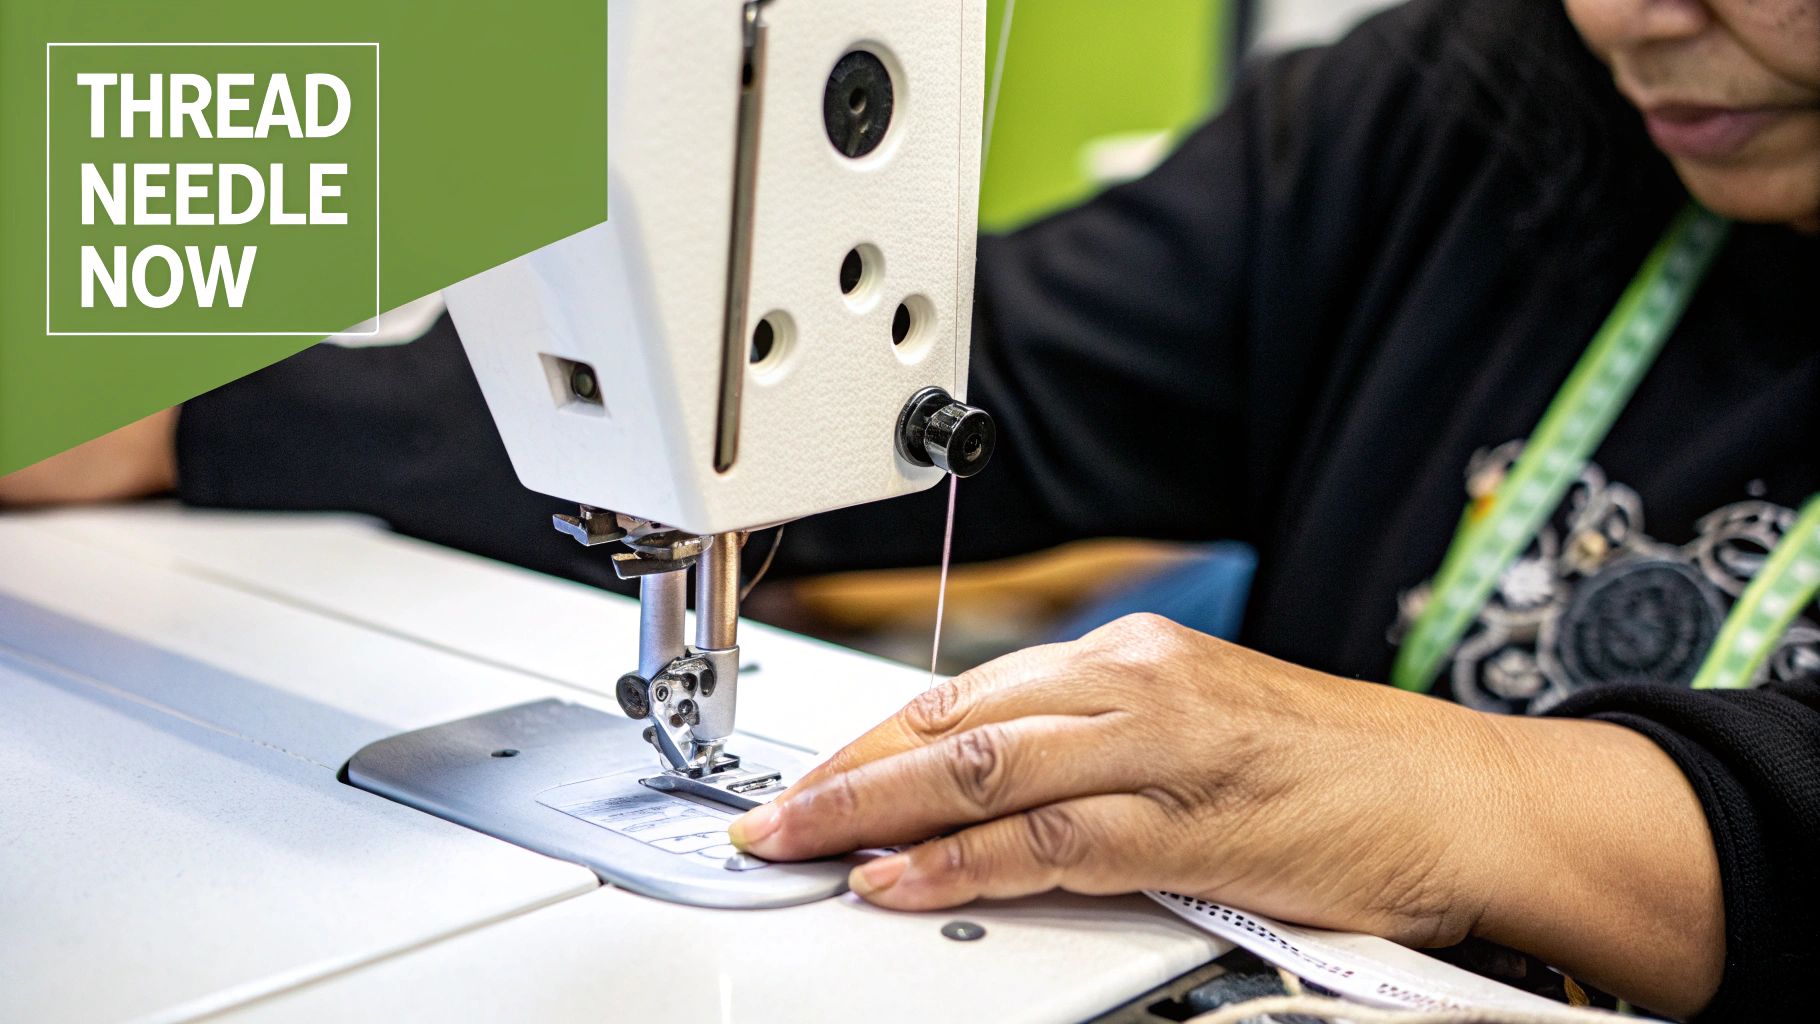
Getting the Needle Threaded
This is the final checkpoint for the top thread. How you do it comes down to your machine's features and what you find easiest. Whether you thread it by hand or use a built-in threader, the goal is the same: get the thread through the needle's eye from front to back.
The Manual Method
If you're threading by hand, a clean, sharp end on your thread is non-negotiable. Trying to force a fuzzy, frayed end through the needle is a fast track to frustration.
- Get a Clean Cut: Grab a sharp pair of scissors or snips and trim the thread end at a crisp 45-degree angle. This creates a nice, sharp point that's much easier to aim.
- Brace Yourself: I find it helps to rest the fingers of one hand against the machine right by the needle. This steadies your hand so you can guide the thread with more control.
- Let There Be Light: Good lighting is your best friend here. If your machine's light isn't cutting it, aim a small desk lamp or task light right at the needle area. It’s a total game-changer.
Using an Automatic Needle Threader
So many modern machines have this little lifesaver built right in. It can look a bit complicated at first, but it’s designed to be a quick, smooth action.
Most of them work by lowering a tiny hook mechanism that actually grabs the thread and pulls a loop through the eye for you. You’ll usually guide the thread around a little catch and then across the front of the needle. When you engage the threader, that little hook passes through the eye, snags the thread, and pulls it back through as it retracts. Check your machine's manual for the specific motion, as it can vary a bit between brands like Brother, Singer, and Janome.
A bit of hard-won advice: Automatic threaders are happiest when the needle is in its absolute highest position. If the threader is giving you trouble, just turn the handwheel toward you one full rotation to reset everything and then try again. It usually works like a charm.
Bringing Up the Bobbin Thread
With the needle threaded, it's time for the big introduction. This step feels a little like a magic trick the first time you do it successfully.
Hold the tail of your top thread loosely with your left hand, leaving a few inches of slack. With your right hand, slowly turn the handwheel toward you—never away! You'll see the needle dip down into the bobbin area.
As the needle travels down and comes back up, the upper thread cleverly forms a loop that catches, or "scoops up," the bobbin thread. Keep turning the handwheel until the take-up lever is back at its highest point.
Now, give that top thread tail a gentle pull. You should see a loop of the bobbin thread pop up through the hole in the needle plate. I like to use the tip of my scissors or a seam ripper to gently pull that loop all the way through. You’ll now have two separate thread tails, ready to go.
Your Final Pre-Sew Checklist
You did it! The machine is officially threaded. Before you hit the foot pedal, run through this quick mental check to make sure your first seam is a great one.
- Presser Foot DOWN: This is the #1 mistake I see beginners make. If you sew with the presser foot up, you’ll get a giant, tangled mess of "bird's nest" thread on the bottom of your fabric. Lowering the foot is what engages the upper tension, which is absolutely critical.
- Clear the Tails: Take both thread tails and sweep them under the presser foot and toward the back of the machine. This keeps them from getting tangled in your first stitch.
- Do a Test Run: Always sew your first few stitches on a scrap of the same fabric from your project. This is your chance to check the tension and make sure everything looks perfect before you lay a single stitch on your actual garment.
Nailing these final steps solidifies everything you've just done. You’ve successfully learned how to thread a sewing machine from start to finish.
Troubleshooting Common Threading Headaches
Even when you’ve followed all the steps perfectly, there are days when your sewing machine just seems to have a mind of its own. One minute you're sewing a perfect seam, and the next, you're staring at a frustrating mess. Don't worry—most of these glitches are old news to seasoned sewists, and the fixes are usually surprisingly simple.
It's almost never a big mechanical failure. More often than not, it’s a tiny, overlooked detail in the threading process. Think of yourself as a detective; a few simple clues will point you right to the culprit.
Solving the Dreaded Bird’s Nest
Ah, the bird's nest. That tangled, knotted disaster of thread on the underside of your fabric. It’s probably the most common headache in the sewing world, and your first instinct is usually to blame the bobbin.
Believe it or not, 99% of the time, a bird’s nest is caused by a problem with the upper thread.
Specifically, it means your upper thread has zero tension. This almost always happens for one of two reasons:
- You forgot to lower the presser foot before you started sewing. That single action is what engages the tension discs. If the foot is up, the top thread is just flying free, causing chaos underneath.
- The thread missed the tension discs. Even with the foot down, if the thread isn't seated snugly between those discs, you get the same result: no tension.
The fix is beautifully simple. Lift the presser foot, pull the top thread all the way out, and re-thread the machine from the very beginning. As you go, make sure you feel that slight pull of resistance once you pass the tension mechanism.
When Your Thread Shreds or Breaks
Is your top thread snapping constantly? Or does it look fuzzy and frayed as it comes off the spool? This is another classic that points to a few usual suspects. Before you throw your hands up, just stop and check these three things.
First, look at your needle. A dull, bent, or nicked needle is the number one cause of shredded thread. Even a burr so small you can't see it will catch and tear the thread fibers with every stitch. Remember, needles are disposable! A good rule of thumb is to pop in a new one after every 8-10 hours of sewing.
Next, think about the thread itself. The global sewing thread market is huge, with recent valuations soaring between $2.37 billion and $3.85 billion, which tells you a lot about the sheer variety and quality available. If you're using that dusty spool you found in your grandma's old sewing box, it might just be too old and brittle. Poor-quality thread simply can't handle the stress. You can learn more about the scale of the sewing thread industry and how quality impacts performance.
Finally, glance at your tension dial. If the upper tension is cranked up too high, it's putting too much strain on the thread, eventually causing it to snap.
A little diagnostic tip from my own experience: if the thread breaks right down at the needle, the problem is almost always the needle or the thread quality. If it snaps higher up, closer to the spool, your tension is likely too tight or the thread is snagging on something along its path.
Why Your Stitches Are Skipping
Skipped stitches—those frustrating little gaps in your otherwise perfect seam—are a dead giveaway that the needle and the bobbin hook aren't playing nicely together. They're failing to connect and form a proper lockstitch.
The solution? You guessed it: re-thread the whole machine from scratch.
When you start seeing skipped stitches, run through this quick mental checklist:
- Change the Needle: Always start here. It's easy and often solves the problem instantly. Make sure you're also using the right type of needle for your fabric, like a ballpoint for knits or a sharp for crisp woven cottons.
- Re-thread Everything: Don't just re-do the top thread. Take the bobbin out, too. Methodically re-thread the entire machine, paying close attention to every guide and pathway.
- Check Bobbin Placement: Is your bobbin in the right way? Some machines need it to spin clockwise, others counter-clockwise. Putting it in backward is a very common reason for skipped stitches.
Here’s a quick-reference table to help you diagnose these issues even faster.
| Solving Common Threading Problems | | :--- | :--- | :--- | | Problem | Most Likely Cause | How to Fix It | | A giant tangled nest of thread on the bottom of the fabric ("bird's nesting"). | No tension on the upper thread. This is usually because the presser foot is still up or the thread isn't seated in the tension discs. | Lift the presser foot. Completely un-thread and re-thread the upper part of the machine, making sure the thread clicks into the tension discs. | | The top thread keeps breaking or looks frayed and fuzzy. | A dull, bent, or incorrect needle. It could also be old/low-quality thread, or the upper tension is set too high. | Start by changing the needle. If it persists, try a different, higher-quality spool of thread. Finally, slightly lower the upper tension setting. | | The machine is creating gaps in the seam line (skipped stitches). | The needle and hook are failing to connect. This is often caused by an old/incorrect needle or improper threading. | Change the needle first. Then, re-thread both the top thread and the bobbin from the very beginning. Double-check that the bobbin is inserted correctly. | | The stitches look uneven, loopy, or messy on one side. | The tension is unbalanced. Loops on the bottom mean the top tension is too loose; loops on top mean the bobbin tension is too loose (or top is too tight). | First, re-thread the top thread to rule out any issues there. Then, adjust the upper tension dial slightly (a lower number for looser, a higher number for tighter) and test on a scrap. |
Tackling these common problems methodically will help you get back to sewing in just a few minutes. Mastering how to thread a sewing machine isn't just about the initial setup; it's also about learning to spot and fix these simple but disruptive issues that pop up along the way.
Pro Tips for Specialty Threads and Fabrics
Once you’ve got the basics down, you can start tackling those more ambitious materials you've been dreaming of. Working with specialty threads and fabrics isn't necessarily harder, but it does mean you have to be a little smarter about your setup. This is where you really start to level up your skills.
Take slippery rayon or delicate silk threads, for instance. They behave completely differently from your workhorse polyester and demand a much lighter touch. For fine fabrics like chiffon or organza, I almost always switch to a smaller, sharper needle—a size 70/10 Microtex is my go-to. It pierces the fabric cleanly without causing those dreaded snags and pulls.
Handling Heavy-Duty and Tricky Threads
Now, let's talk about the other end of the spectrum: thick, heavy-duty thread for things like denim or canvas. If you've ever had your top thread constantly snap on a tough project, you know how frustrating it can be. The fix is usually a few simple tweaks.
- Go for a bigger needle. You need something more robust to punch through dense fabric without bending or breaking. A 90/14 or 100/16 Jeans needle is designed for exactly this.
- Keep your bobbin thread normal. This might sound counterintuitive, but using your regular all-purpose thread (like a 40 or 50 wt.) in the bobbin creates a much more balanced stitch. The heavy thread on top does the visible work, while the standard thread on the bottom keeps things from getting too bulky.
- Ease up on the gas pedal. Seriously, just slow down. Trying to race through thick layers with heavy thread is the number one reason it breaks.
My secret for metallic thread? Those beautiful, sparkly threads are notorious for shredding and snapping. The trick is to use a "Metallic" or "Topstitch" needle. They have a much larger eye and a special groove that protects the fragile thread, letting it glide through without a fight.
The sheer variety of threads available is staggering. It's no wonder, considering the Asia-Pacific region alone makes up roughly 75% of the market share in the sewing thread industry, supplying the world's massive textile production. You can read more about the global sewing thread market on Proficient Market Insights. Learning to make these small adjustments is what will take your sewing from looking homemade to looking truly professional.
Tackling Common Threading Troubles
You've followed all the steps, but something's still not quite right. Don't worry, it happens to all of us! Let's walk through a few of the most common snags you'll run into and how to fix them without the headache.
Why Does My Thread Keep Breaking?
Ah, the dreaded thread snap. It’s frustrating, but it's usually an easy fix. More often than not, the culprit is tension. If your upper thread tension is cranked up too high, it puts too much strain on the thread, causing it to break mid-seam.
But before you start fiddling with dials, check a couple of other things first. Is your needle dull, bent, or the wrong type for your fabric? A damaged needle is a primary cause of shredding and snapping. And don't forget the thread itself—old, dusty, or cheap thread can become brittle and just can't handle the stress of stitching.
Does It Really Matter Which Way My Bobbin Spins?
Absolutely! This little detail is a game-changer. Getting the bobbin direction wrong is one of the top reasons for those ugly thread nests on the bottom of your fabric.
Here's the general rule of thumb:
- For most top-loading (drop-in) bobbins, the thread needs to come off the bobbin in a counter-clockwise direction. Think of the letter 'p' for perfect.
- For front-loading bobbins that go into a separate metal case, the thread typically unwinds in a clockwise direction.
When in doubt, your machine's manual is your best friend. It will show you the exact direction for your specific model.
A Quick Word of Caution: Bobbins might look the same, but they are not universal. It’s so important to use only the bobbins specifically designed for your machine. Using a bobbin that's even a millimeter off can lead to skipped stitches, tension nightmares, and can even damage your machine over time.