


How to Sew Curved Seams for a Perfect Finish
Let's be honest, if you've ever felt a little intimidated by a princess seam or a set-in sleeve, you're in good company. Sewing curves can seem tricky at first, but it's a skill that truly separates a homemade project from a professional, handmade garment. It's an absolute game-changer.
Why Mastering Curved Seams Elevates Your Sewing
The secret to clothing that actually fits and flatters the human body? It's all in the curves. Think about those beautiful, sweeping necklines, comfortable armholes, and bodices that gently shape the waist. Without well-sewn curves, our projects would be boxy and stiff. This technique is what gives clothing structure, style, and comfort that moves with you, not against you.
Nailing this skill opens up a whole new world of more complex and rewarding patterns. It's a cornerstone of garment construction with a surprisingly rich history. The technique really hit its stride in Victorian fashion around the 1880s with the rise of "princess seams," which relied on long, elegant curves to create that classic hourglass silhouette.
More Than Just Garments
This isn't just about sewing new clothes from scratch, either. For anyone interested in sustainable fashion, it's an essential skill for upcycling and repurposing old clothes. Taking a garment apart and putting it back together in a new way almost always involves creating new seams and new shapes.
The ability to sew a perfect curve allows you to deconstruct an old pair of jeans and reshape them into a stylish bag or transform a boxy t-shirt into a fitted top. It’s about seeing potential in old fabric and having the technical ability to bring your creative vision to life.
In the end, learning how to handle curves is one of the most empowering things you can do for your sewing. It helps you:
- Achieve a better fit: You'll be able to create clothes that actually hug your body's natural lines.
- Expand your project scope: Suddenly, those advanced patterns in your stash won't seem so daunting.
- Refine your finish: Your finished garments will look polished, clean, and expertly crafted from the inside out.
Getting Your Toolkit Ready for Sewing Curves
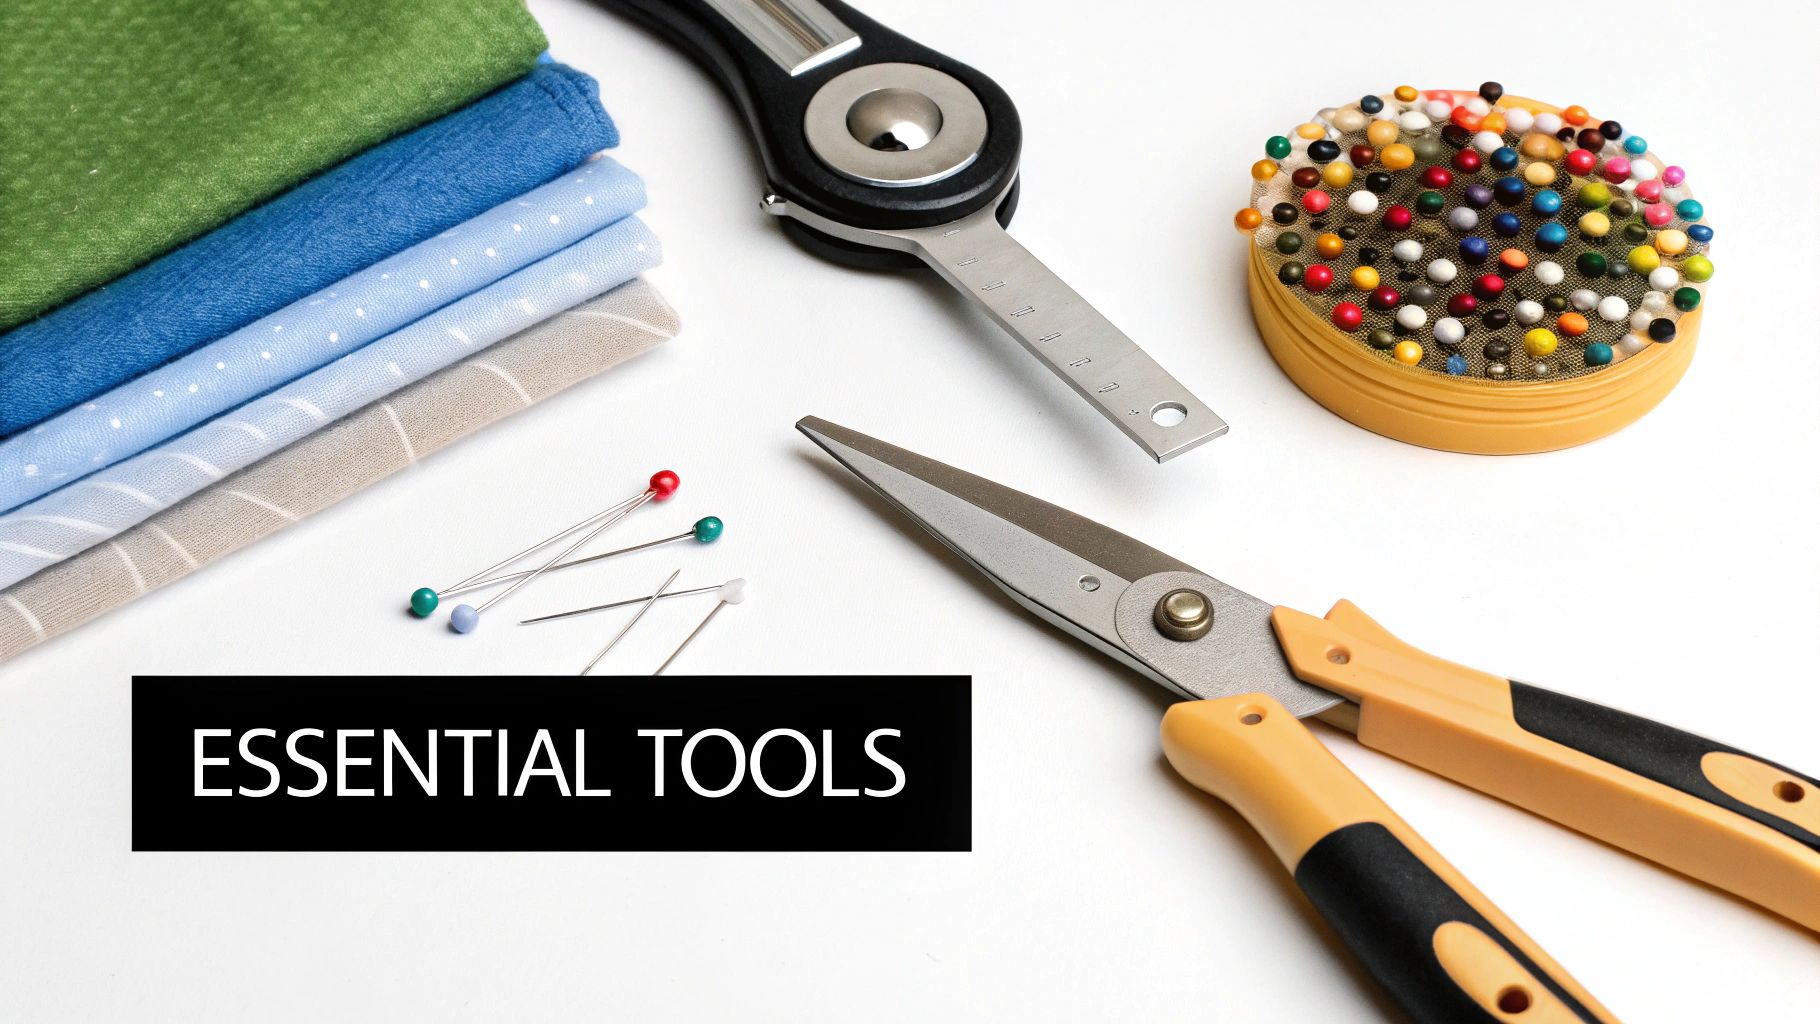
Before you even think about making that first stitch, let's talk about setting yourself up for success. Having the right tools on hand can be the one thing that separates a puckered, frustrating seam from a beautifully smooth, professional-looking curve. Your sewing machine and thread are a given, but mastering curves is really about the smaller tools that offer you precision and control.
It all starts with a clean cut. A pair of seriously sharp fabric shears is the absolute minimum for getting crisp edges. But if you really want to level up your accuracy, a rotary cutter and a self-healing mat are a game-changer. They let you slice through fabric with a steady hand, preventing the material from shifting or stretching out of shape.
Tools for Precision and Preparation
Once your pieces are cut, the next hurdle is keeping them perfectly aligned while you sew. This is where a generous supply of fine, sharp pins becomes your best friend. I highly recommend silk pins or extra-fine glass head pins—they slide into the fabric without leaving big holes or snagging the weave. Trust me, you'll use more of them than you think to secure the seam allowance properly.
A few other helpers will make your life much easier:
- Pattern Weights: Essential for holding down pattern pieces, especially on slinky or delicate fabrics. They keep everything flat and in place while you cut.
- Tailor’s Chalk or Fabric Pen: You need a reliable way to transfer all those important notches and dots from your pattern. These marks are your guideposts for matching the curves.
- Stiletto or Awl: Think of this as a tiny, precise extension of your finger. It's perfect for guiding fabric right up to the needle without putting your fingers in harm's way.
Key Takeaway: Having the right tools isn't about being fussy—it's about building a solid foundation. When your tools do their job, you can stop fighting your materials and focus on the real skill: guiding the fabric to create that perfect curve.
A good toolkit simplifies the process, but nothing beats practice. If you're looking to build your confidence from the ground up, our collection of free sewing lessons is a great place to start before diving into trickier projects.
Here's a quick-glance table of the most important tools and why they're so helpful for this specific task.
Essential Tools for Sewing Curves
| Tool | Primary Function for Curves | Pro Tip |
|---|---|---|
| Rotary Cutter & Mat | Provides an exceptionally smooth, accurate cut without lifting or distorting the fabric. | Use a smaller 28mm rotary cutter for tighter curves; it offers more control and a tighter turning radius. |
| Fine Pins (Silk Pins) | Secures curved seams without shifting the fabric layers or leaving permanent holes. | Pin perpendicular to the seam allowance. This makes them easier to remove as you sew and holds the layers more securely. |
| Stiletto or Awl | Safely guides the fabric under the needle right up to the last moment for maximum control. | Invaluable for easing in fabric around a curve, preventing tiny puckers right at the stitch line. |
| Marking Tool | Accurately transfers crucial pattern markings (notches, dots) needed to align curves. | Choose a water-soluble or air-erasable pen so your marks disappear completely after you're done. |
Having these specific items in your sewing box will make a noticeable difference in the quality and finish of your curved seams.
Getting Your Fabric Ready for Perfect Curves
The secret to a beautiful curved seam doesn’t start at your sewing machine. It actually begins with careful prep work. Getting this right is what turns a potentially frustrating task into a smooth process, preventing the pulling and puckering that can ruin a garment.
First things first, let's get those two fabric pieces—the concave (inner curve) and the convex (outer curve)—aligned. Lay them with their right sides together. Your absolute priority here is to match up any pattern markings. Think of notches, dots, and center marks as your non-negotiable guides. Line those up before you even think about the rest of the raw edges.
The Art of Pinning
When you're pinning a curve, don't be shy. This is one of those times where more is definitely more. Your pins are what will stop the fabric layers from shifting while you sew.
I always place my pins perpendicular to the seam allowance, with the heads pointing out. This simple trick lets you sew right up to the pin before pulling it out, giving you maximum stability right where you need it.
Fine, sharp pins are your best friend here, as they'll glide through the fabric without causing snags. If you find standard pins a bit fiddly, you might love the colorful Easy Grasp Pins by Dritz. They're much easier to handle and can make the whole process feel less like a chore. The goal is just to ease the fabric together so it lays flat, even if the raw edges don't look perfectly aligned yet.
Pro Tip: As you pin, gently work the fabric so the raw edges meet. The concave piece will need to stretch just a little, while the convex piece compresses. Focus on easing the fabric evenly between your main alignment points, like your notches.
When to Bring in Staystitching
For fabrics that are delicate or a bit shifty, staystitching is a game-changer. It’s simply a line of regular stitches sewn just inside the seam allowance on a single layer of fabric. This acts as a stabilizer, preventing that curved edge from stretching out of shape as you work with it.
You'll definitely want to staystitch:
- Necklines: A must, especially for anything cut on the bias or made from a loose weave.
- Armholes: These curves are notorious for distorting as you handle the bodice pieces.
- Any bias-cut curve: Fabric cut on the bias has a natural, beautiful stretch, but staystitching helps you control it.
Taking a few extra minutes to align, pin generously, and staystitch where needed builds a stable foundation. Honestly, this careful preparation is the most effective way to sew smooth, professional, and pucker-free curves every single time.
Stitching Your Curved Seam with Control
Alright, with your pieces prepped and pinned, it's time to head to the machine. The secret to a beautiful curved seam isn't speed—it's all about slow, deliberate control. If you rush this part, you'll fight the fabric the whole way. Just take a breath, lower your presser foot, and focus on guiding your project.
I always recommend shortening your stitch length just a bit for curves, somewhere in the 2.0mm to 2.2mm range. Those smaller stitches give you more precision around the bend and make the seam stronger. Once you start, your only job is to guide the fabric gently with your fingertips. Let the machine's feed dogs do the pulling; if you start pushing or pulling the material yourself, you're pretty much guaranteed to get puckers and stretched-out seams.
This infographic breaks down the essential prep work that leads to a perfect stitch.
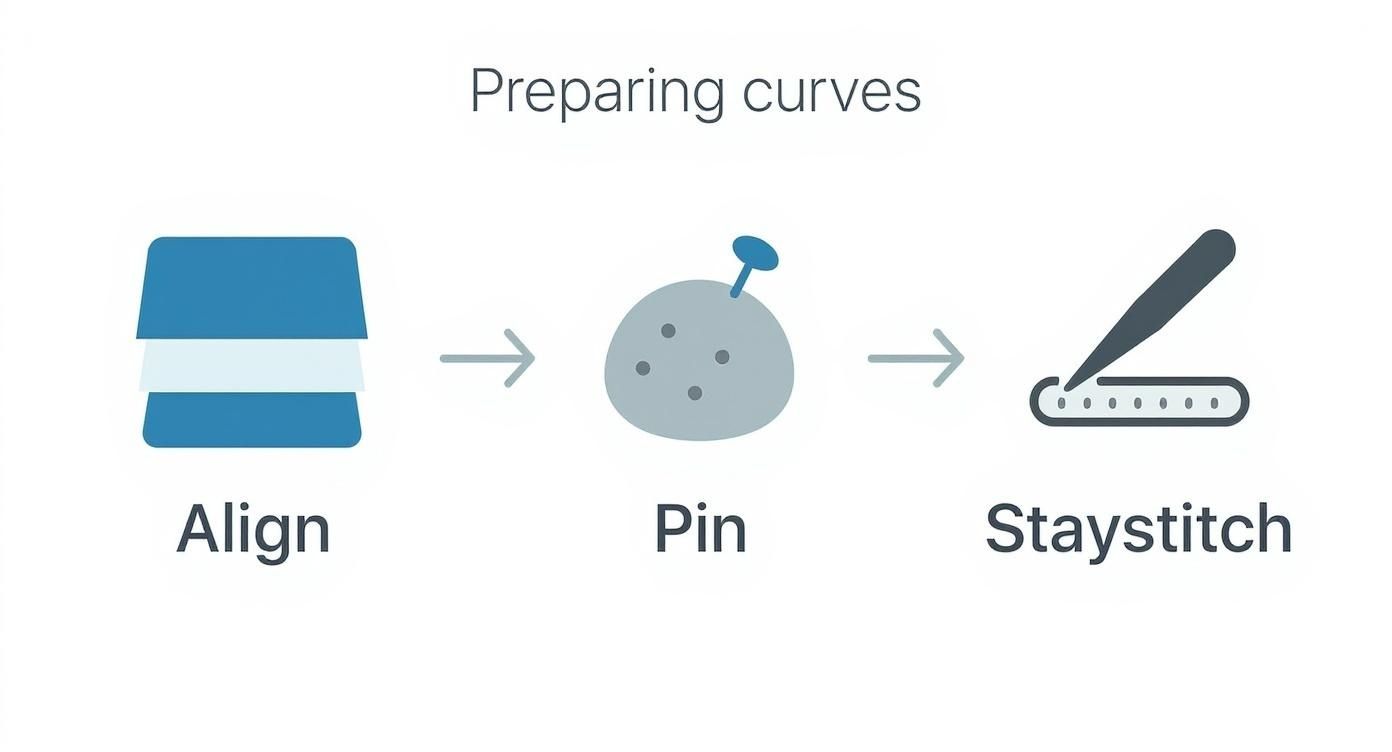
As you can see, getting the stitching right starts with getting the alignment, pinning, and staystitching right first.
Navigating the Curve
When you get to the curviest part of the seam, slow way down. I often sew a few stitches, then stop with the needle down in the fabric. This acts as a pivot point, letting you lift the presser foot and slightly reposition the fabric to keep it aligned without losing your spot. Think of it like easing a car around a bend, not cranking the wheel for a sharp turn.
Here's a tip that helps a lot of people: try sewing with the concave (the inward, "caved-in") curve on top. This positioning lets you see exactly how the smaller piece is easing into the larger convex piece underneath, giving you much better control.
And hey, if you make a mistake, it’s not the end of the world. We all do. A good dual-ended seam ripper and thread remover is your best friend here, letting you undo stitches quickly without wrecking your fabric.
Key Takeaway: Sewing curves is an exercise in patience. Let the machine set the pace, use the "needle down" position to your advantage for pivots, and focus on guiding, not forcing, the fabric.
This mindful approach might feel tedious at first, but it’s what creates that polished, professional finish. And you're not alone if you find it tricky. Around 67% of sewists say they struggle with curves, and these seams can easily add 30%-50% more time to a project compared to straight ones. Mastering them is a huge step up in your sewing game. You can find more technical details about seam construction on Wikipedia).
5. Clip and Notch Your Seam Allowances
Alright, you've stitched your curved seam. You might feel like the hard part is over, but this next step is the real secret to getting that polished, professional look. If you skip it, your beautiful curve will pull, pucker, and refuse to lie flat when you turn it right side out.
This is where clipping and notching save the day. They sound similar, but they do opposite jobs for the same reason: to help the seam allowance behave itself.
Think of an inner curve, like a neckline. When you turn it, that sewn edge has to stretch and spread out to become longer. Clipping gives it the room to do that. On the flip side, an outer curve on something like a collar needs to get smaller and compress. Notching removes all the extra fabric that would otherwise create ugly lumps.
When to Clip an Inner Curve
Any time you have an inner curve (also called a concave curve), you need to clip it. We're talking necklines, armholes, or even decorative scalloped edges. It's a simple process, but it definitely requires a steady hand.
Grab a sharp pair of small scissors and make a series of little straight cuts into the seam allowance. You need to get close, but not too close—stop about 1/16th of an inch (1-2mm) from your stitches. Seriously, be careful not to snip your beautiful sewing!
The sharper the curve, the closer together your clips need to be. For a gentle curve, they might be an inch apart, but for a tight one, you might need them every ¼ inch.
I find that a pair of really sharp-tipped scissors makes all the difference here. Some of my students swear by a dedicated hook and snip tweezer set because it gives them incredible precision for making those tiny, accurate cuts without accidentally ruining the seam.
How to Notch an Outer Curve
Now for the outer, or convex, curves. You'll want to notch these. This technique is your best friend for things like collar points, rounded pocket flaps, and cuffs.
Notching just means cutting small, V-shaped wedges out of the fabric in the seam allowance. This gets rid of all the bulk that would otherwise bunch up and create a mess when you turn and press the piece.
Space your notches about every ½ inch or so. Just like with clipping, place them closer together on tighter curves. And again, cut close to the seam but never, ever through it.
My favorite way to remember this: "Clip into a cave, notch off a mountain." It’s a silly little phrase, but it works perfectly. It helps you instantly recall whether to cut into a concave curve or cut wedges out of a convex one.
Pressing Your Curves for a Flawless Finish
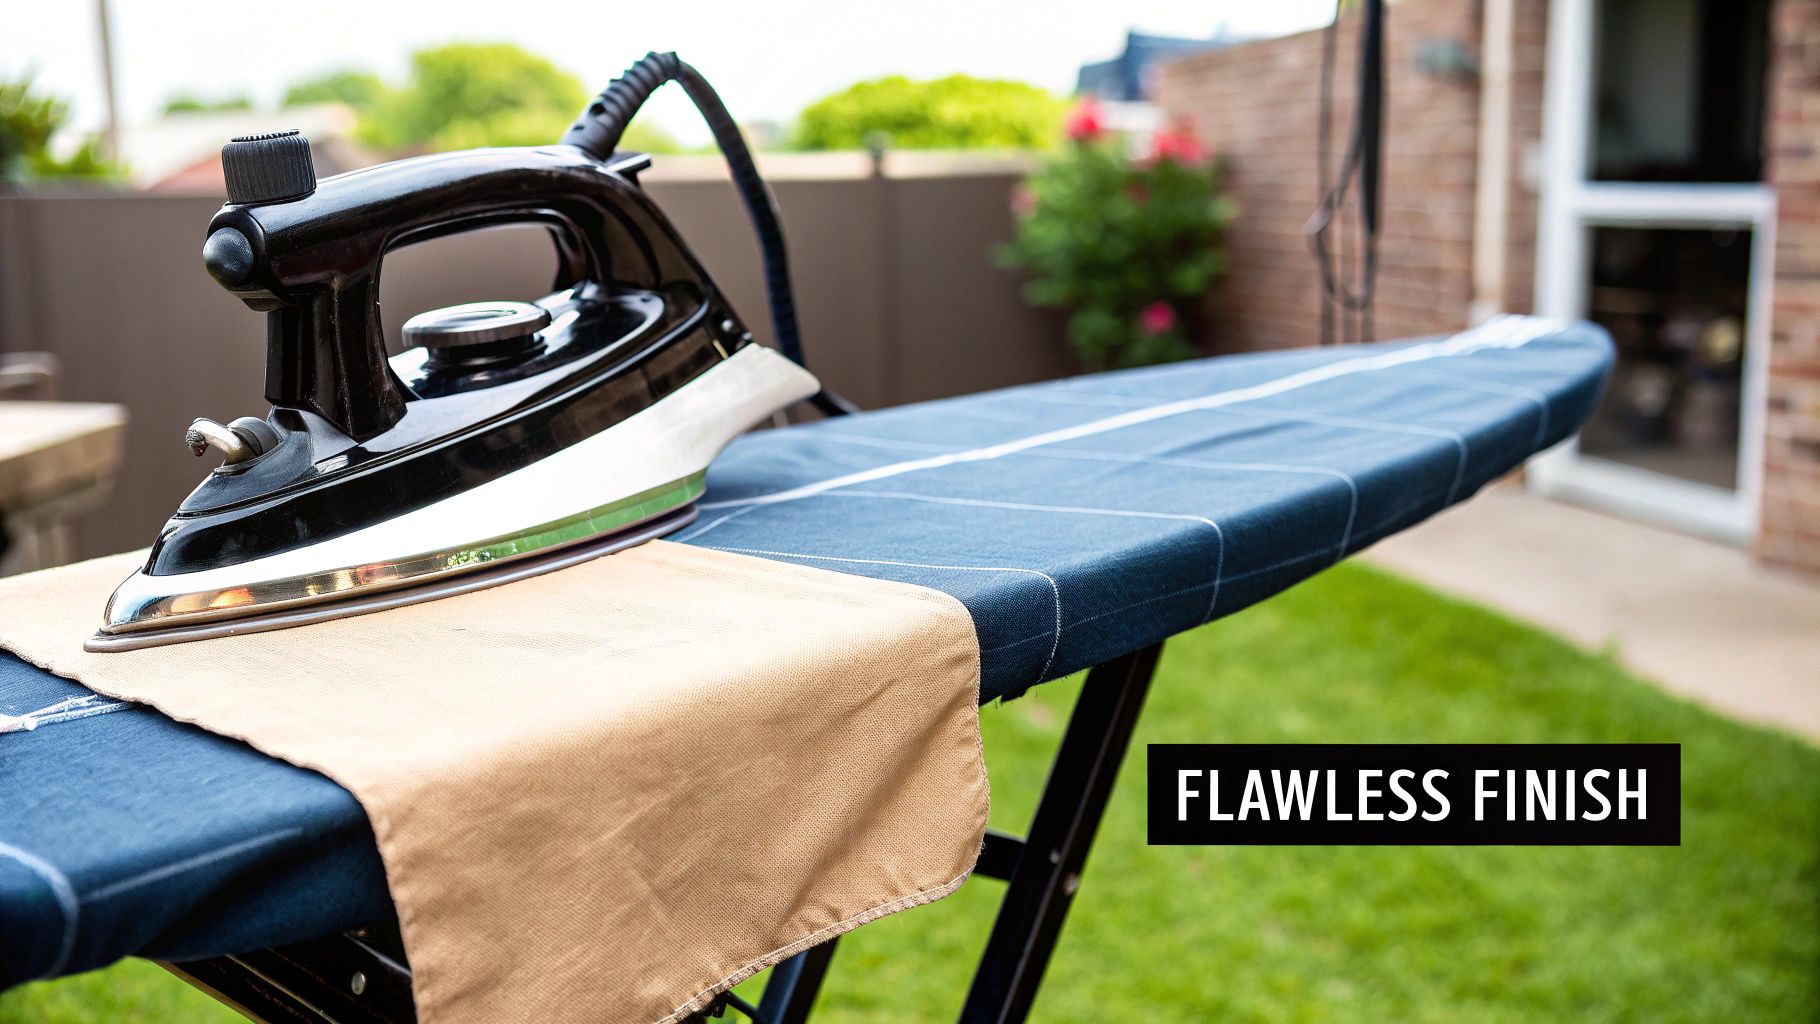
This final step is what truly separates good sewing from great sewing. A lot of people think pressing is the same as ironing, but it's a completely different technique. Instead of sliding the iron back and forth, you’ll be using a gentle up-and-down motion. For curved seams, this is the only way to get that crisp, professional finish we're all after.
The secret weapon here is a tailor's ham. It’s basically a firmly stuffed cushion that mimics the body’s natural curves. If you try to press a curved seam on a flat ironing board, you’ll just flatten out the beautiful shape you worked so hard to create. A ham gives your seam the right support.
The Correct Pressing Technique
First things first, press the seam flat, exactly as you sewed it. This crucial step is called setting the stitches, and it helps meld the thread right into the fabric fibers. You'll find it makes the seam stronger and much more stable.
Once the stitches are set, open up the seam allowance and drape it over your tailor's ham. Now, using just the tip of your iron, gently press the seam open along the curve. This is where a small, nimble iron really shines; something like the Oliso M3 Pro Mini Iron gives you the precision you need for tight spots.
This two-step process—setting the stitches first, then pressing the seam open over a ham—is the secret to a flawless curve. It ensures the seam lies perfectly flat and retains its intended shape without any pulling or distortion. This final touch makes all the difference.
Ready to elevate your next project? Explore the high-quality fabrics, notions, and patterns available at Famcut.com and find everything you need for your sewing journey at https://famcut.com.