


A Beginner's Guide on How to Quilt by Hand Stitch
Hand quilting is the art of stitching together three layers of fabric—a quilt top, the soft batting in the middle, and a backing—all with just a needle and thread. You’ll use a simple running stitch, often with a gentle rocking motion, to bind these layers. This creates that classic textured look and makes the quilt durable. It’s a craft that’s far more about rhythm and patience than just sewing.
Rediscovering the Art of Hand Quilting
Welcome to the incredibly rewarding world of hand quilting. In our fast-paced, automated lives, this craft is a chance to truly slow down and connect with a tradition that’s centuries old. It’s about turning simple fabric into a cherished heirloom, one deliberate stitch at a time.
More and more people are rediscovering this almost meditative art form, and for good reason. There’s a special kind of satisfaction that comes from creating something so beautiful with your own two hands. Think of this guide as your roadmap—I’ll walk you through everything from choosing the right needle to tying off that final knot, sharing practical tips I’ve learned over the years to help make your first project a joy.
Why Hand Quilting Endures
The real charm of hand quilting is in its simplicity and the personal touch you can’t get any other way. You don’t need a fancy, expensive machine. All it takes is a few basic tools and the desire to learn, which is a huge part of why it's remained so popular for so long.
Hand quilting is more than a technique; it’s about weaving a story into fabric. Each stitch is a moment of intention, and the finished quilt becomes a beautiful record of your time, care, and creativity.
The quilting world is thriving. The global market, valued at around US$5.32 billion, is expected to keep growing, largely because people are craving handmade, artisanal goods again. It’s a clear sign that we value the authenticity that only hand stitching can bring.
What Makes a Quilt a Quilt
Before you dive in, it helps to know what makes a quilt, well, a quilt. While a quilt and a comforter both keep you warm, how they're made and what they're for are quite different. Understanding the fundamental differences between a comforter and a quilt will clarify the unique three-part structure you’re about to create. Every true quilt is a "sandwich" of these three layers:
- The Quilt Top: This is the star of the show—the decorative, often pieced, top layer.
- The Batting: This is the fluffy middle layer that gives the quilt its warmth and loft.
- The Backing: This is the fabric on the bottom that holds everything together.
Your hand stitches are what will travel through all three layers, locking them into a single, cohesive piece of art.
Assembling Your Hand Quilting Toolkit
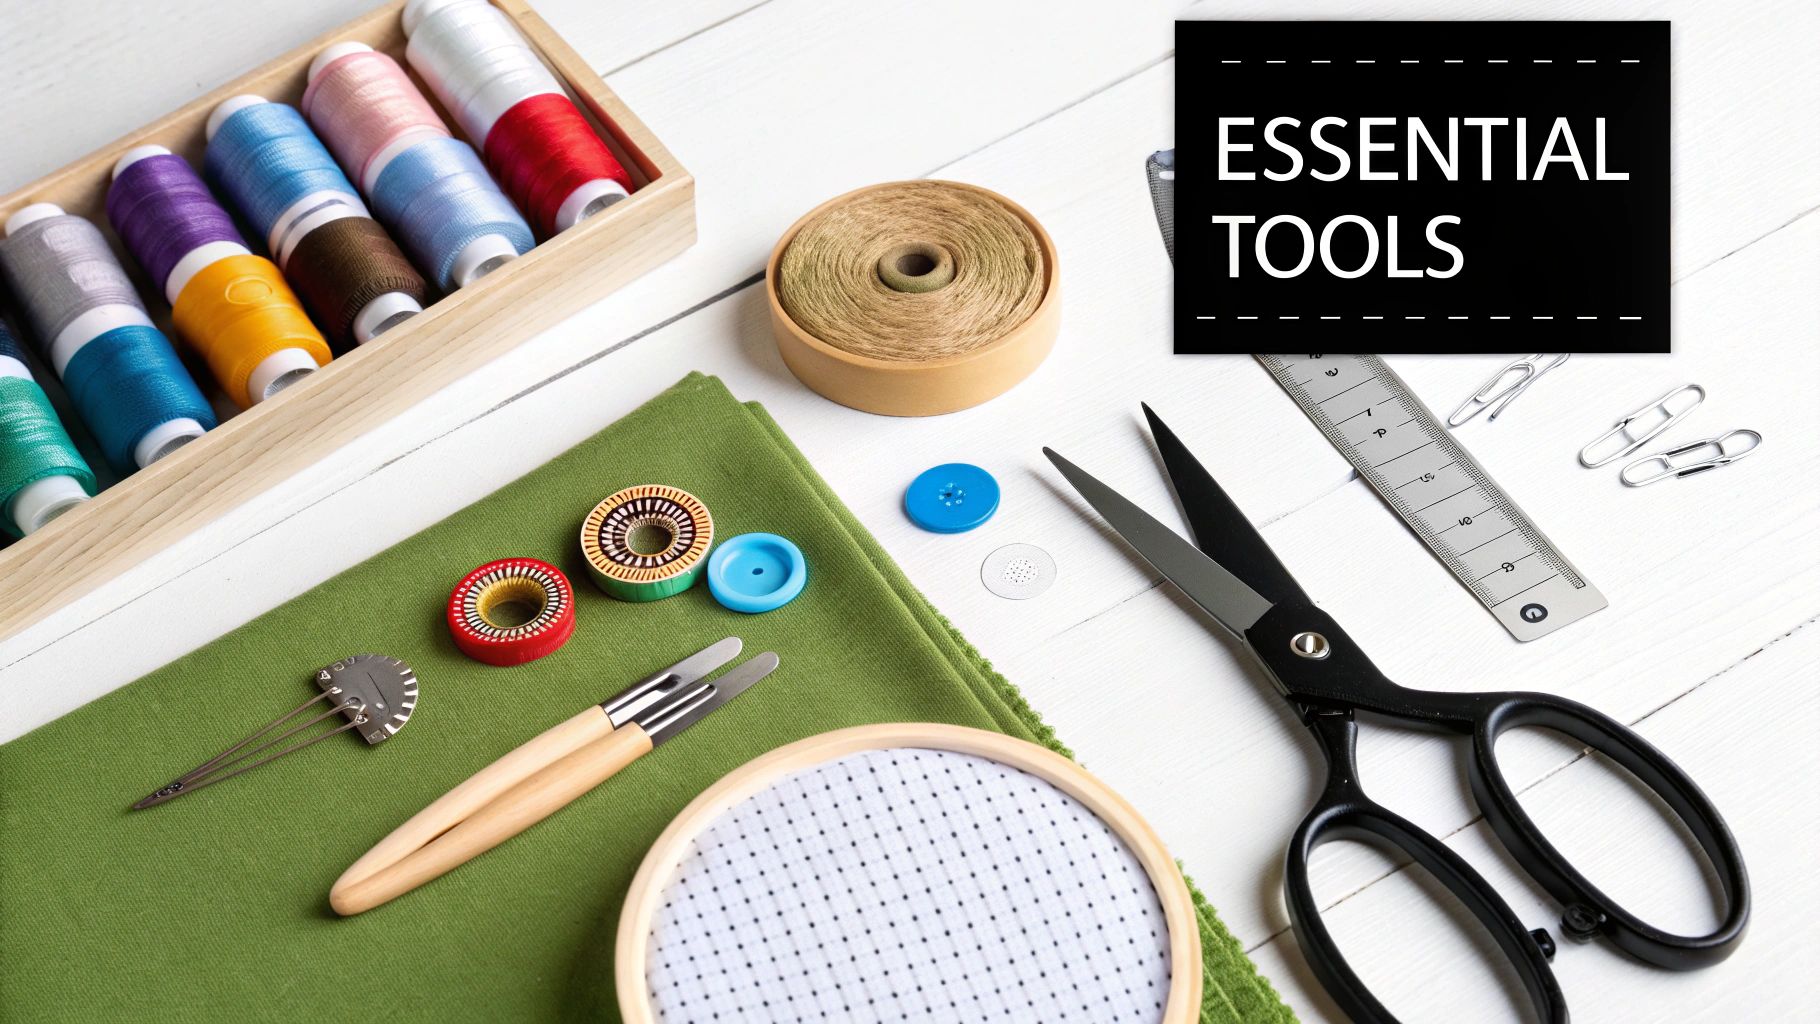
Before you can even think about making that first stitch, you've got to gather your gear. This isn’t about running out and buying the most expensive tools on the shelf. It’s about getting the right tools for the job—things that feel good in your hands and make the process a joy, not a chore.
Hand quilting is such a tactile, personal craft. The tools that become my old friends might not feel right to you, and that's perfectly okay. The goal here is to build a simple, effective kit that will help you learn without frustration.
Let's dive into what you'll need.
Needles, Thimbles, and Thread
These are the absolute, non-negotiable heart of your kit. The quality of these three little items will make or break your hand quilting experience, directly affecting everything from the look of your stitches to how sore your hands are at the end of the day.
Your needle is probably the most critical choice you'll make. Most seasoned hand quilters, myself included, swear by needles called "betweens." They’re short, fine, and typically come in sizes 8 through 12. That shorter shaft gives you incredible control for making those tiny, even stitches we all strive for. If betweens feel too fiddly at first, an embroidery needle is a fine substitute while you get the hang of it.
Next up: a thimble. Seriously, don't skip this. You’ll use it on the middle finger of your sewing hand to push the needle through the quilt sandwich, and it will save you a world of pain. They come in metal, plastic, and my personal favorite for beginners, leather. A leather thimble molds to your finger over time, offering great protection without feeling clunky.
And finally, the thread. You can't go wrong with a good 100% cotton thread, especially since you'll likely be working with cotton fabrics. Look for a spool that's specifically labeled for "hand quilting." This kind of thread is usually coated with a light glaze, which gives it extra strength and, most importantly, keeps it from tangling into a frustrating bird's nest.
Hoops, Fabric Markers, and Scissors
Once you have your core three, a few more tools will really set you up for success. These are the items that help you control your quilt and create a clean, professional-looking design.
A quilting hoop or frame is a must. It holds the layers of your quilt taut, which is the key to preventing ugly puckers and keeping your stitch tension even. A 14-inch to 18-inch round hoop is a fantastic place to start—it gives you a generous work area but isn't so big that it becomes awkward to handle.
You'll also need a reliable way to draw your quilting lines onto the quilt top. There are a few great options here:
- Water-soluble pens are my go-to for light fabrics. They make a crisp, clear line that vanishes with just a spritz of water.
- Chalk pencils are perfect for marking on darker fabrics, and the lines simply brush away when you're done.
- Hera markers are a bit different; they don't leave any ink or chalk at all. Instead, this clever tool makes a temporary, sharp crease in the fabric that you can follow with your needle.
A small, sharp pair of scissors—often called thread snips—is invaluable. Keep them right by your side for trimming threads flush with the fabric. Dedicating one pair just for thread will ensure they stay sharp and precise for years.
I have one last trick up my sleeve: a small cake of beeswax or a tube of thread conditioner. Pulling your thread through it before you start stitching makes it glide through the fabric like a dream. This tiny step strengthens the thread and dramatically cuts down on knots.
To make getting started even easier, here’s a quick-glance table to help you put together your first kit.
Choosing Your Hand Quilting Starter Kit
This chart breaks down the essentials with some practical recommendations to get you quilting with confidence. Think of it as your personal shopping list.
| Tool | Beginner Recommendation | Why It's a Good Start | Pro Tip |
|---|---|---|---|
| Needles | "Betweens" in a mixed-size pack (e.g., 9-12) | Allows you to experiment and find the size that feels most comfortable and gives you the best control. | Start with a size 9 or 10—they're a great middle ground for learning. |
| Thimble | A soft leather thimble with a metal tip | Molds to your finger for comfort but still provides solid protection for pushing the needle. | Wear it around the house for a bit to get used to the feeling before you start sewing. |
| Thread | 100% cotton hand quilting thread in a neutral color (cream, grey, or white) | A neutral color will blend beautifully with most fabrics, and cotton thread wears well with cotton quilts. | A 200-300 yard spool is plenty for a small- to medium-sized project like a lap quilt or wall hanging. |
| Hoop | A 14-inch round wooden or plastic hoop | This size is manageable for most laps and provides a good-sized, taut work surface without being bulky. | Wrap the inner ring with cotton twill tape for a better grip on your fabric. |
| Marking Tool | A blue water-soluble fabric pen | The blue lines are easy to see on most light-colored fabrics and disappear completely with water. | Always test your marker on a scrap piece of your project fabric first to ensure it removes cleanly! |
| Scissors | A pair of 4-inch embroidery scissors or thread snips | Their small, sharp blades are perfect for getting close to the fabric to snip threads neatly. | Keep them with your project so they don't get used for cutting paper, which dulls the blades. |
Once you've gathered these key items, you’ll have a reliable, high-quality toolkit that will see you through many happy hours of stitching.
Getting Your Quilt Ready for Stitching
 Let me tell you a little secret I've learned over years of quilting: the most beautiful hand-stitched quilts aren't just about the stitching. The real magic happens before you even thread your needle. It's all in the prep work.
This is where you build your "quilt sandwich"—the perfect layering of your top, batting, and backing. Nailing this step is the difference between a joyful, relaxing time spent stitching and a frustrating battle with shifting fabric. Get this right, and everything else falls into place.
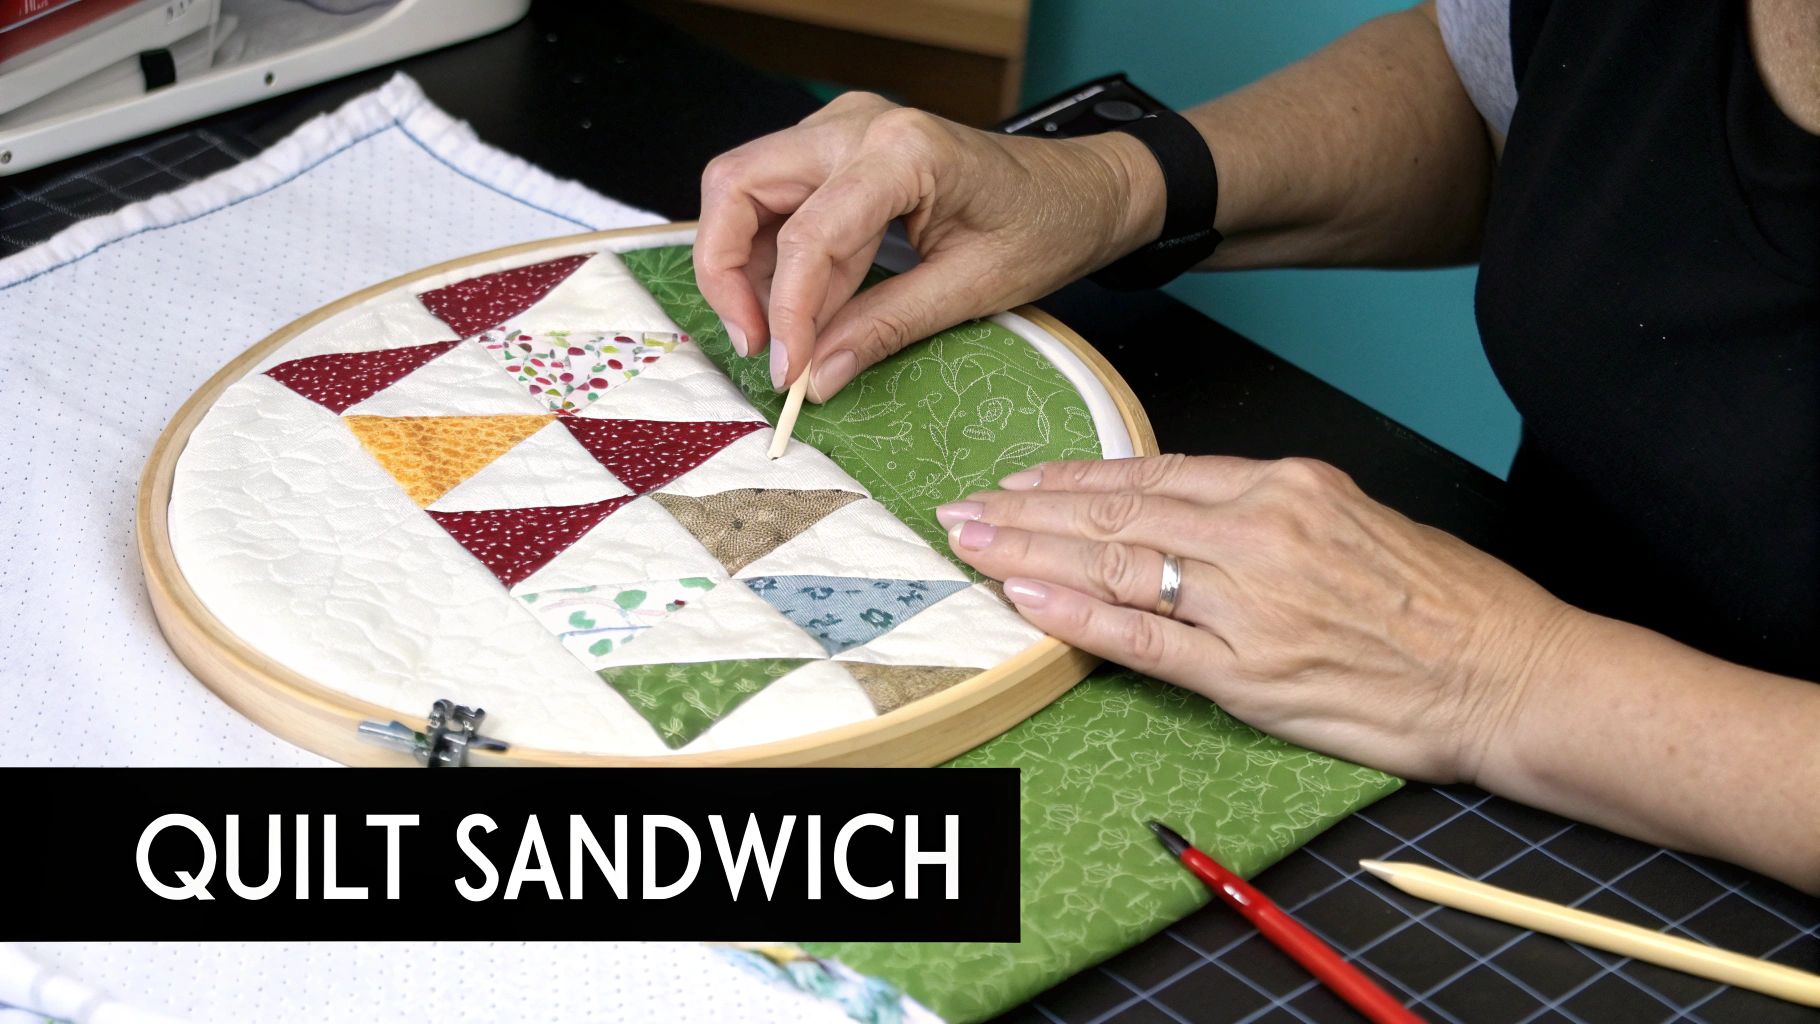
Building Your Quilt Sandwich
Think of it just like a real sandwich. You've got your beautiful quilt top, the fluffy batting in the middle, and the backing fabric holding it all together. Each piece has a job to do.
- The Quilt Top: This is the star of the show—the decorative, pieced layer you've already put so much love into.
- The Batting: This is what gives your quilt its warmth and personality. Cotton batting gives you that classic, flat, crinkly look after washing, while wool offers incredible loft and warmth. A cotton-poly blend is a fantastic, reliable choice that's both durable and easy to handle.
- The Backing: This is the foundation. A good rule of thumb is to cut your backing at least 4 inches wider and longer than your quilt top. This extra fabric gives you plenty of wiggle room when you’re basting and quilting.
To assemble your sandwich, find a large, clean space—the floor works great. Start by laying your pressed backing fabric down, wrong side facing up. Next, smooth the batting over it, getting rid of any bumps. Finally, place your quilt top on top, right side up. Your goal is to make every layer as smooth and wrinkle-free as possible.
The All-Important Step: Basting
Once your sandwich is layered perfectly, you need to hold it all together. That's where basting comes in. It’s a temporary hold that prevents the layers from slipping and bunching up while you do the real work of quilting. You've got a few solid options here.
Basting Methods at a Glance
| Method | Best For | Pros | Cons |
|---|---|---|---|
| Pin Basting | Beginners; most projects | Quick, adjustable, and reusable. Curved safety pins are a lifesaver. | Pins can feel bulky to stitch around. You'll need a lot of them. |
| Thread Basting | Large quilts; purists | Inexpensive and creates zero bulk. The stitches come out easily later. | It can be very time-consuming. Requires a big needle and thread. |
| Spray Basting | Small to medium projects | Super fast and gives you an even hold. No pins to navigate around. | You need a well-ventilated space; can get sticky if you overdo it. |
For anyone just starting out, I almost always recommend pin basting. It gives you the best mix of speed and security. Start pinning from the center of the quilt and work your way out to the edges, placing a pin every 4-6 inches.
Marking Your Quilting Design
With your quilt securely basted, it's time for the final prep step: marking your design. This is your stitching roadmap. Knowing how to transfer designs onto fabric is a key skill, whether you're planning simple straight lines or a more elaborate pattern.
Your marking tool is your best friend during this stage. Always test it on a scrap piece of your project fabric first to ensure the marks will disappear completely when you're finished.
I'm a big fan of water-soluble pens or chalk pencils because the lines are easy to see but wash away cleanly. Use a ruler for straight lines or stencils for fancier motifs. These guides will help you learn how to quilt by hand stitch with confidence, knowing every stitch will be exactly where you want it.
And just like that, your quilt is prepped and ready for its very first stitch.
Stitching It All Together
Alright, this is where the fun really starts. Your quilt sandwich is prepped and ready, and now it's time to add the stitches that will bring the whole thing to life. The soul of hand quilting is a beautifully simple stitch called the running stitch. Don't worry about making every stitch perfect right out of the gate. The real goal here is to find a comfortable rhythm and let your hands learn the motion.
It’s a lot less about intense concentration and more about muscle memory. This is the part of the process where many quilters, myself included, find a real sense of calm and connection to the work.
The Secret: Mastering the Rocking Motion
If you want to create those lovely, even stitches and finish your quilt in this lifetime, the "rocking motion" is your best friend. This single technique is what separates slow, laborious quilting from a smooth, efficient flow. Instead of making one painstaking stitch at a time, you'll learn to load several onto your needle at once.
It's a rhythmic push-and-pull that feels a little awkward at first but quickly becomes second nature. Here’s how it breaks down:
- Hand Placement is Key: Rest one hand on top of the quilt inside your hoop, and place your other hand directly underneath. The top hand is your guide, pushing the needle, while your bottom hand acts as a sensor, feeling for the needle's tip.
- The First Plunge: Using your thimbled finger, push the needle straight down through all three layers. Try to keep it as perpendicular as you can.
- Rock and Load: The moment you feel the needle tip touch your finger underneath, use that finger to push the tip right back up. As it comes up, rock the needle forward a short distance before it pokes back through the quilt top.
- Keep it Going: Continue this gentle, rocking movement. You'll be able to load two, three, or maybe even four stitches onto your needle before you have to pull the thread all the way through.
This fluid motion is what produces those classic, uniform stitches that are the hallmark of beautiful hand quilting. It takes a little practice to get the hang of it, I won't lie, but once it clicks, you'll see a huge improvement in both your speed and consistency.
Clean Starts and Invisible Finishes
Nothing makes a quilt look more professional than stitches that seem to appear from nowhere. We don't want clunky knots showing on the front or the back. The trick is a little bit of magic called a quilter's knot.
To start a new line of stitching:
- First, tie a small, simple knot at the very end of your thread.
- Insert your needle into the quilt top, but only through the top fabric and the batting. Do this about an inch away from where you actually want your first stitch to be.
- Now, bring the needle up right at your starting point. Pull the thread through gently until the knot is sitting on the surface of the fabric.
- Here's the magic part: give the thread a quick, firm tug. You'll feel a tiny "pop" as the knot pulls through the top layer of fabric and buries itself invisibly inside the batting.
When you're ready to end a line of thread, you'll basically do the same thing in reverse. Tie another small knot right up against the fabric, take one last tiny stitch, and pop that knot into the batting to hide it. Snip the thread flush with the quilt top, and you're done. No one will ever know.
Finding Your Groove
Over time, you'll find your own quilting signature. Some people fall in love with tiny, delicate stitches, while others prefer a bolder, more modern look. Both are beautiful. If you're just starting, it can help to mark your quilting lines. A water-soluble pen and a ruler can help you create neat 1/4-inch channels to follow, giving you a clear path.
A couple of pro tips: Hand quilting is tough on needles. Expect to go through 20-40 needles on an average-sized project as they dull. For areas that need more durability, like along the binding, try a simple backstitch. Just stitch forward about 1/8 inch, then go back 1/16 inch, and repeat. This builds a surprisingly strong seam that can get up to 10 stitches per inch. You can always check out quilting industry standards and other techniques as you get more comfortable.
Honestly, the best advice I can give you is just to relax. Don't death-grip the needle or hunch your shoulders. Hand quilting should feel good. Let that rocking motion become a natural rhythm, and soon you'll be lost in the process, creating beautiful, even stitches without even thinking about it.
Tackling Common Hand Quilting Hiccups
Even after years with a needle and thread, I still have those days. You know the ones—where your thread turns into a tangled mess or your stitches suddenly decide to go rogue. It’s frustrating, for sure, but trust me when I say these issues are almost always fixable. Let's walk through some of the most common snags and how to get back on track.
One of the biggest complaints I hear from new quilters is thread that knots up constantly. If this sounds familiar, the first thing to check is how long your thread is. Anything longer than about 18 inches is just asking for trouble. Also, don't skip the beeswax or thread conditioner! A quick swipe through one of those makes a world of difference in taming tangles.
Smoothing Out Uneven Stitches and Puckers
Are your stitches coming out all different sizes? Don't panic. This usually boils down to finding a consistent rhythm and getting your tension just right. Take a moment to notice your grip—are you holding the needle in a death grip? That tension travels from your hand right into your stitches, making them uneven. Try to relax and focus on that gentle, fluid rocking motion.
Puckered fabric is another classic quilting headache, and nine times out of ten, the culprit is your basting. If the layers of your quilt sandwich can shift around, they absolutely will, and you'll end up with little puckers on the surface.
- If you see puckering: Your basting pins are probably too far apart. I like to keep mine about a hand-width apart, which is roughly every 4-6 inches.
- If your stitches are uneven: Check the tension on your hoop. The fabric should feel taut, like the top of a drum, but not so tight that it's stretched out of shape. A floppy work surface makes consistent stitching nearly impossible.
This little diagram is a great reminder of the core motion you're aiming for. It really is the secret to building consistency.
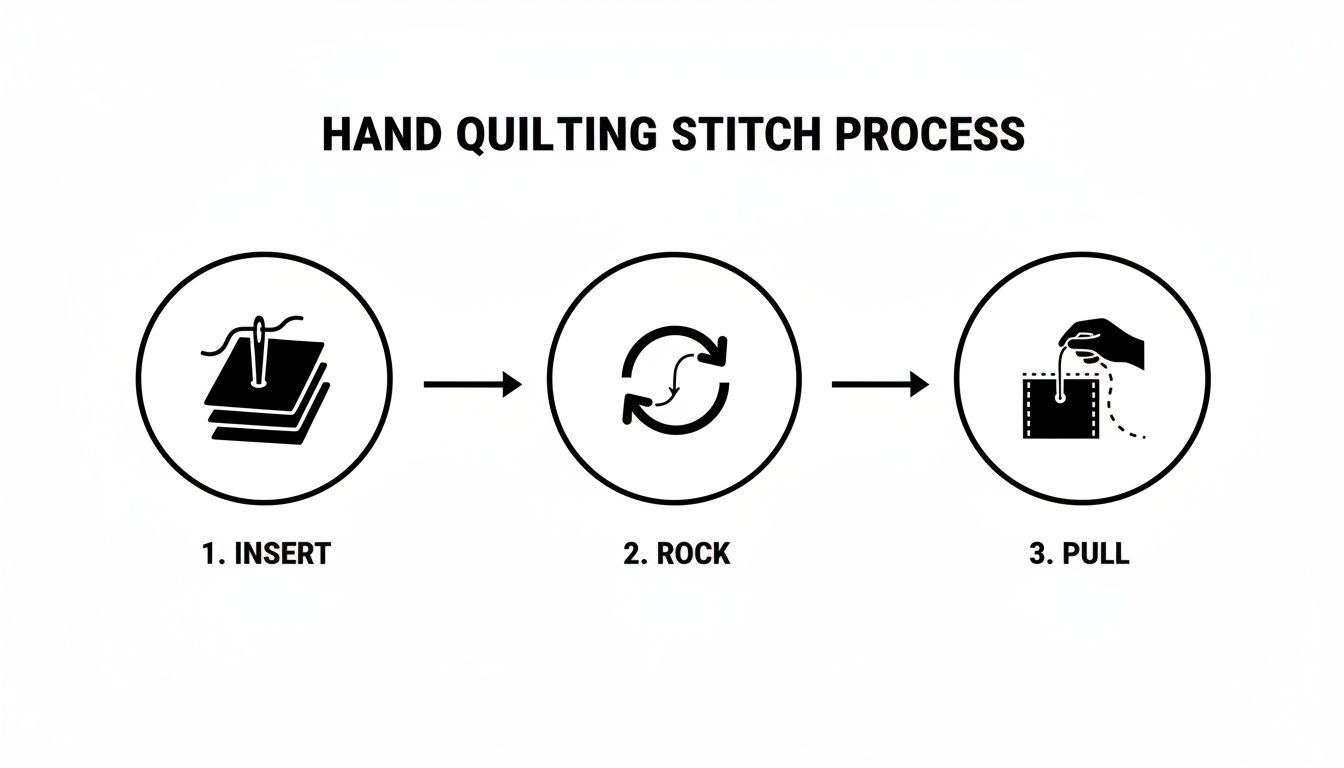
Once you get that "insert, rock, pull" motion into your muscle memory, you'll find your rhythm, and your stitches will become much more even and a lot faster, too.
Avoiding Aches and Pains
Hand quilting is meant to be a relaxing, meditative craft—not a painful one. If your hands are cramping or your fingers are sore, your body is telling you to make an adjustment.
Don't underestimate the power of a good thimble. Seriously. Trying to push a needle through three layers of fabric with a bare finger is a recipe for soreness. Find a thimble you love, whether it's metal, leather, or plastic. The right fit is everything.
And remember to take breaks! Get up, stretch your hands, and give your shoulders a good roll. Quilting is a marathon, not a sprint. By paying attention to these little details, you can keep the process joyful from the very first stitch to the last.
Finishing Your Quilt Like a Pro
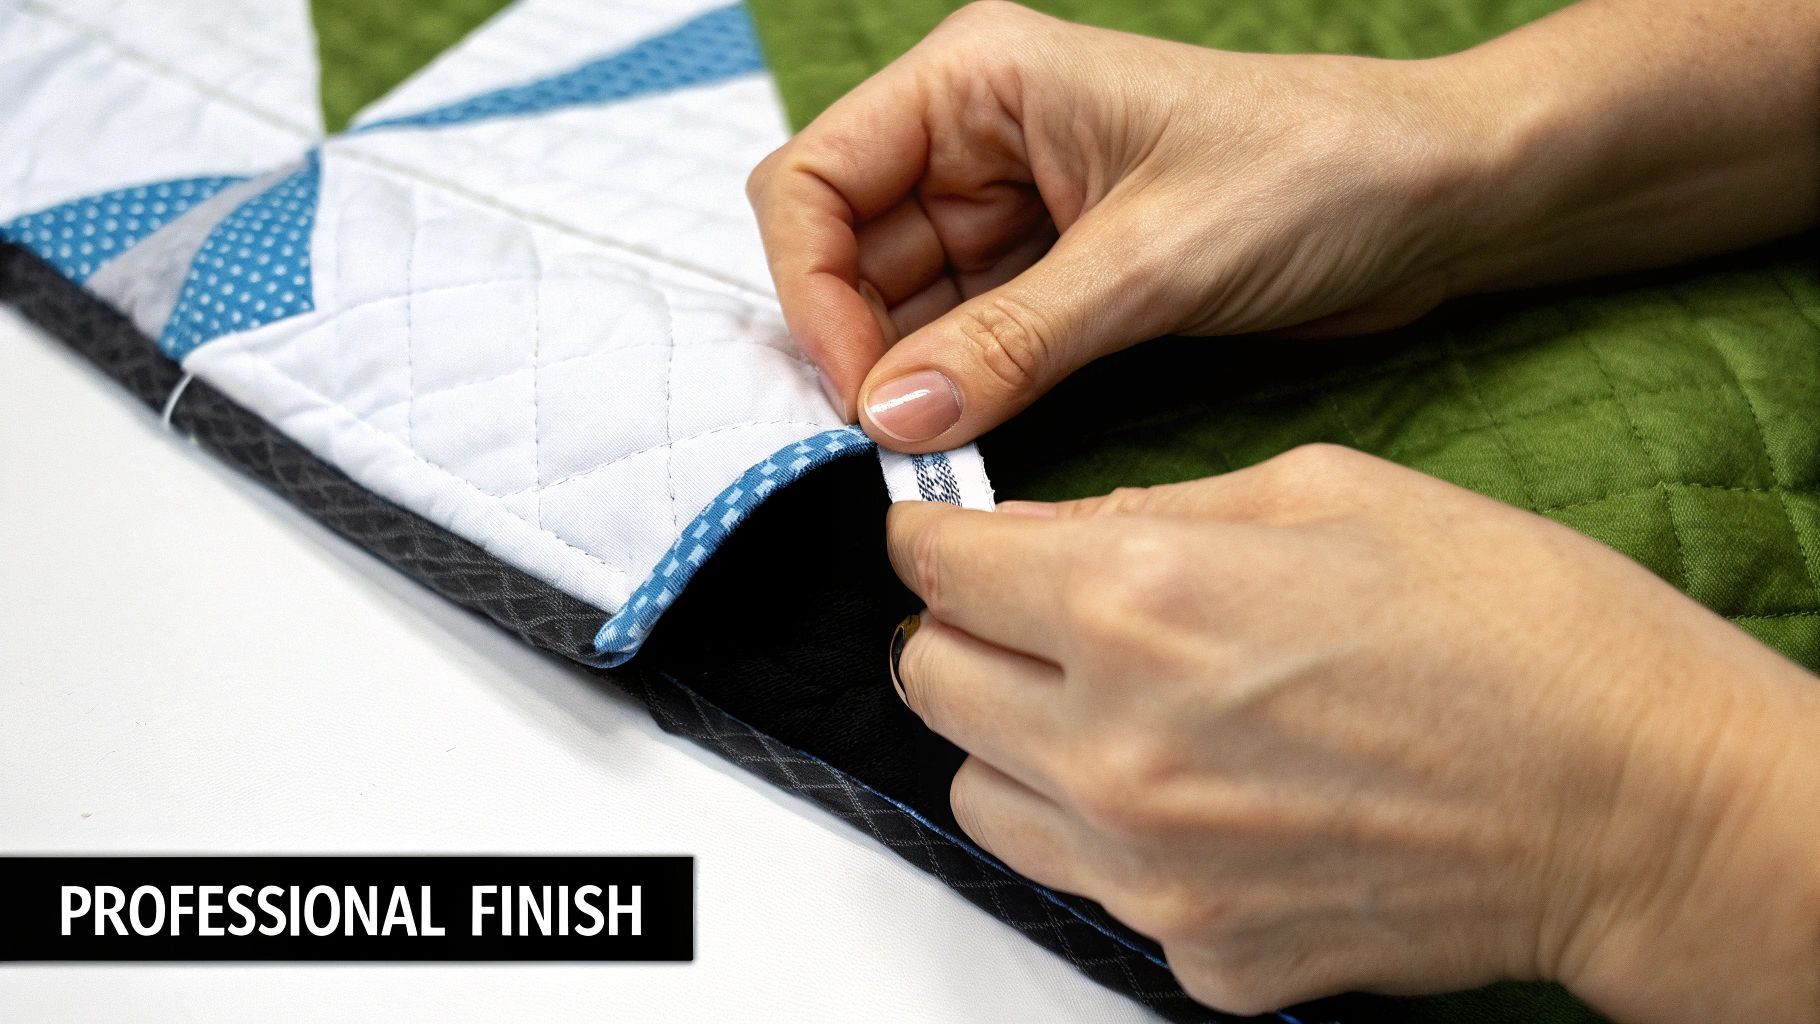
You’ve poured hours of love and care into every single stitch, and the finish line is finally in sight. These last few steps are what take your project from a lovely quilted top to a durable, polished masterpiece. This is your chance to frame your work and give it the professional edge it deserves.
The most important part of finishing is the binding. Think of it as the frame for your art—a narrow strip of fabric that wraps around the raw edges of your quilt sandwich. It not only protects the quilt from fraying but also provides a clean, beautiful border.
Creating and Attaching the Binding
First things first, you'll need to create long strips of fabric for the binding. I almost always cut mine 2.5 inches wide, which is a pretty standard size. You can cut these strips on the straight grain for most quilts, but if you have curved edges, you’ll want to cut them on the bias so they can stretch and bend smoothly.
Once your strips are cut, sew them together end-to-end to create one continuous piece. You’ll need it to be long enough to go all the way around your quilt, plus about 10-12 extra inches to give you room to join the ends neatly.
Next, press this long strip in half lengthwise with the wrong sides of the fabric together. Voila! You have your binding, ready to go.
To attach it, start somewhere in the middle of one side of your quilt. Align the raw edges of the binding with the raw edge of your quilt top and sew it down with a 1/4-inch seam allowance. You'll want to miter the corners as you go to get that crisp, professional look. After sewing all the way around, you’ll join the two ends together.
Finally, it’s time for a little more handwork. Flip the folded edge of the binding around to the back of the quilt. Using a simple whipstitch or a nearly invisible blind stitch, sew the binding down to the backing fabric. This last bit of hand stitching is what creates that truly timeless, heirloom-quality finish.
Final Touches for a Lasting Legacy
Before you officially call it done, there are a few little cleanup tasks. Carefully snip away any leftover basting threads and gently remove any visible quilting lines you made with your marking tools. Often, a light spritz of water is all it takes to make water-soluble marks disappear.
Your quilt tells a story, and every story needs a byline. Adding a label is a simple but profound final step that documents your work for future generations. It’s your signature on a piece of art.
I always recommend adding a small fabric label to a back corner. At a minimum, include your name and the year you completed it. This simple act transforms your beautiful creation into a true family heirloom, ready to be loved and cherished for years to come.
At Famcut.com, we're passionate about helping you bring your creative visions to life with the best tools and materials. Explore our full collection of quilting and sewing supplies at https://famcut.com.