


How to Quilt by Hand A Beginner's Guide
Learning to quilt by hand is all about finding a rhythm. It’s a simple, repetitive motion that transforms layers of fabric into a single, beautiful piece of art. The magic is in those small, even stitches, which form intricate patterns and turn ordinary cloth into a potential family heirloom.
The Timeless Appeal of Hand Quilting
In a world that’s always rushing, the slow, deliberate pace of hand quilting is a breath of fresh air. It’s not just a technique—it’s a meditative practice that links you directly to a long line of artisans. Every single stitch is a small moment of focus, a chance to create something real and lasting with your own two hands.
This craft fits so well with the growing love for sustainable living and traditional skills. Instead of another mass-produced item, you're pouring your time into creating something unique and full of personal meaning. The real charm of hand quilting shines when you create truly cherished items. You can find more inspiration for handmade gift ideas to see how this skill can become a heartfelt present.
A Modern Resurgence
If you're picking up a needle and thread, you're in good company. Hand quilting has seen a huge comeback, largely thanks to vibrant online communities. A quick scroll through Instagram or Pinterest will show you endless inspiration, making it easier than ever to find patterns, watch tutorials, and get encouragement from fellow quilters. This digital-age connection has turned what was once a quiet, solitary hobby into a wonderfully shared experience.
The numbers back this up. In the United States and Canada alone, there are an estimated 9 to 11 million active quilters. This passion is part of a much bigger creative movement, with about 85 million people diving into creative projects each year, generating over $35 billion in sales. Social media has been a game-changer, giving both newcomers and seasoned experts a place to connect. You can dig deeper into quilting market trends on craftindustryalliance.org.
The satisfaction of hand quilting comes not just from the finished product, but from the quiet hours spent bringing it to life. It’s a testament to patience and the beauty of imperfection.
This hands-on process offers a few things that machine quilting just can't match:
- A Deeper Connection: You physically touch and guide every inch of your quilt, building a real, intimate relationship with your work.
- Total Artistic Control: Each stitch is placed with intention. This allows you to create subtle textures and a soft, supple drape that’s tough to get with a machine.
- True Portability: Your quilting project can go wherever you do. Take it from your favorite armchair to a sunny spot on a park bench.
Ultimately, learning to quilt by hand is about embracing a rewarding journey. The result is more than just a quilt; it’s a functional piece of art infused with your own personal story.
Assembling Your Essential Hand Quilting Toolkit
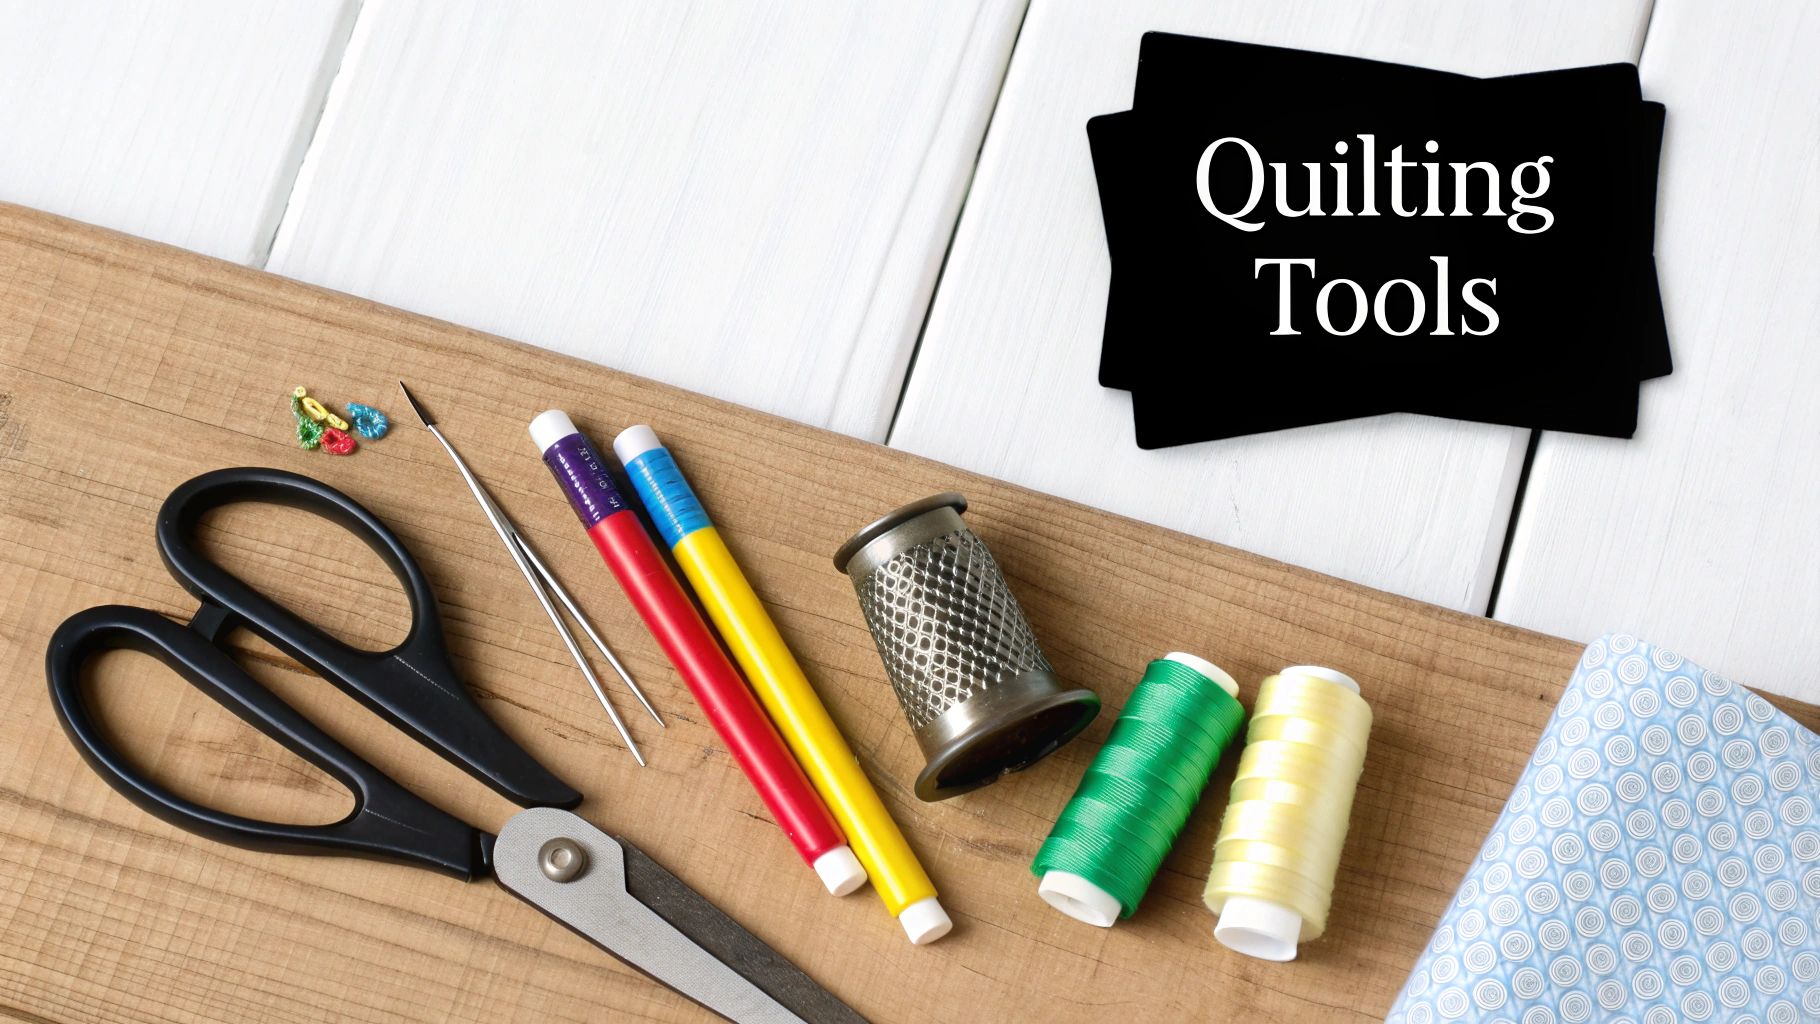
The right tools can make all the difference, turning a project that could be a struggle into a truly joyful process. When you're learning how to quilt by hand, your toolkit doesn't have to be massive or break the bank, but every piece should earn its place. This is less about collecting fancy gadgets and more about setting yourself up for a comfortable, successful stitching experience from the moment you begin.
Think of these tools as your creative partners. A good needle glides through fabric like a hot knife through butter, a quality thimble saves your fingers during those long, meditative quilting sessions, and the right thread is what holds your masterpiece together for generations.
Let's walk through the absolute must-haves for your hand quilting kit.
Needles, Thimbles, and Thread
Your needle is the star of the show, so it pays to be picky. For hand quilting, you'll want to look for needles specifically called "betweens." They're shorter than your average sewing needle, which gives you much better control for making those tiny, even stitches we're all after. Their slim profile and small eye help them pass cleanly through the three layers of your quilt sandwich without a fight.
Just as crucial is a thimble that actually fits you. I know so many beginners who try to skip this, but it’s a total game-changer for both comfort and your quilting technique. A thimble lets you push the needle through the fabric with your middle finger, saving your fingertip from getting sore and making that classic "rocking motion" stitch possible. If you can't stand the feel of metal, try a leather thimble—they're a wonderfully flexible alternative.
When it comes to thread, your best choice is 100% cotton hand quilting thread. It’s engineered to be strong and has a special glaze or coating that helps it glide through fabric with less friction. What does that mean for you? Far fewer frustrating tangles and knots.
Pro Tip: Don't fight your tools. If your needle feels like you’re pushing a square peg through a round hole or your thread is constantly knotting, it's probably not you—it's the tool. Experimenting is the only way to find what feels right in your hands.
Hoops, Frames, and Marking Tools
Keeping your fabric taut is the secret to even, beautiful stitches, and that's where a quilting hoop or frame comes in. A 14-inch round hoop is a fantastic place to start. It’s big enough to give you a decent work area but still small and manageable enough to use comfortably in your lap.
You’ll also need a way to mark your quilting lines. The key is to find something that gives you a clear guide while you stitch but vanishes without a trace when you're done.
- Hera Marker: This little plastic tool is a personal favorite. It creates a temporary, crisp crease in the fabric without using any ink, so there's zero risk of it becoming permanent.
- Water-Soluble Pens: These draw a fine blue or white line that disappears with just a spritz of water. Just be sure to test it on a scrap of your project fabric first to make sure it vanishes completely!
- Chalk Pencils: A lifesaver for marking on dark fabrics. The chalk provides a clear line and simply brushes away when you're finished stitching.
Essential Hand Quilting Supplies Breakdown
To help you get started, here’s a quick look at the core tools, what they do, and a little tip for each.
| Tool | What It Does | Beginner's Tip |
|---|---|---|
| Quilting Needles ("Betweens") | Creates the stitches. Shorter for better control. | Start with a mixed pack of sizes (e.g., 8, 9, 10) to find what feels most comfortable for you. |
| Thimble | Protects your finger and helps push the needle. | Try a few styles! A metal one with a ridge is great for "catching" the needle's eye, while a leather one offers more flexibility. |
| Hand Quilting Thread | Strong, coated cotton thread that holds layers together. | Don't use regular sewing thread. The special coating on quilting thread really does prevent tangles and makes stitching smoother. |
| Quilting Hoop | Holds the quilt layers taut for even stitching. | Look for a hoop with a screw tensioner you can tighten by hand, like a wooden or sturdy plastic one. |
| Marking Tool | Creates guide-lines for your stitching design. | The Hera Marker is the safest bet for beginners as there's no ink or chalk to worry about removing later. |
| Small Scissors/Snips | For trimming thread tails close to the fabric. | Keep a dedicated pair just for thread. Using them on paper or fabric will dull them quickly. |
These core supplies will give you a solid foundation. You can always add more specialized tools later, but this is truly all you need to start making beautiful hand-quilted projects.
Finally, a sharp pair of small scissors, often called snips, is indispensable for trimming your threads cleanly and close to the fabric. Having a dedicated pair just for your hand quilting kit means they'll stay sharp and ready to go. With these carefully chosen items, you'll have a reliable toolkit that actually helps your craft instead of getting in the way. If you're looking for specific recommendations to get started, you can find a variety of excellent choices, including reliable John James easy threading needles.
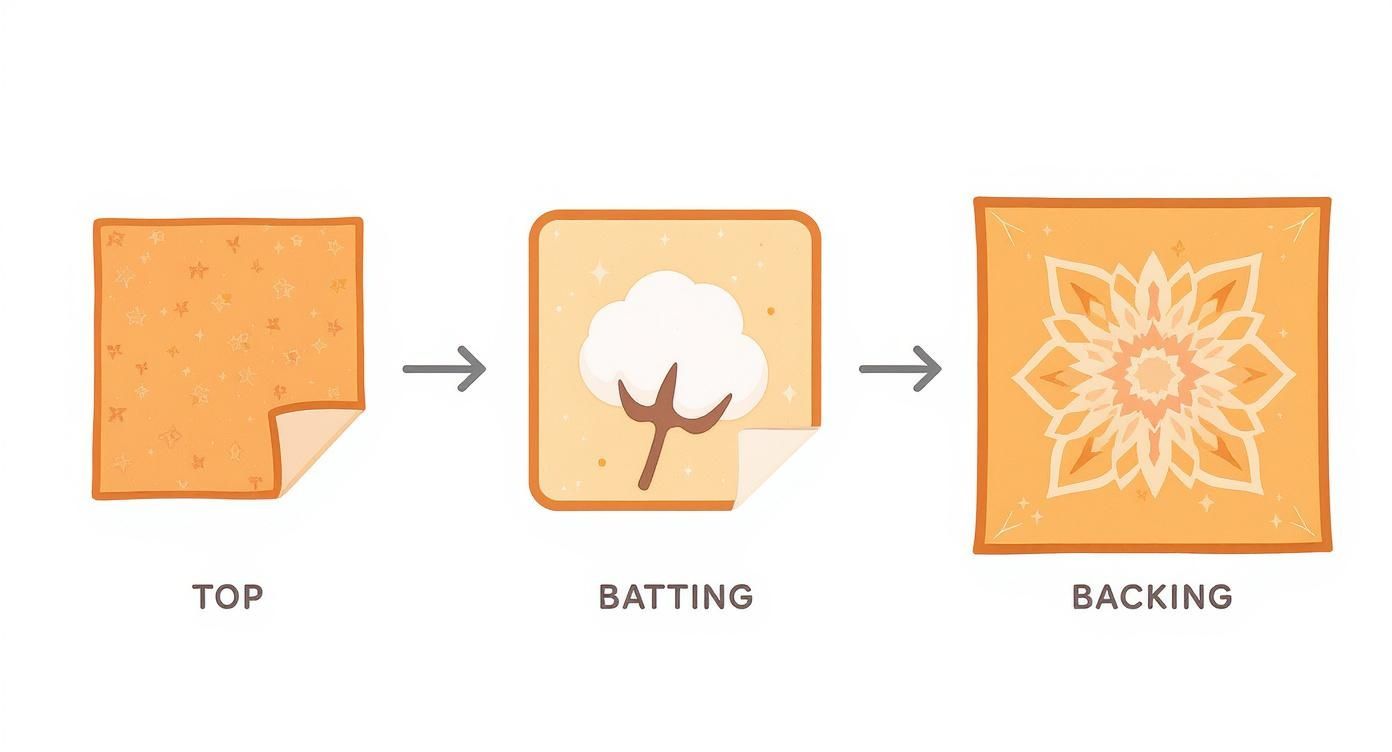
Preparing the Perfect Quilt Sandwich
A beautiful hand-quilted project begins long before you take your first stitch. It all starts with building a perfectly smooth, stable foundation—what we quilters call the quilt sandwich. This layered combination of your quilt top, batting, and backing fabric is the canvas for your work. Getting it right is the secret to avoiding those frustrating puckers and fabric shifts later on.
Think of it like stretching a canvas before painting. Any tiny wrinkle or loose area will absolutely show up in the final piece. So, the first real step is to press every single layer meticulously. I don't mean just running an iron over them; press with intention until your quilt top, batting, and backing are completely flat and wrinkle-free.
If you’re working with cotton that’s putting up a fight, a little starch can be your best friend. Learning how to whip up a simple homemade spray starch can really help tame stubborn creases and give the fabric a nice, crisp body.
Assembling the Layers
Once everything is pressed, find a large, flat surface. For bigger quilts, a clean floor is often your best bet.
Start by laying down your backing fabric, wrong side facing up. Grab some painter’s tape and secure the fabric to the floor, pulling it taut at the corners and along the sides. You're aiming for smooth and firm, like the head of a drum, but be careful not to stretch the fabric out of shape.
Next, gently float your batting over the backing. Use your hands to smooth out any bubbles or folds, working from the center outwards. The batting is the cozy heart of your quilt, giving it warmth and dimension. If you're looking for a reliable option that’s easy to needle through, a quality cotton-poly blend batting is a fantastic choice, especially for beginners.
Finally, place your pressed quilt top, right side up, over the batting. Just like before, smooth it carefully from the center out, making sure all three layers are perfectly aligned and wrinkle-free.
The goal here is to get three separate layers to act as a single, unified unit. Take your time with this. A little extra patience now will save you hours of frustration down the road.
Basting Your Quilt Securely
With your layers perfectly smooth, the final prep step is basting. This just means temporarily fastening them together so nothing shifts while you're quilting. There are a few tried-and-true methods, and each has its fans.
- Pin Basting: This is the classic approach for a reason. Using special curved safety pins, place a pin every 4-5 inches (about the width of your hand) across the entire quilt. Always start from the center and work your way out to the edges.
- Thread Basting: This method involves using a needle and a contrasting thread color to make long, running stitches that hold everything in place. It definitely takes more time, but it results in a super secure hold without any hard pins to work around.
- Spray Basting: A temporary spray adhesive can be a huge time-saver. You'll work in sections, spraying a light, even coat on the batting before smoothing your quilt top or backing over it. Just be sure to do this in a well-ventilated area!
Your choice really comes down to the project size and your own preference. Pins are fantastic, reusable, and dependable. Spray basting is incredibly fast and effective, especially for smaller projects. Whichever path you choose, a securely basted quilt sandwich is your ticket to a smooth, enjoyable hand quilting experience.
Mastering The Foundational Quilting Stitch
This is where the real work—and the real magic—of hand quilting begins. We're going to break down the classic running stitch into simple, repeatable motions. Don't worry about perfection right out of the gate. The goal here is to find a comfortable rhythm that feels good in your hands.
Tying a Proper Quilter's Knot
First things first, you need a quilter's knot. It's completely different from a clunky double knot you might tie for other projects. A quilter's knot is small, secure, and designed to disappear into the layers of your quilt.
Here’s how I do it:
- Hold the end of your thread against the tip of your needle.
- Wrap the thread around the needle three or four times.
- Pinch those little wraps with your thumb and forefinger.
- Now, slide those wraps all the way down the thread. A neat little knot will form at the very end.
It takes a little practice to get the hang of it, but once you do, you'll never go back.
Popping the Knot
With your knot ready, it’s time for your first stitch. The secret to a clean start is to "pop" the knot. Start by pushing your needle through only the top fabric of your quilt, about an inch away from where you want your quilting line to actually begin.
Bring the needle tip back out at your starting point and pull the thread until the knot is sitting right on top of the fabric. Now, give it a gentle but firm tug. You’ll feel a little pop as the knot pulls through the top layer and settles snugly inside the batting, completely hidden from sight.
Finding Your Stitching Rhythm
Now for the stitch itself. The most efficient way I've found to quilt by hand is with a gentle "rocking motion." This technique lets you load several stitches onto your needle at once, which is the key to creating those beautiful, consistent lines of quilting.
Here's how it works:
- Hand Position: Your non-dominant hand goes underneath the quilt, right below where you're stitching. This hand acts as your guide. Your dominant hand, with a thimble on the middle finger, holds the needle up top.
- The First Stitch: Push the needle straight down through all three layers. Your finger underneath will feel the little prick of the needle tip.
- The Rocking Motion: Instead of pulling the thread through, use your thimble to push the needle, rocking its angle so the tip comes back up a short distance away. That's your first stitch!
- Load 'em Up: Keep that needle in the fabric and repeat that down-and-up rocking motion two or three more times. This weaves the needle through the layers, loading it up with stitches before you finally pull the thread all the way through.
This whole process relies on a well-basted quilt sandwich. Getting those layers perfectly smooth is what allows this technique to work.
When every layer is smooth and secure, your fabric won't shift around, making the rocking motion feel much more natural and effective.
Trust me, everyone's stitches feel awkward and uneven at first. Hand quilting is all about muscle memory. Your hands will learn the motion, and with every session, you'll find your rhythm gets smoother and your stitches more consistent.
Troubleshooting Common Stitching Headaches
Even seasoned quilters run into a few common hiccups. Tangled thread is probably the number one frustration, and it's almost always caused by using a piece of thread that's way too long. A good rule of thumb is to work with a length no longer than the distance from your fingertips to your elbow—about 18 inches.
If you're still fighting with your thread, consider upgrading to a high-quality option like Quilter's Select Cotton Plus 60 Weight, which is specifically designed to glide through fabric.
It's amazing to see how much interest in quilting has grown. The global quilt market was valued at around $5.32 billion in 2024, driven by a real appreciation for handcrafted, sustainable goods. This trend pushes companies to innovate with better materials, from eco-friendly fabrics to threads that make our work easier and more enjoyable. It just goes to show how many people are rediscovering the quiet joy of this timeless craft.
Finishing Your Quilt with Professional Binding
Alright, you've reached the final, most satisfying part of the journey: binding. This is what truly turns your project into a finished quilt, an heirloom. A good binding protects all those raw edges and beautifully frames your hard work, giving it that polished, professional look we all strive for.
Essentially, you'll be creating long fabric strips, attaching them to the front edge of your quilt, and then neatly folding them over to hand-stitch them to the back. It might sound a bit fiddly, but once you get the hang of it, it's a wonderfully rhythmic and relaxing process. It’s this kind of detailed craftwork that people truly value; the global handmade market is expected to hit an astounding USD 1.94 trillion by 2033. It just goes to show how much people appreciate items made with care, like a hand-finished quilt. You can read more about the expanding craft market on customcy.com.
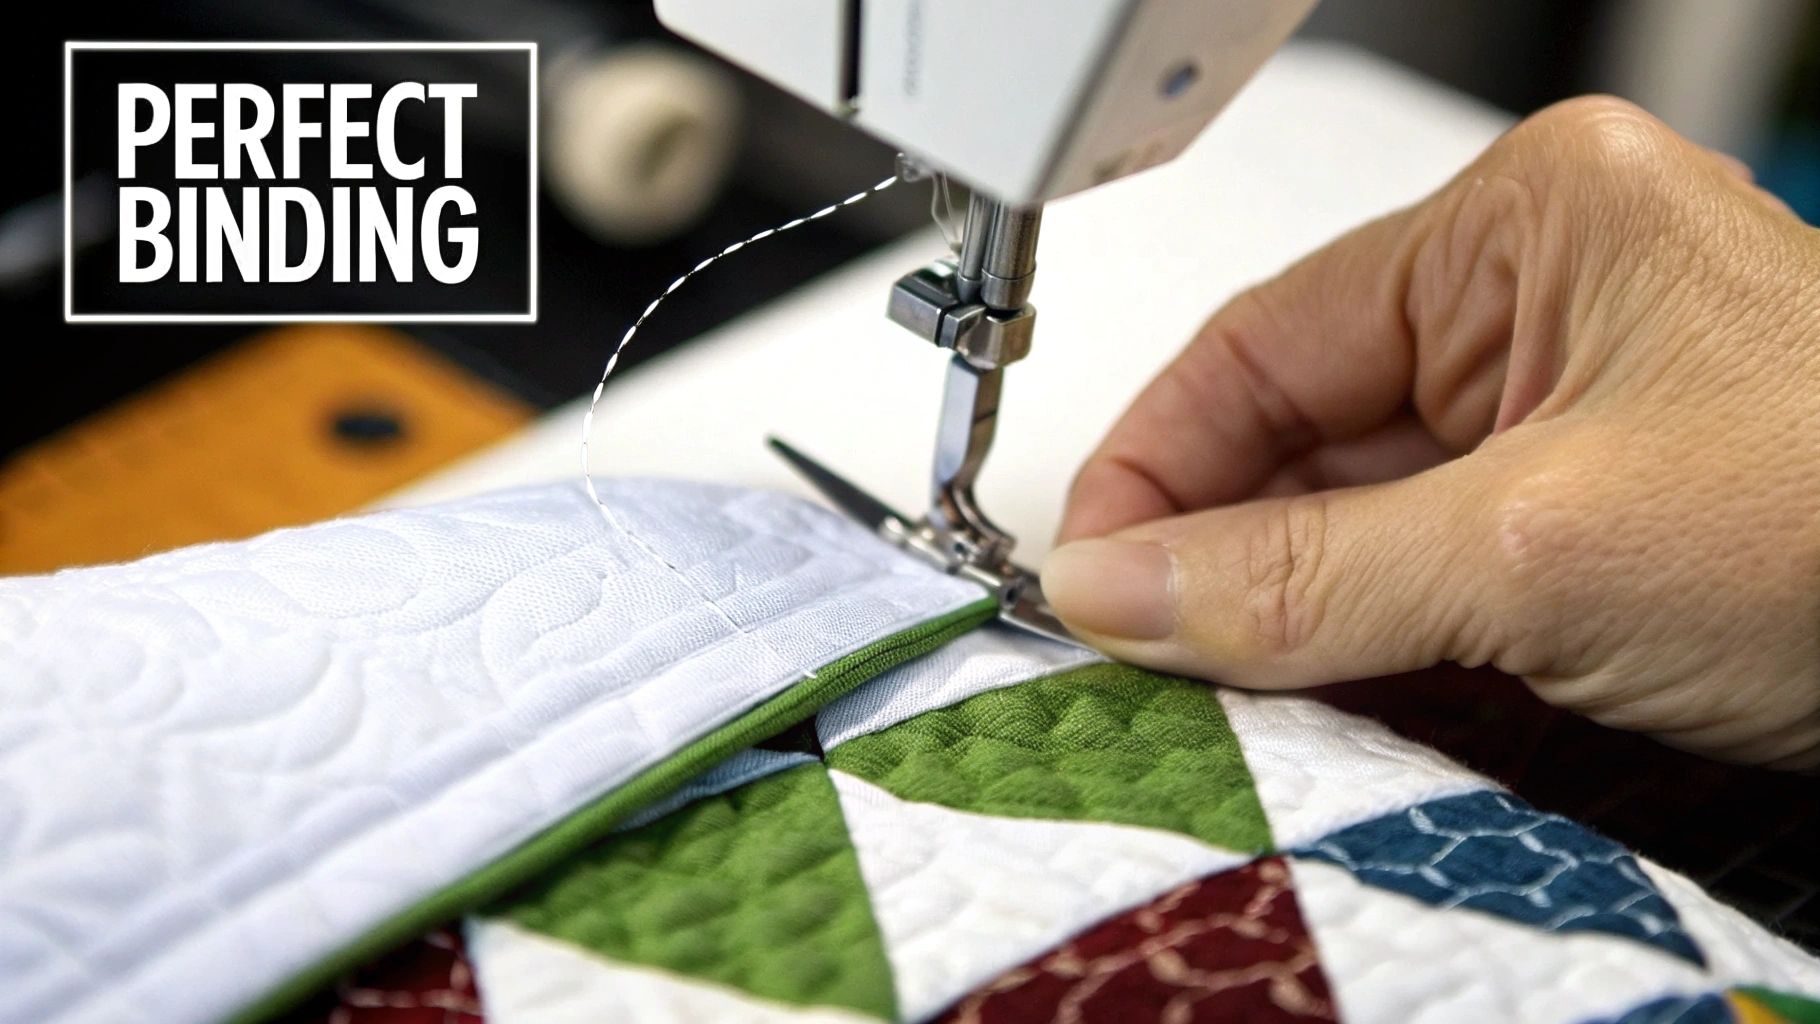
Preparing and Attaching Your Binding
First things first, let's make the binding itself. For a classic finish, you'll want to cut your binding fabric into 2.5-inch wide strips. Accuracy is key here, so a good quilting ruler is a must. Something like a Quilter's Select 2.5" x 18" non-slip ruler is perfect for getting clean, precise cuts.
Once you have your strips, sew them together end-to-end to create one long piece. Give it a good press, folding it in half lengthwise with the wrong sides together. Now you’re ready to attach it. Start sewing the raw edge of the binding to the raw edge of your quilt top, but be sure to leave a tail of a few inches unsewn at the beginning.
Pro Tip: A walking foot on your sewing machine is a lifesaver for this step. It grips all the layers—top, batting, and backing—and feeds them through evenly, which is the secret to avoiding any ugly puckers or waves along the edge.
Creating Perfect Mitered Corners
Those sharp, tidy mitered corners are what really elevate a quilt's finish. They look impressive, but the technique is surprisingly simple.
Here’s the trick:
- Sew down the first side, but stop when you’re exactly a quarter-inch from the corner. Backstitch to lock it in.
- Take the quilt off the machine. Fold the binding strip straight up and away from the quilt, creating a neat 45-degree angle.
- Now, fold the strip back down on itself, making sure its top edge is perfectly aligned with the raw edge of the next side of the quilt you’re about to sew.
- Begin stitching again right from the top edge of this new side.
This little folding maneuver creates the perfect fabric tuck needed for a crisp mitered corner. After you’ve attached the binding all the way around, all that’s left is to fold it over to the back of the quilt and secure it with a nearly invisible slip stitch. It’s the final touch that completes your masterpiece.
Common Hand Quilting Questions Answered
https://www.youtube.com/embed/R_7EZsqvd0I
Every quilter I’ve ever met, myself included, started with a head full of questions. When you're learning how to quilt by hand, it’s completely natural to hit a few roadblocks or wonder if you’re “doing it right.” Let’s walk through some of the most common hurdles together.
Think of this as advice from a friend who has been there, tangled the thread, and ripped out more stitches than they can count. The goal here isn't perfection right out of the gate; it's about making steady, enjoyable progress.
How Do I Keep My Hand Quilting Stitches Even?
Here's the secret: consistency is way more important than stitch size, especially when you're just starting. The real magic happens when you find a comfortable, repeatable rhythm. This comes from mastering the gentle "rocking motion" of the needle through the fabric. Your stitches will naturally even out as your hands build that muscle memory.
For this, a good quilting hoop is your best friend—it's not really optional. It keeps the fabric taut, which is crucial for guiding the needle and controlling your stitch length. And don't be afraid to use a water-soluble marker to draw your quilting lines! Guides are there to help you, not to prove you're a beginner.
What Is the Best Thread for Quilting by Hand?
For just about any project you can dream up, 100% cotton hand quilting thread is the gold standard. It’s made for this exact job. It’s strong, has very little stretch (which prevents puckering down the line), and it will age just as gracefully as the fabric in your quilt.
You'll notice this thread often has a light glaze on it. That coating is intentional—it helps the thread glide smoothly through the three layers of your quilt sandwich and dramatically cuts down on tangles and knots. While there are tons of specialty threads out there, starting with quality cotton thread sets you up for a much happier quilting experience.
If there’s one mistake I see new quilters make over and over, it’s trying to use regular sewing machine thread for hand quilting. It will tangle, snap, and drive you absolutely crazy. Investing in the right thread is one of the single best things you can do for your project.
Why Is My Thread Always Tangling?
Ah, the universal frustration of every hand-stitcher! Thankfully, this is usually an easy fix. The number one culprit behind tangles is using a piece of thread that's simply too long. A good rule of thumb is to work with a length no longer than about 18 inches—roughly the distance from your fingertips to your elbow.
Also, try running your thread through a block of beeswax or a thread conditioner before you start stitching. It’s a tiny step that makes a huge difference. The wax coats the thread, helping it glide more easily and resist twisting up on itself. One last tip: every few stitches, just let your needle and thread dangle for a second. This allows any twists to unwind naturally before they become a knot.
How Long Does It Take to Quilt a Quilt by Hand?
The only honest answer is: it depends! The time it takes can vary wildly based on a few key things:
- Quilt Size: A small baby quilt might take a dedicated quilter 20-40 hours.
- Quilting Density: A large, king-sized quilt with intricate, dense stitching could easily take hundreds of hours.
- Your Pace: It all comes down to how much time you can settle in with your project each day or week.
My best advice is to lean into the journey. Hand quilting is a marathon, not a sprint. The slow, mindful pace is part of the charm and what makes the finished piece so incredibly special. If you're looking to build your skills from the ground up, exploring some free sewing lessons can give you a fantastic foundation for all your future projects.
At Famcut.com, we're passionate about supporting your creative journey, whether you're just starting out or are a seasoned pro. Explore our wide selection of high-quality quilting supplies and fabrics to bring your next masterpiece to life at https://famcut.com.