


how to hem a dress: quick guide for a flawless finish
Learning how to hem a dress really just comes down to having the right tools and a solid plan. I like to think of it in three main stages: getting your supplies together, nailing the measurement and marking, and finally, picking the best sewing method for your specific dress fabric—whether that’s a machine stitch, a hand-sewn finish, or even a no-sew tape.
Gathering Your Essential Hemming Toolkit
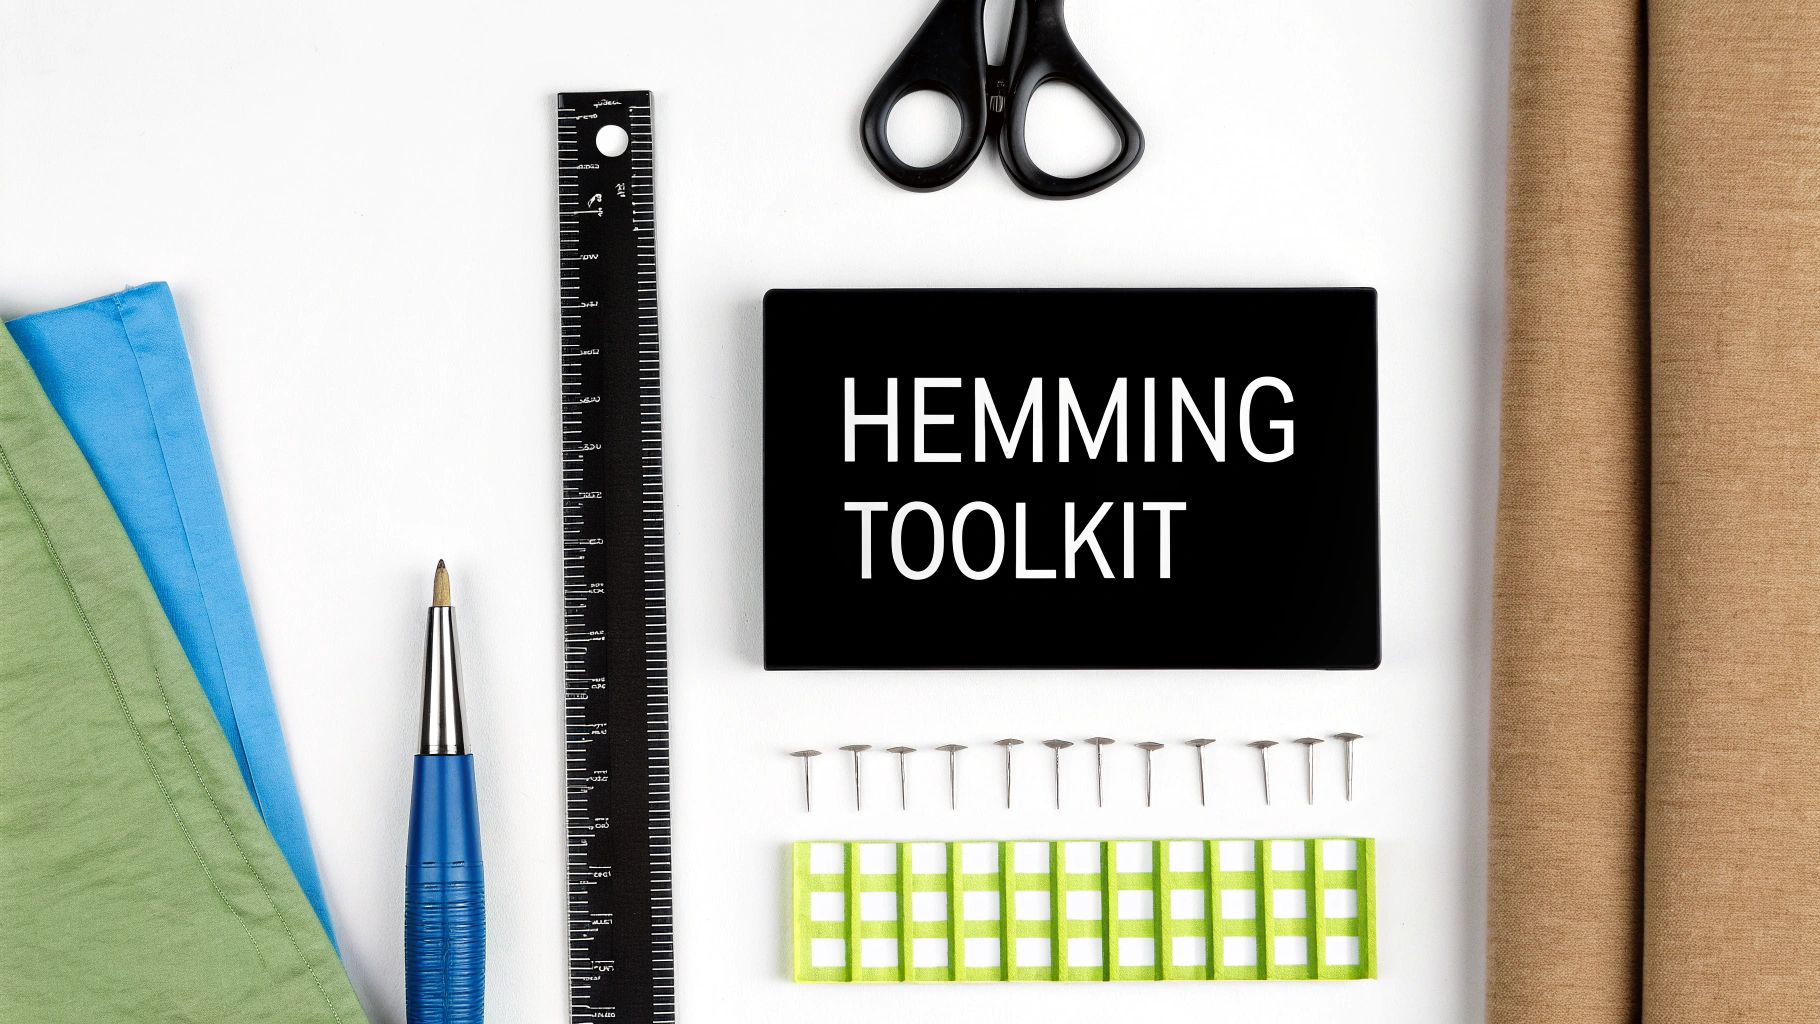
Before you even think about cutting or sewing, you need to set up your workspace. Having the right equipment on hand makes all the difference between a frustrating mess and a professional-looking finish. Think of these tools as your partners in this project; they’ll help you work with precision and turn the task into something genuinely satisfying.
Good tools don’t have to be expensive, but having the basics is non-negotiable. It’s a skill worth learning, too. With so many of us trying to make our clothes last longer, altering garments is becoming a big deal. In fact, the market for tailoring and alterations is expected to hit nearly $12 billion globally by 2034. Learning a simple skill like hemming a dress puts you right in the middle of this sustainable fashion movement.
Core Tools for Cutting and Measuring
It all starts with an accurate measurement and a clean cut. Trust me, trying to work with dull scissors or a wonky ruler will derail your project from the get-go.
- Fabric Shears: A sharp, dedicated pair of fabric scissors is your best friend here. Seriously, hide them from anyone who might be tempted to cut paper with them—that's the fastest way to dull the blades. A crisp, clean cut prevents fraying and makes the sewing part a thousand times easier.
- Clear Ruler or Measuring Tape: I love a transparent acrylic ruler because you can see the fabric right through it, which is a huge help when measuring out hem allowances. You'll also want a flexible measuring tape for any curved hems or for taking body measurements.
- Seam Gauge: This little gadget is a secret weapon for getting a perfectly even hem. It’s a small ruler with a slider that you can set to your desired depth. It lets you check your fold consistently all the way around the garment without having to re-measure every few inches.
Essential Marking and Pressing Supplies
Getting your new hemline marked accurately is just as important as the initial measurement. Once it’s marked, a good, hot iron is what creates those sharp, professional folds that make sewing a breeze.
Pro Tip: Always, always test your marking tool on a scrap of fabric first. Some chalks or pens can be stubborn to remove, especially on delicate fabrics. A quick test on an inside seam allowance or a leftover scrap can save you a world of hurt.
A good iron is absolutely essential for a polished look. It’s not just for pressing the final hem; it helps set your stitches and flatten seams as you go. For detailed work, a reliable mini iron like this one can be a lifesaver, especially for getting into tight corners or around curves.
And last but not least, a seam ripper. Let’s be honest, mistakes are part of the process. Having a good seam ripper lets you undo stitches without tearing your fabric. It’s one of those tools you hope you won’t need, but you’ll be incredibly glad to have it when you do.
How to Measure and Mark for a Flawless Hem
Getting the measurement right is the single most important part of hemming a dress. If your line is off, even the neatest stitch in the world won’t save it. This is where you need to slow down and be precise—it pays off in the end.
First things first: put on the exact shoes you'll be wearing with the dress. Seriously. The difference between a 2-inch heel and a flat can completely change the hemline, and this is the most common mistake people make. Stand up straight and naturally, just as you would when you're wearing it.
This step is absolutely crucial when you're working on something special, like a perfectly fitted prom dress, where the length has to be perfect.
Getting the Measurement Just Right
The gold standard for measuring is to have a partner help you. Ask a friend to use a yardstick or a good sewing ruler to measure from the floor up to where you want the hem to fall. As they go, they should place pins parallel to the floor every few inches. Have them step back every so often to eyeball it—you want a line that looks straight and even from a distance.
Working solo? No problem. You just have to get a little creative.
- The Yardstick Method: Grab a yardstick and stand it upright on the floor beside you. Use tailor's chalk to make a tiny mark on your leg at the height you want the hem. Now, turn your body slowly, using that mark as a consistent guide to place pins all the way around the dress.
- The Door Frame Trick: This one is a classic. Stand right next to a door frame and stick a piece of tape on it at your target hem height. Slowly rotate, keeping your distance from the frame consistent, and use the tape as your visual guide for pinning.
My Two Cents: Always, always try the dress on one last time after pinning and before you even think about cutting. A quick look in a full-length mirror can save you a world of heartache. It’s a lot easier to move a few pins than to fix a dress you've cut too short.
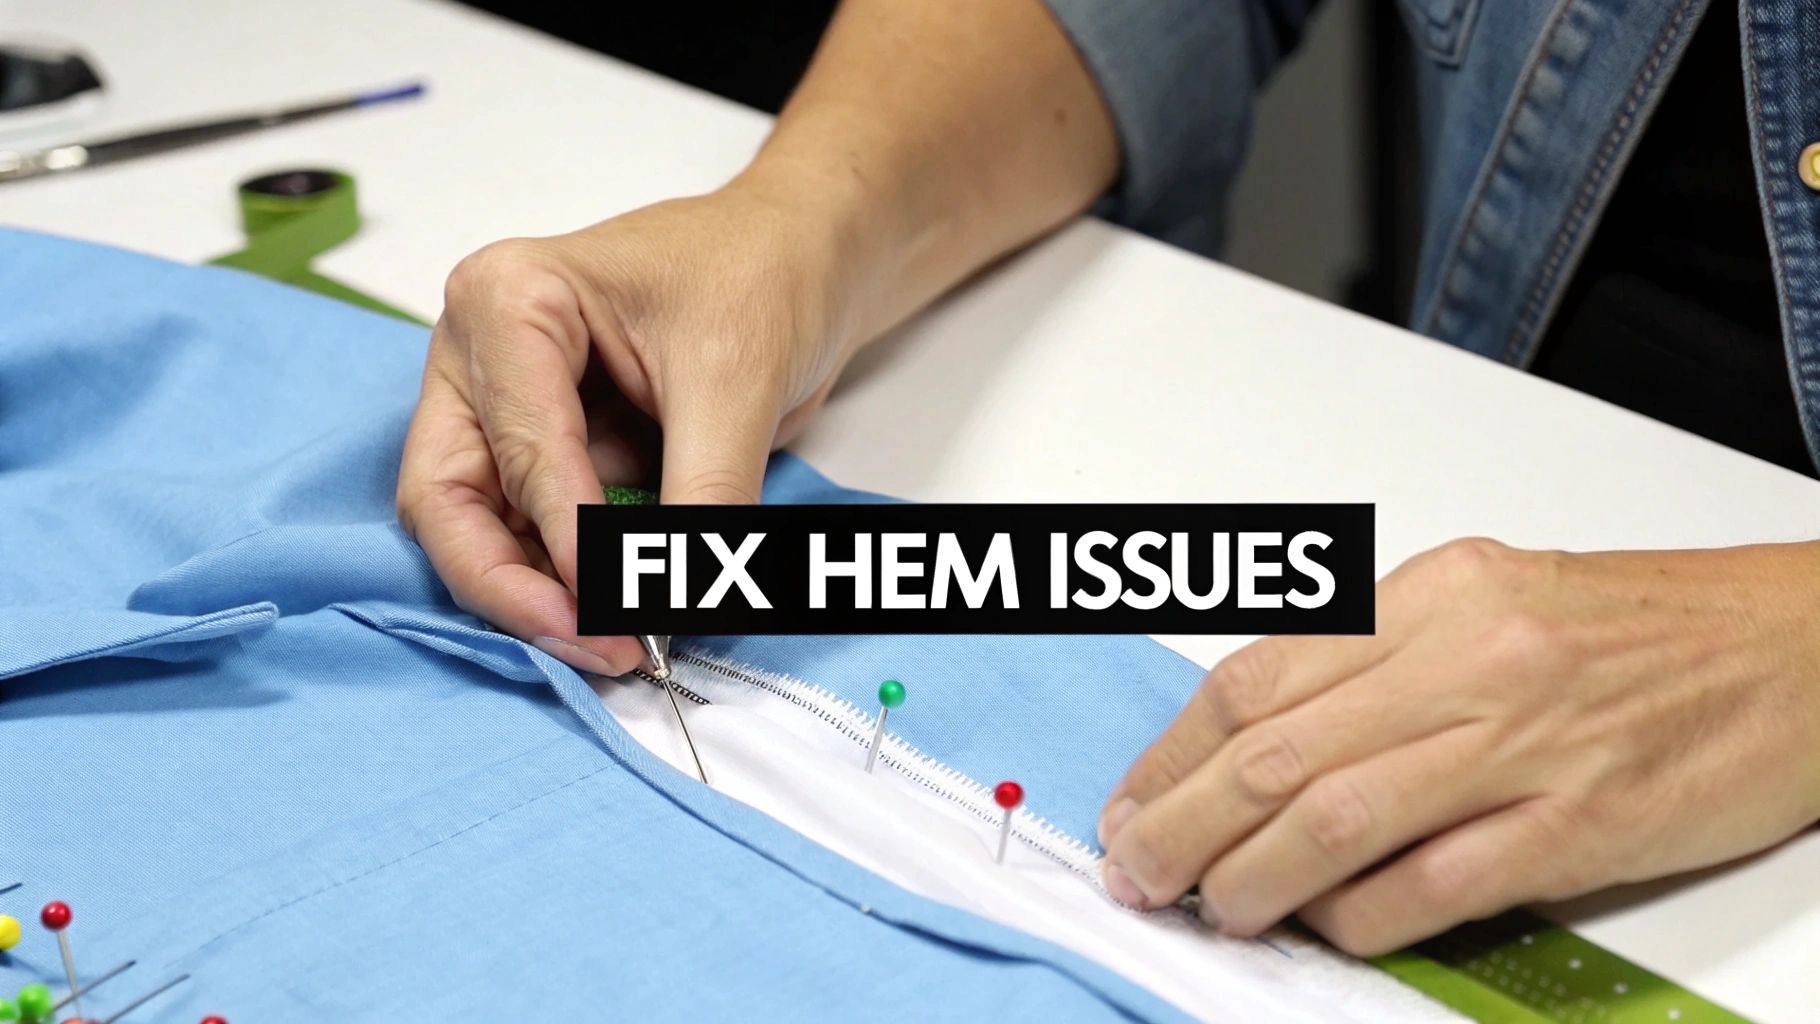
Marking Your Fold and Cut Lines
Okay, with the pins in place, carefully take the dress off and lay it on a large, flat surface. You're going to mark two lines. The first is your fold line—this is the line your pins created. Below that, you'll mark the cut line, which includes the hem allowance. This is usually between 1 to 2 inches, depending on the fabric and the type of hem you're doing.
For this, you need a good marking tool. I’m a big fan of a mechanical chalk pencil because it gives you a crisp, fine line that's visible but easy to brush off later. Use a clear ruler to connect the dots (or pins, in this case), drawing a smooth, solid line for both the fold and the cut.
It’s amazing to think that this simple act is part of a massive industry. The global garment alteration market is estimated to be worth between $4.3 and $4.5 billion. That number just goes to show how many people value a perfect fit. By learning this skill, you're tapping into a universal desire for clothes that look like they were made for you.
One final tip: if you're hemming an A-line or flared skirt, your marked hemline won't be a straight line—it will be a slight curve. Just follow the natural shape of the skirt, making sure your measurement from the floor is consistent all the way around. This ensures it hangs beautifully instead of dipping at the sides.
Choosing the Right Hemming Technique
Once you've got your dress perfectly measured and marked, the next big decision is how you're going to finish that hem. There’s no single “best” way—the right method depends entirely on your fabric, the style of the dress, and frankly, the tools you have on hand.
A sturdy denim A-line dress needs a completely different approach than a floaty chiffon gown. Understanding these nuances is what separates a homemade-looking hem from a truly professional finish. Getting the measurement right is the foundation, but the technique is what brings it all together.
This little chart breaks down that first critical step: making sure you're standing straight to get an accurate mark. Whether you have a helper or are flying solo, a level hem starts here.
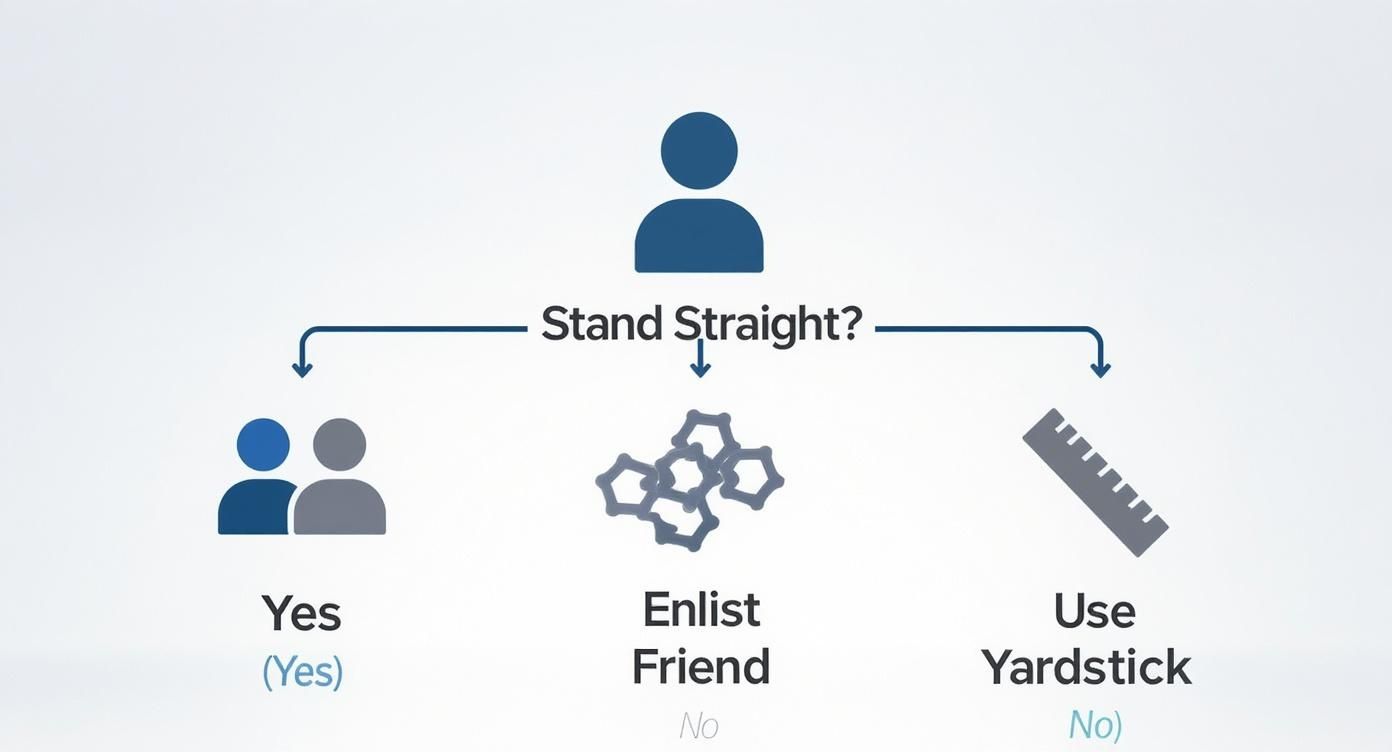
As you can see, you have plenty of options for ensuring a straight starting point, which is absolutely essential for a great result.
To help you decide on the best finish, I've put together a quick guide. Think of this as your cheat sheet for matching the hem to the job.
Hemming Method Decision Guide
This table breaks down the most common hemming methods, so you can quickly see which one is the best fit for your project.
| Hemming Method | Best For Fabric Types | Finished Look | Skill Level |
|---|---|---|---|
| Standard Machine Hem | Cotton, denim, linen, rayon, stable wovens | Clean, visible, and durable stitch line | Beginner |
| Blind Hem | Wool, crepe, suiting, dress-weight cottons | Nearly invisible from the outside | Intermediate |
| Hand Slip Stitch | Silk, chiffon, satin, delicate formalwear | Completely invisible, couture finish | Intermediate |
| Rolled Hem | Chiffon, organza, voile, very lightweight silks | Tiny, delicate, and clean edge | Intermediate to Advanced |
| Serger Hem | Knits (jersey, spandex), stretchy fabrics | Professional, stretchy, and finished edge | Intermediate (Requires Serger) |
| Fusible Hem Tape | Medium-weight wovens (for quick fixes) | No-sew, can be slightly stiff | Beginner |
Ultimately, the best technique is one that complements your dress and that you feel comfortable executing. Let's dig a little deeper into these options.
For Everyday Fabrics And Sturdy Hems
For most of your everyday dresses made from cotton, linen, or denim, the standard machine-stitched hem is your workhorse. This is the classic double-fold hem you see on everything from casual skirts to button-down shirts. It’s tough, clean, and gets the job done.
You simply fold the raw edge up, press it, and then fold it again to hide the edge completely before stitching it down. This technique is built to last through countless washes, making it perfect for your go-to wardrobe pieces.
Expert Insight: Want that machine-stitched hem to look extra sharp? Use an edge-stitching foot. This little gadget attaches to your machine and acts as a guide, helping you sew a perfectly straight line that’s an exact distance from the fold. It’s a game-changer for a professional look.
For Formalwear And Invisible Finishes
When you’re hemming a cocktail dress or a formal gown, a visible line of stitches can ruin the whole effect. The goal here is an invisible finish that lets the fabric's drape and design shine.
Your best bets for this are the blind hem and the hand-sewn slip stitch.
A blind hem, done on a sewing machine, is a brilliant technique that creates a nearly invisible seam from the outside. It uses a special stitch that zig-zags inside the hem, just catching a single thread of the outer fabric every few stitches. Most modern machines have a blind hem setting and foot to make it surprisingly straightforward.
For the ultimate in stealth, nothing beats the classic slip stitch. This is my personal favorite for high-end fabrics like silk or satin. You do it by hand, carefully picking up just a thread or two of the fabric with your needle, hiding the stitch inside the hem's fold. It takes a bit of patience, but the result is a truly couture finish. If you find threading needles frustrating, a pack of quality easy-threading needles can make a world of difference.
Specialized Hems For Unique Fabrics
Some fabrics just play by their own rules and demand a special approach.
Lightweight and sheer materials like chiffon and organza are a great example. A standard hem would be too bulky and would show right through the fabric.
- Rolled Hem: This is the answer. It creates a tiny, delicate edge by rolling the raw fabric up very tightly and securing it with a stitch. You can do this by hand for incredible control or use a special rolled hem foot on your sewing machine or serger for a lightning-fast, perfect finish.
Stretchy knit fabrics, like jersey, are another challenge. A standard straight stitch has no give, so the thread will pop the second the fabric stretches.
- Serger Hem: If you have a serger (also called an overlocker), it's the absolute best tool for knits. In one pass, it trims the excess fabric, sews a seam, and finishes the edge with a stretchy stitch that moves with the garment.
- Knit Hem with a Sewing Machine: No serger? No worries. Your sewing machine can still do the job. Just use a stitch that can stretch—a narrow zig-zag stitch, a dedicated stretch stitch, or a twin needle will all create a flexible hem that won’t break.
Finally, for those who don’t sew or just need a super quick fix, there’s fusible hem tape. This is a no-sew adhesive that you place inside the hem fold and press with an iron. It’s incredibly fast but creates a slightly stiffer hem and might not survive repeated, vigorous washing. It's a great tool to have for emergencies or temporary alterations on medium-weight fabrics.
Mastering the Most Common Hemming Methods
Alright, you've measured and marked your dress—now for the fun part. This is where all that careful prep work comes together and you actually create the hem. There are a few different ways to tackle this, and the best one really depends on your fabric and the look you're going for.
Don't let the options overwhelm you. Hemming is all about matching the right technique to the right project. A casual cotton sundress and a delicate formal gown just need different kinds of love. Let's walk through the most common methods, starting with the one you'll probably use most often.
The Classic Machine-Stitched Double-Fold Hem
Think of this as the workhorse of hemming. It’s sturdy, reliable, and looks great on most medium-weight fabrics like cotton, linen, and even denim. It's called a "double-fold" because it completely encloses the raw fabric edge. This means no fraying, even after a bunch of trips through the washing machine.
Getting it done is pretty straightforward. First, fold the fabric up along your marked hemline and give it a good press with a hot iron. This first press is a game-changer; it creates a crisp memory in the fabric that makes the next step so much easier.
Next, tuck the raw edge inside that fold, meeting the crease you just made, and press it again. You should now have a clean, folded edge with no raw fabric in sight. To keep everything from shifting while you sew, you can use pins. I'm also a huge fan of these handy sewing clips, which are great for holding thicker layers without leaving annoying pinholes. Once it's secure, just stitch close to that top folded edge to lock it all in.
A Quick Tip: Want a perfectly straight stitch line? Your sewing machine’s needle plate has guide marks for a reason! Line up your fabric edge with the correct one. For an even easier guide, I sometimes place a piece of painter's tape on my machine to create a custom edge to follow. Works like a charm every time.
The No-Sew Fusible Tape Method
In a pinch or just don't have a sewing machine? Fusible hem tape is your best friend. This stuff is basically a heat-activated adhesive that glues the fabric together, creating a surprisingly strong hem without a single stitch. It’s fantastic for most medium-weight fabrics, though it can sometimes be a little too stiff for really light, drapey materials.
You'll start by making a single fold, pressing your hem allowance to the inside of the dress. Cut a piece of fusible tape the same length as your hem and tuck it inside the fold, right between the two layers of fabric.
Make sure none of the tape is peeking out. Then, grab your iron and follow the instructions on the tape's packaging. The key is to press and hold the iron in place for several seconds—don't glide it back and forth like you normally would. That direct heat and pressure is what melts the adhesive and creates a solid bond.
The Invisible Hand-Sewn Slip Stitch
When you're working with delicate fabrics like silk, chiffon, or fine satin, a visible machine stitch can look clunky and ruin the effect. This is where the hand-sewn slip stitch becomes your secret weapon. It creates a finish that is genuinely invisible from the outside, which is why it’s the gold standard for formalwear and high-end garments.
To start, prepare a clean double-fold hem and press it well. Thread a hand-sewing needle with a single strand of thread that matches your fabric perfectly, and knot the end.
Bring your needle up from inside the folded edge of the hem—this hides the knot. Now, look directly across from where the thread came out and pick up just one or two tiny threads from the main dress fabric. Don't go all the way through! Then, slide your needle horizontally through the folded edge of the hem for about a quarter-inch and pull it through. Just repeat that motion all the way around: a tiny stitch in the dress, a longer stitch hidden in the hem. The result is a secure hem that looks like it’s magically floating in place.
The Professional Blind Hem Stitch
The blind hem is basically the machine-sewn version of the slip stitch. It gives you a strong hem that’s almost invisible from the right side of the garment. It might look intimidating, but most modern sewing machines have a dedicated blind hem stitch setting and a special presser foot that make it much simpler than you'd think.
The trick is in the fold. You’ll create a special "Z" shape. First, fold the hem allowance up as you normally would. Then, fold the bulk of the hem back down toward the right side of the fabric, leaving about 1/4 inch of the hem's top edge showing.
Now, using your blind hem foot and stitch setting, you'll sew along that little exposed edge. The machine will make several straight stitches in the hem allowance, then throw one wide zig-zag stitch that just barely catches a thread of the main dress fabric. When you unfold it, the stitches practically disappear. I always recommend practicing this on a scrap piece of your fabric first to get the tension and stitch width just right.
Troubleshooting Common Hemming Problems
Even the most seasoned sewers run into trouble. You can measure three times and still find yourself with a wonky hem. Don't worry—most hemming mishaps are fixable. Think of these moments less as failures and more as rites of passage that sharpen your skills.
From a wavy edge to a hem that’s suddenly way too short, there’s almost always a clever workaround. A calm approach and a few tricks up your sleeve are all you need to tackle any challenge with confidence.
The Wavy Lettuce Leaf Hem
Ah, the dreaded "lettuce leaf" hem. It's one of the most common frustrations, especially when working with knits or jersey fabrics. You’ll know it when you see it: the hem stretches out as you sew, creating a rippled, wavy edge instead of lying flat. It happens because the presser foot drags the top layer while the feed dogs pull the bottom, stretching the material out of shape.
Luckily, you have a few excellent ways to fight back:
- Use a Walking Foot: This is the magic bullet for knits. A walking foot has its own set of feed dogs on top, so it pulls both layers of fabric through the machine at the same rate. It's a total game-changer.
- Ease Up on the Tension: Sometimes, just lowering your machine's thread tension is enough to reduce the pull on the fabric.
- Switch to a Stretch Stitch: Most machines have a specific stretch stitch, but a narrow zig-zag also works beautifully. These stitches have built-in give that moves with the fabric instead of fighting against it.
- Bring in the Steam: For minor waves, a good press with a steamy iron can often persuade the fibers to relax and flatten back out.
Fixing an Uneven Hem or Puckering
So, you’ve finished stitching, tried on the dress, and the hem is obviously lopsided. Before you grab the seam ripper, take a deep breath. You can often correct minor issues without starting from scratch. Put the dress back on and have a friend mark the lowest spots. You might be able to simply trim the longer sections to match the shortest point, creating a new, slightly shorter, but perfectly even hem.
Puckering along the stitch line is another frequent culprit, usually caused by thread tension that's too tight. If you see puckers, the only real fix is to unpick the stitches. A good seam ripper and thread remover is your best friend here, especially with delicate threads. Once the stitches are out, press the area flat and resew with a lower tension setting.
Pro Tip: Always test your stitches on a scrap of the same fabric before you touch your dress. This five-minute check helps you dial in the perfect tension and stitch length, preventing puckers and waves from ever happening in the first place.
The "Oops, I Cut It Too Short" Dilemma
This is the one that makes your heart sink. But cutting a hem too short doesn't have to be a disaster. Honestly, some of my favorite designs have come from these "mistakes." It's an opportunity to add a unique design element.
Here are a few creative saves I've used over the years:
- Add a Lace Trim: Sewing a coordinating or even a contrasting lace trim to the bottom edge can add back the length you need while introducing a beautiful, delicate detail.
- Attach a Fabric Band: Cut a band of contrasting fabric (or matching, if you have it) and attach it to the hem. This creates a stylish color-blocked or bordered look that seems completely intentional.
- Create a "Faux" Hem: Use a wide piece of coordinating hem facing or bias tape. Sew it to the raw edge, then flip it entirely to the inside and secure it with a nearly invisible slip stitch. This saves every last millimeter of length.
If you’ve run into these problems, you’re in good company. In North America, which holds about 35% of the global tailoring market, hemming is one of the top alteration requests. This steady demand has fueled innovation and investment, making professional help more accessible than ever. You can learn more about this growing market on precisionbusinessinsights.com.
Your Hemming Questions, Answered
Even the most detailed guide can leave you with a few lingering questions. When you're in the middle of a project, a unique challenge always seems to pop up. Hemming might seem basic, but every dress has its own personality and quirks.
Let’s tackle some of the most common questions I hear from sewers of all skill levels. This is your go-to spot for clear, practical answers to get you over any hurdles and back to sewing with confidence.
How Much Should I Charge to Hem a Dress?
This is the million-dollar question, isn't it? The truth is, there's no single price. Your rate will really depend on three things: how complex the dress is, what kind of fabric you're working with, and the going rates in your area.
For a simple, straight machine-stitched hem on a casual cotton dress, you’re probably looking at the $15-$25 range. It's a quick job that doesn't demand a ton of specialized work.
But the price tag climbs quickly with complexity. For instance:
- Formal Gowns: A bridesmaid dress with layers of chiffon or tulle is a whole different beast. You're hemming multiple layers that all have to hang perfectly together. These jobs often start around $50 and can easily top $100.
- Delicate Fabrics: If you're working with silk or another slippery fabric, you'll likely need to do a hand-sewn slip stitch. That takes time and a delicate touch, which rightly commands a higher price.
- Lined Dresses: Hemming a lined dress is essentially hemming two dresses. You have to handle each layer separately and make sure they play nicely together, which adds to the labor and cost.
My best advice? Do a little recon. Call a couple of local tailors or alteration shops and ask for a quote on a similar job to get a baseline for your city. Always remember to factor in your time, material costs, and the skill the specific hem requires.
Can I Hem a Dress Without Cutting It?
Absolutely! This is a smart move if you're not 100% committed to the new length, hemming a dress for a growing child, or trying to preserve the integrity of a vintage piece. It’s totally reversible.
The technique you're looking for is called a deep hem. Instead of trimming away the extra fabric, you just fold it all up on the inside.
How a Deep Hem Works: You’ll press a sharp crease at your new hemline, then fold all the excess fabric up and secure it. A hand-sewn slip stitch is perfect for this, as it keeps the outside looking clean. It might add a touch of bulk, but on fabrics like cotton, wool, or linen, it’s usually unnoticeable. Best of all, you can let it down again in minutes.
What Is the Easiest Way to Hem a Curved Hemline?
Ah, the curved hem—the nemesis of the standard double-fold. If you’ve ever tried to force a straight fold around a curve on a circle skirt or high-low dress, you know it just puckers and fights you the whole way. The secret is to go small.
For these beautifully flowing hems, the narrow rolled hem is your best friend. It creates a tiny, clean edge that follows the curve perfectly without any bunching.
You have two great options for creating one:
- Rolled Hem Foot: This little sewing machine attachment is a game-changer. It automatically guides and rolls the fabric edge under as you stitch, giving you a fast, consistent, and professional-looking finish.
- Hand-Rolled Hem: If you don't have the special foot or you're working with something incredibly delicate like chiffon, you can create a stunning rolled hem by hand. You simply make one tiny fold, stitch it down, then roll that stitched edge over one more time and secure it with a nearly invisible slip stitch. It requires patience, but the couture-quality result is worth it.
Should I Wash the Dress Before Hemming It?
Yes. A thousand times, yes! This is probably the most critical prep step, and skipping it is a recipe for regret. Always, always wash and dry the dress according to its care label before you even think about marking your hemline.
So many fabrics, especially natural fibers like cotton, linen, and rayon, will shrink the first time they're washed. Imagine hemming a dress to the perfect floor-grazing length, only to pull it out of the dryer and find it’s now hitting your ankles. It’s a gut-wrenching moment.
Pre-washing gets all that shrinkage out of the way upfront. It ensures that the length you set is the length it will stay, wash after wash. And for tips on keeping your dresses looking their best long after the sewing is done, check out these expert insights on post-party care for your favorite dresses. Great garment care starts before the first stitch.
At Famcut.com, we are passionate about providing the tools and knowledge you need to bring your creative visions to life. From high-quality fabrics and notions to expert advice, we're here to support your sewing and cosplay journey. Explore our full collection of supplies at https://famcut.com and find everything you need for your next project.