


How to Finish Quilt Edges for a Flawless, Lasting Look
That final step of finishing the edge is what turns a pile of fabric into a true quilt. It's the frame for your artwork, and for most quilters, that means using a classic double-fold binding. This technique involves creating a folded strip of fabric that wraps neatly around the raw edges of your quilt sandwich, which you then stitch down for a finish that’s as durable as it is beautiful.
Your Guide to a Perfect Quilt Edge
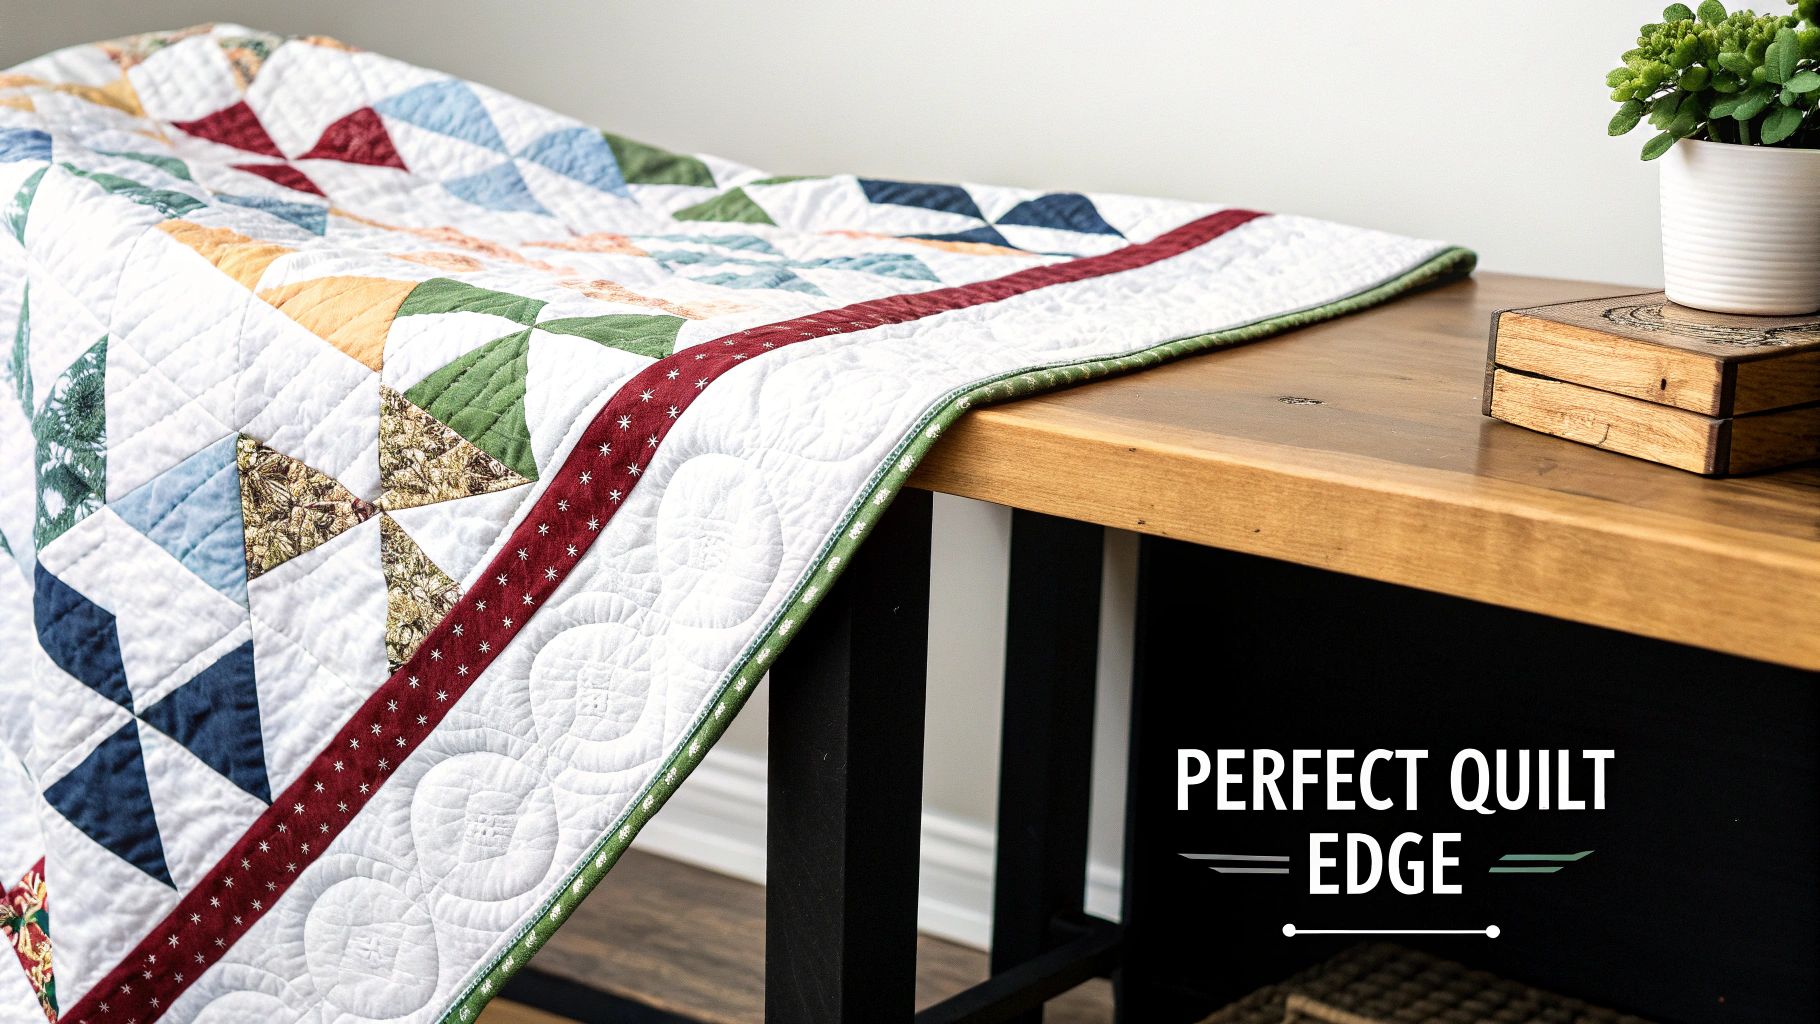
Learning how to finish quilt edges is arguably the most critical skill in your quilting journey. It's more than just a decorative touch; a well-made binding acts as a protective barrier, encasing the raw edges of your quilt top, batting, and backing to prevent them from fraying with use and washing.
This is what gives a quilt its longevity. That structural integrity is the difference between a quilt that lasts for a season and one that can be loved, used, and snuggled under for decades. Think of it as the final seal of quality on all your hard work. Plus, the style of finish you choose can completely change the vibe of your finished piece.
Choosing Your Finishing Technique
While double-fold binding is the go-to for its incredible durability, it's far from your only option. The best choice really depends on what you've made and how it will be used.
- For quilts that will see a lot of action: You can't beat a double-fold binding. It's the champion for bed quilts, couch throws, and baby blankets that need to stand up to frequent washing.
- For a clean, modern aesthetic: Consider a faced binding. This technique hides the finish on the back of the quilt, creating an invisible edge that lets your design shine right to the very edge. It's perfect for wall hangings and art quilts.
- For a little something extra: Techniques like faux piping or a scalloped edge can add a pop of personality and a custom feel to special projects.
A beautifully finished edge is the signature of a skilled quilter. It shows you care about the details and are committed to creating a piece that will stand the test of time.
This guide will walk you through these essential techniques, giving you the confidence to pick the perfect finish for any project. Whether you’re a beginner tackling your first baby quilt or an experienced quilter creating a modern wall hanging, mastering the edge is a game-changer.
To get you started, here’s a quick look at some of the most popular methods and what they’re best for.
Quilt Edge Finishing Methods at a Glance
| Finishing Method | Best For | Difficulty Level | Final Look |
|---|---|---|---|
| Double-Fold Binding | Everyday quilts, bedspreads, baby blankets | Beginner-Intermediate | Classic, durable frame (approx. 1/4" - 1/2") |
| Single-Fold Binding | Delicate quilts, heirloom pieces, hand-finishing | Intermediate | Thinner, less bulky edge than double-fold |
| Faced Edges | Art quilts, wall hangings, modern designs | Intermediate-Advanced | "Invisible" finish, no visible frame on the front |
| Scalloped/Curved Edges | Decorative quilts, vintage-inspired designs | Advanced | Playful, decorative curved or wavy edge |
| Faux Piping | Adding a pop of color, decorative projects | Intermediate | A thin accent line of color along the edge |
Each of these techniques offers a different look and level of durability, so you can always find the perfect match for your quilt's style and purpose.
Alright, let's get you set up. Before you can even think about stitching that final seam, you need to gather your gear. Having everything you need within arm's reach isn't just about convenience; it's about making the whole process smoother and a lot more fun. This is your quilting mission control.
When it comes to cutting binding strips, precision is everything. You can forget about your trusty fabric scissors for this job. For perfectly straight, uniform strips every single time, you absolutely need a sharp rotary cutter. You’ll pair this with a large self-healing mat and a long acrylic quilting ruler—a 24-inch one is ideal. This trio is the secret to avoiding the wavy, uneven binding that can ruin an otherwise perfect quilt.
Getting Your Sewing Machine Ready
Just about any sewing machine can handle binding, but a couple of small additions can make a huge impact. The single most important tool here is a walking foot, sometimes called an even-feed foot. This little marvel has its own feed dogs on top, which work in tandem with your machine's feed dogs to pull all the layers of your quilt sandwich through evenly.
Why does this matter so much? A quilt sandwich has a lot going on—the top, batting, backing, and now the binding. A standard presser foot can push the top layers forward, causing ugly puckers and ripples. The walking foot prevents all that shifting, keeping your binding flat and flawless. Don't forget to pop in a fresh needle (an 80/12 or 90/14 is a great all-rounder) and grab some quality thread that matches your binding.
Picking the Perfect Binding Fabric
Your binding fabric is the frame for your masterpiece, so this is where you get to make a fun design choice. Do you want a fabric that disappears into the quilt top, or maybe a bold pop of color to make the whole thing sing? I've seen some fantastic quilts finished with a scrappy binding made from all the leftover fabrics from the project—a great way to use up every last piece.
One of the biggest decisions you'll make is whether to cut your binding on the straight grain or on the bias. This choice will directly affect how your binding behaves and how durable it is.
So, how do you decide? It's actually pretty simple.
- Straight-Grain Binding: This is your go-to for any quilt with straight sides and 90-degree corners. You cut the strips along the fabric's grain (either lengthwise or crosswise). It's stable, economical with your fabric, and a breeze to handle.
- Bias-Cut Binding: If your quilt has any curves or scalloped edges, this is your only option. Cut at a 45-degree angle to the grain, bias binding has a natural stretch that lets it conform to curves beautifully without any puckering. Because of its durability, it's also a fantastic choice for well-loved quilts that will see a lot of wear and tear, even if the edges are straight.
Mastering Classic Double-Fold Quilt Binding
If you're just getting into finishing quilt edges, the double-fold binding is the absolute best place to start. There's a reason it's the go-to for quilters everywhere: it wraps the edge in two layers of fabric, creating a tough, durable frame that holds up to years of snuggling and washing. It’s my trusted method for everything from baby quilts that see a lot of wear to large bed quilts.
The beauty of this technique is its perfect marriage of strength and a clean, polished look. It’s what gives a quilt that professional, long-lasting finish.
Calculating and Preparing Your Binding Strips
First things first, let's figure out how much fabric you'll need. Just measure the perimeter of your quilt—that’s all four sides added together—and then add an extra 15-20 inches to be safe. That little bit of extra length is your best friend when it comes to joining the ends and turning corners without coming up short.
When you're cutting, most quilters aim for strips between 2.25 and 2.5 inches wide. If you’re new to this, I’d suggest starting with 2.5 inches. It gives you a bit more fabric to work with and is much more forgiving.
Once your strips are cut, you need to join them into one long piece.
- Lay two strips right-sides-together, forming a 90-degree angle.
- Sew diagonally across them, from the top left corner to the bottom right.
- Trim the extra fabric, leaving about a quarter-inch seam.
- Keep doing this until all your strips are connected.
Finally, press the entire strip in half lengthwise with the wrong sides together. This simple fold is what creates the "double-fold" and gives this binding all its strength. This part of the process is all about precision, where understanding seam allowance really pays off.
Attaching the Binding to Your Quilt
With your long binding strip prepped and ready, it's time to attach it. I always start on one of the longer sides of the quilt, leaving a tail of about 8-10 inches of binding loose before I start sewing. Line up the raw edges of your folded binding with the raw edge of your quilt top. A walking foot is a lifesaver here, helping you stitch everything down smoothly with a 1/4-inch seam allowance.
Sew along the edge until you’re exactly a quarter-inch from the first corner, then stop and backstitch. Now, get ready for the corner magic.
The infographic below captures the essence of quilting—a craft built on precision.
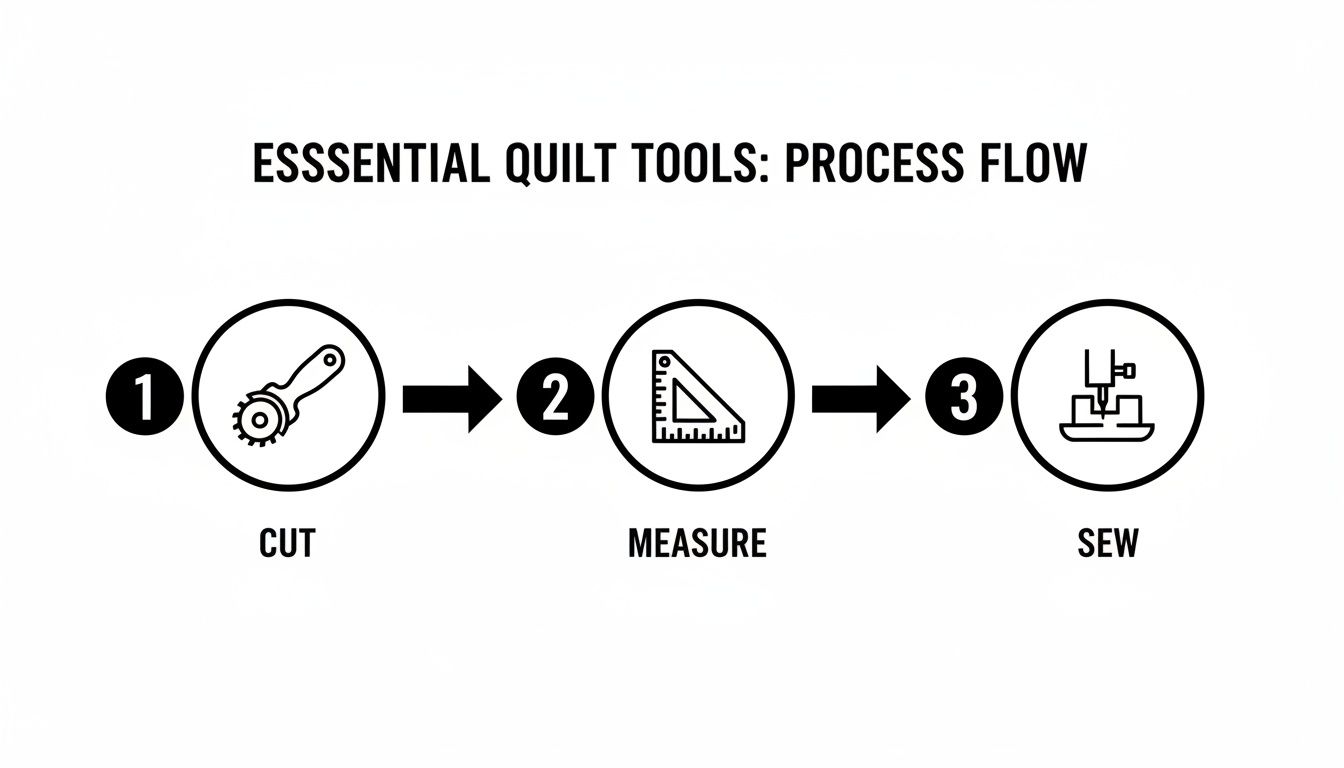
This simple flow—cut, measure, sew—is the foundation for achieving the professional results you’re after.
Creating Perfect Mitered Corners
A sharp, clean mitered corner is what separates a good binding job from a great one. After you've stopped a quarter-inch from the edge, take the quilt out from under the needle. Fold your binding strip straight up and away from the quilt, which creates a neat 45-degree angle.
Hold that fold in place, then bring the binding strip back down over itself, making sure its raw edge lines up perfectly with the raw edge of the next side of the quilt. The folded edge should now be flush with the side you just sewed. Pin it down and start sewing right from the top edge of this new side, sticking with that quarter-inch seam.
Pro Tip: Don't rush the corners. The secret to avoiding bulky, rounded messes is holding that fold firmly as you start stitching the next side. A clean, crisp fold makes all the difference.
You'll repeat this for all four corners. When you get back around to where you started, stop sewing about 12 inches away from your starting stitches. This leaves you with two long tails, which you’ll use to create one final, seamless join. Once they’re connected, just sew down that last open section. All that’s left is to wrap the binding around to the back and stitch it down, either by machine or by hand for a flawless, invisible finish.
Exploring Creative Alternatives for Finishing Edges
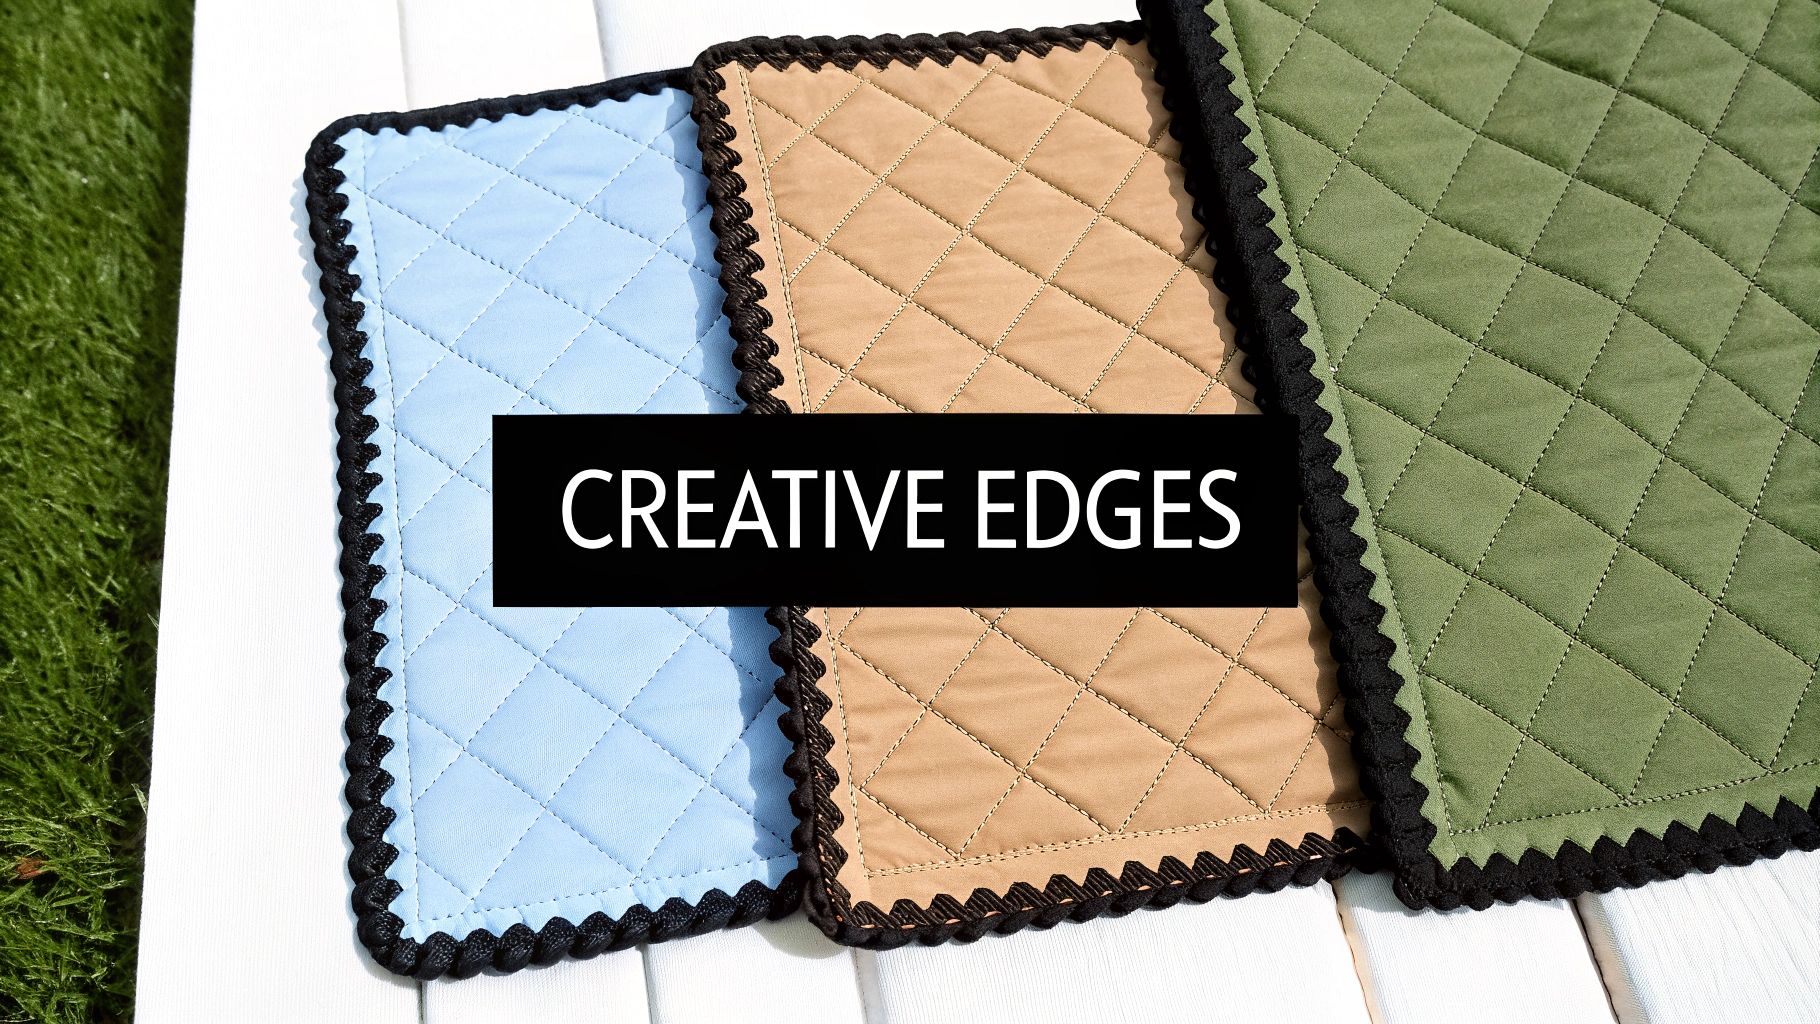
While the classic double-fold binding is a reliable workhorse, the fun doesn't have to stop there. Some quilts just call for a different touch—something that elevates the design from well-made to truly memorable.
Exploring these alternative finishes can solve unique design problems. Maybe you need an invisible frame for a modern art quilt, or perhaps a playful, vintage-inspired edge. Whatever your vision, there's a finishing technique to match.
The Invisible Finish with Faced Binding
Have you ever designed a quilt where the pattern bleeds right off the edge? A traditional binding would just interrupt that visual flow, acting like a thick frame you never wanted. That’s the perfect time to use faced binding.
Facing is a brilliant technique that gives you a clean, sharp edge with no visible frame on the front of your quilt. Instead of wrapping around the quilt sandwich, the facing is stitched to the front and turned completely to the back before being secured. The result is a crisp, professional finish that’s ideal for wall hangings and art quilts where the piecing needs to be the star of the show. It's the secret to that gallery-ready look.
Adding a Delicate Accent with Faux Piped Binding
Sometimes, a quilt just needs a tiny pop of a contrasting color to pull the whole thing together. Faux piped binding is a deceptively simple way to get that sophisticated look, creating the illusion of a thin line of piping tucked between the quilt top and the binding.
It’s easier than it looks:
- You start with two different fabric strips for your binding.
- The accent fabric (the "piping") is cut just a little bit wider than your main binding fabric.
- When you sew them together and attach them to the quilt, that extra sliver of accent fabric peeks out, creating a perfect, subtle pop of color.
This little detail adds a custom, high-end feel without the fuss of working with actual cording. It's a fantastic way to add that final, thoughtful touch, like pulling an accent color from a nursery's decor into a new baby quilt.
Embracing Curves with Bias Binding
So, what do you do when your quilt isn't a perfect square? From vintage Dresden Plate quilts to modern, flowing art pieces, many designs feature gorgeous scalloped or curved edges. If you've ever tried to force a standard straight-grain binding around a curve, you know it's a recipe for puckers and frustration.
For any project with curves, bias-cut binding is non-negotiable. Because it's cut on a 45-degree angle to the fabric's grain, bias binding has a natural stretch. This allows it to bend and conform to any curve smoothly, hugging the edge of the quilt for a flawless, ripple-free finish that truly honors the unique shape of your work.
Choosing a creative finish is a reflection of the maker's attention to detail. It shows that every part of the quilt, right down to the edge, was a deliberate design choice.
While these techniques might seem a bit specialized, they're becoming more and more popular as quilters look for new ways to personalize their creations. This trend is part of a growing global quilting market where uniqueness is highly valued.
Lighter Finishes Like Single-Fold Binding
For projects that won't see a lot of wear and tear—think miniature quilts, doll blankets, or delicate wall hangings—a double-fold binding can feel bulky and overwhelming. A single-fold binding is a much better fit in these situations.
Just like the name says, you press the fabric strip only once, which creates a much thinner, more delicate edge. It’s certainly not as durable as its double-fold cousin, but its lightweight finish is perfect for preserving the fine scale of smaller or more fragile pieces.
Working Through Common Quilt Binding Hiccups
Let's be honest, even after years of quilting, a binding can still throw you a curveball. But don't worry—most of the common frustrations are completely fixable. In fact, learning how to troubleshoot is just as valuable as learning the technique itself.
A wavy or rippled binding is probably the most common issue I see. It's almost always a sign that the binding fabric was stretched a bit too taut during sewing. You really want to just guide the binding onto the quilt, not pull or stretch it into place. If you spot waves, the best thing to do is stop, unpick that section, give it a good press with some steam, and re-sew it without any tension.
Another classic struggle is getting those corners to look sharp and mitered instead of bulky or rounded. This is purely a battle against excess fabric.
Taming Bulky or Messy Mitered Corners
If your corners are looking a little puffy, it's likely because there's too much batting and backing stuffed inside. Before you even think about attaching your binding, you have to trim the quilt sandwich so the edges are perfectly square and flush.
When you get to a corner and fold the binding to create that miter, don't be afraid to use a tool. A stiletto or a point turner is your best friend here, helping you poke the fabric into a crisp, sharp point.
Here's a little trick I use all the time: If a corner is just slightly off, I'll grab a hand-sewing needle and subtly tuck the stubborn fabric into place. A couple of tiny, hidden stitches can work wonders to secure the fold and make the corner look perfect from the front.
What to Do When You Run Out of Binding
That sinking feeling when you realize your binding is too short? We've all been there. It’s an easy fix, I promise. Just cut another strip of binding fabric—give yourself at least 6 to 8 inches to be safe.
Attach this new piece to one of the tails of your existing binding using that same diagonal seam you used for all the other strips. This will give you the extra length you need to finish properly. Then you can trim the other end to size and join the ends as you normally would. Trust me, no one will ever spot that extra seam.
While it's tough to find hard data on quilting mistakes, it's always interesting to see what's happening in the broader market. Industry reports usually look at sales trends instead of specific crafting tips, but they can still be a fascinating read. You can see a quilting market analysis on cognitivemarketresearch.com for a bigger picture.
Answering Your Quilt Finishing Questions
Once you've poured your heart into a quilt top, the finishing touches can feel a little daunting. Let's tackle some of the most common questions quilters ask when they get to the binding stage. A few clear answers can make all the difference between a good finish and a great one.
What’s the Best Binding Width for My Quilt?
The tried-and-true, never-fails-me width for binding strips is 2.5 inches. It’s the industry standard for a reason. This size gives you a beautiful finished binding that’s about 1/2 inch wide on both sides of the quilt—sturdy enough for a quilt that will be loved and used every day.
But you can absolutely play with that number. If I'm working on a delicate wall hanging or a miniature quilt, I might slim it down to 2.25 inches for a finer look. On the other hand, for a super cozy quilt with thick, high-loft batting, bumping the width up to 2.75 inches gives me that extra bit of fabric I need to wrap around the bulky edge without a fight.
My go-to advice? Before you cut all your fabric, make a tiny test binding with a scrap from your quilt sandwich. It’s a quick sanity check to make sure you’ll love how it looks and feels on that specific project.
Straight-Grain or Bias Binding?
This one is simple: it all comes down to the shape of your quilt.
If you have a quilt with straight edges and classic 90-degree corners, straight-grain binding is your best bet. It’s efficient with fabric, incredibly stable, and a breeze to work with, whether it’s your first quilt or your fiftieth.
The second you introduce a curve, however—think scalloped edges or a round quilt—you need to switch to bias binding. It’s cut on a 45-degree angle to the fabric's grain, which gives it a wonderful, natural stretch. That stretch is what lets it mold perfectly around curves without puckering or creating awkward folds. Because of the way the threads are woven on the bias, it’s also exceptionally durable, making it a fantastic choice for any quilt that's going to see a lot of wear and tear, even one with straight edges.
How Do I Get That Perfect, Invisible Binding Join?
That seamless finish where the binding ends meet is the final flourish that makes a quilt look truly professional. It's easier than it looks!
Once you’ve stitched your binding almost all the way around the quilt, stop, leaving yourself a gap of about 12 inches to work in. Let the two tails of your binding overlap inside this gap.
Now, trim one tail so it overlaps the other by the exact width of your binding strip. So, for a 2.5-inch strip, you’ll have a 2.5-inch overlap. Open up both tails, place them right-sides-together to form a right angle, and stitch diagonally across, just like you did when joining your strips. Trim the excess fabric, leaving a 1/4-inch seam allowance.
When you press that diagonal seam open and refold the binding, you'll find it's now the exact length needed to fill the gap. Just stitch it down, and that join will be so clean it’s almost impossible to find.
At Famcut.com, we live and breathe quilting. From gorgeous fabrics and essential tools to local classes that will boost your skills, we're here to help you bring your beautiful projects to life. Explore everything we offer and get inspired.