


How to Draft Sewing Patterns That Actually Fit
Learning how to draft your own sewing patterns is a game-changer. It all breaks down into three core skills: taking spot-on body measurements, using those numbers to draw a basic block, and then adding your design details and seam allowances. Mastering this process hands you the keys to a completely custom-fit wardrobe.
Your Blueprint for a Perfect Fit
A garment that fits like a glove doesn't happen by accident at the sewing machine. The real magic starts way earlier, with creating an accurate blueprint of your body. Think of it like building a house—if your foundation measurements are off, the whole project is going to be a struggle. That's why getting your tools together and taking careful measurements is the most important part of the entire process.
Gathering Your Pattern-Making Gear
Before you start drawing, you'll need a few specific tools. Having the right equipment on hand is the difference between a frustrating mess and a precise, professional-looking pattern.
- Pattern Paper: You'll need big sheets of it. Dedicated dotted paper is great, but I've used medical exam paper or even the blank side of wrapping paper in a pinch.
- Measuring Tape: A flexible, soft tape measure is a must for getting around your body's curves accurately.
- Pencils and Eraser: A sharp mechanical pencil will give you the finest, cleanest lines. A good eraser is also your best friend for making those inevitable tweaks.
- Rulers: A clear gridded ruler (at least 18 inches long) is essential for straight lines. You'll also want a French curve or hip curve for beautifully shaped necklines, armholes, and hiplines.
This infographic lays out the essentials you'll need to create your perfect pattern blueprint.
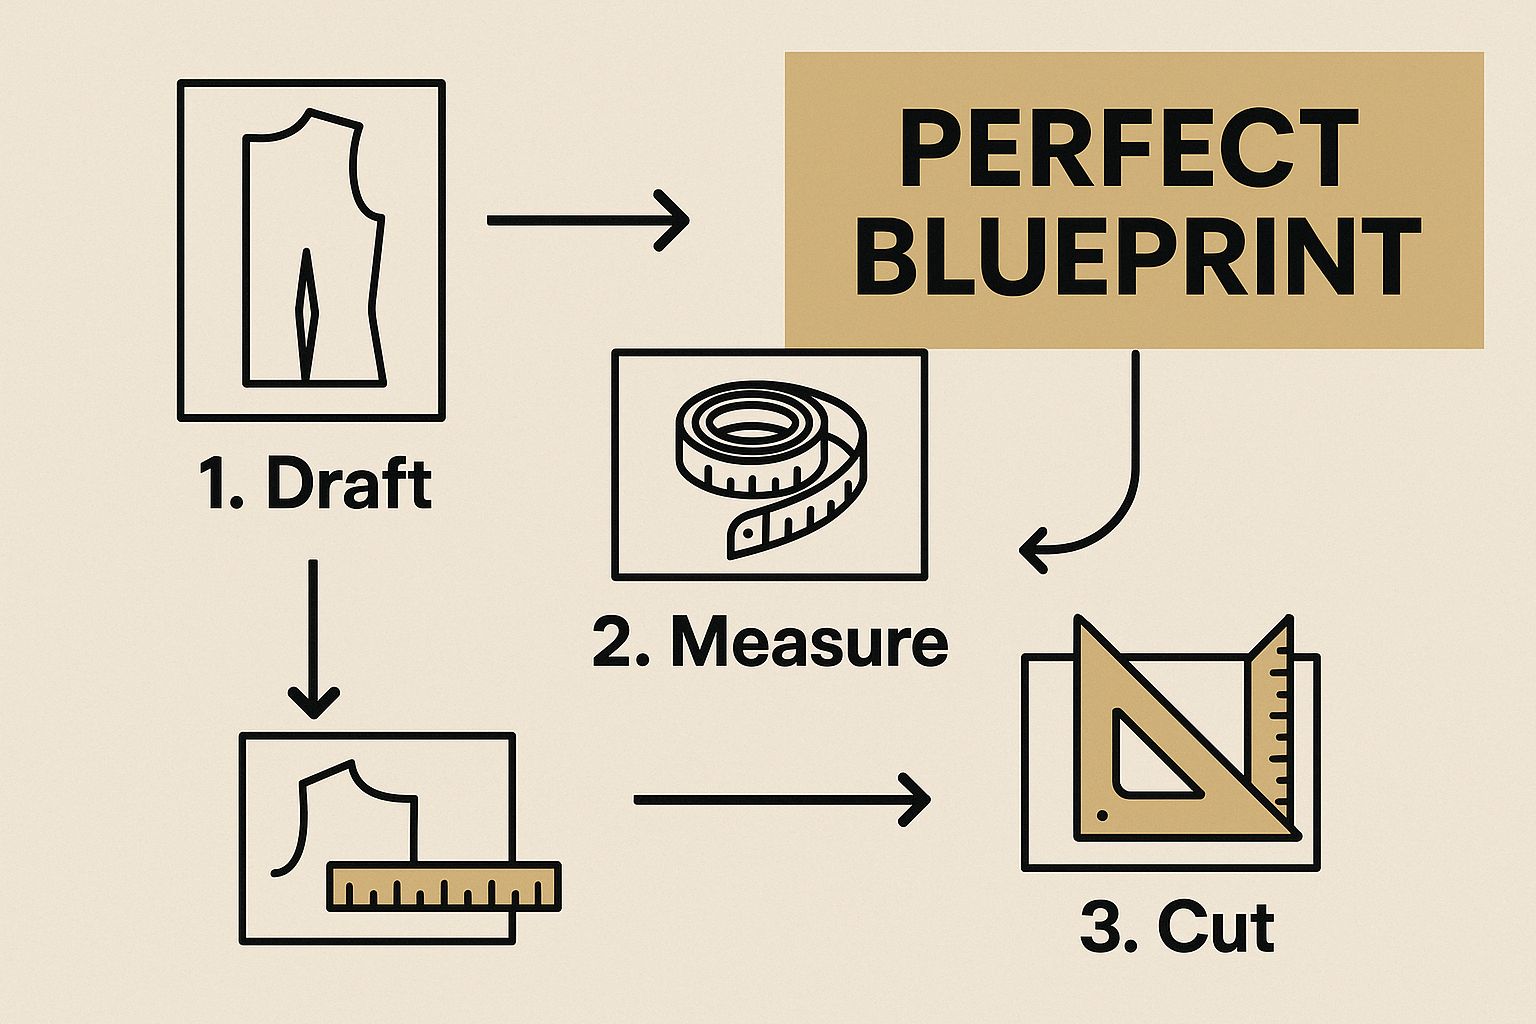
Having these tools organized and ready to go just makes the whole experience so much smoother and, honestly, more enjoyable.
Taking Crucial Body Measurements
This is where the custom fit really begins. Your goal is to capture your body's true dimensions without pulling the tape too tight or letting it sag. For the best results, wear something form-fitting and stand in a relaxed, natural posture. If you can, grab a friend to help—it’s much easier to get an accurate back measurement when you’re not a contortionist.
The tape should be snug, but not digging in. A good rule of thumb is that you should be able to slip one finger comfortably underneath it.
Pro Tip: Before you start, tie a piece of elastic or a ribbon around your natural waist. Let it settle into the narrowest part of your torso. This creates a stable landmark that is incredibly helpful for taking all your vertical measurements accurately.
This methodical approach has a long history. While people have been drafting patterns for centuries, it was the 19th century that saw the process really become formalized. With the invention of the sewing machine, demand for reliable patterns exploded. This led to a major innovation in 1863 when Ebenezer Butterick introduced the first graded commercial sewing patterns, which completely changed the game for home sewers. You can learn more about the fascinating history of sewing patterns on Accio.com.
Drafting Your Foundational Bodice Block
This is where the magic really starts. The bodice block, or what many seasoned sewists call a "sloper," is the master key to unlocking a fully custom handmade wardrobe. It’s here that those careful measurements you took finally get translated onto paper, creating the essential blueprint for nearly any top, dress, or jacket you can imagine.
Think of it as sculpting a second skin from paper—a perfect, flat representation of your unique torso.
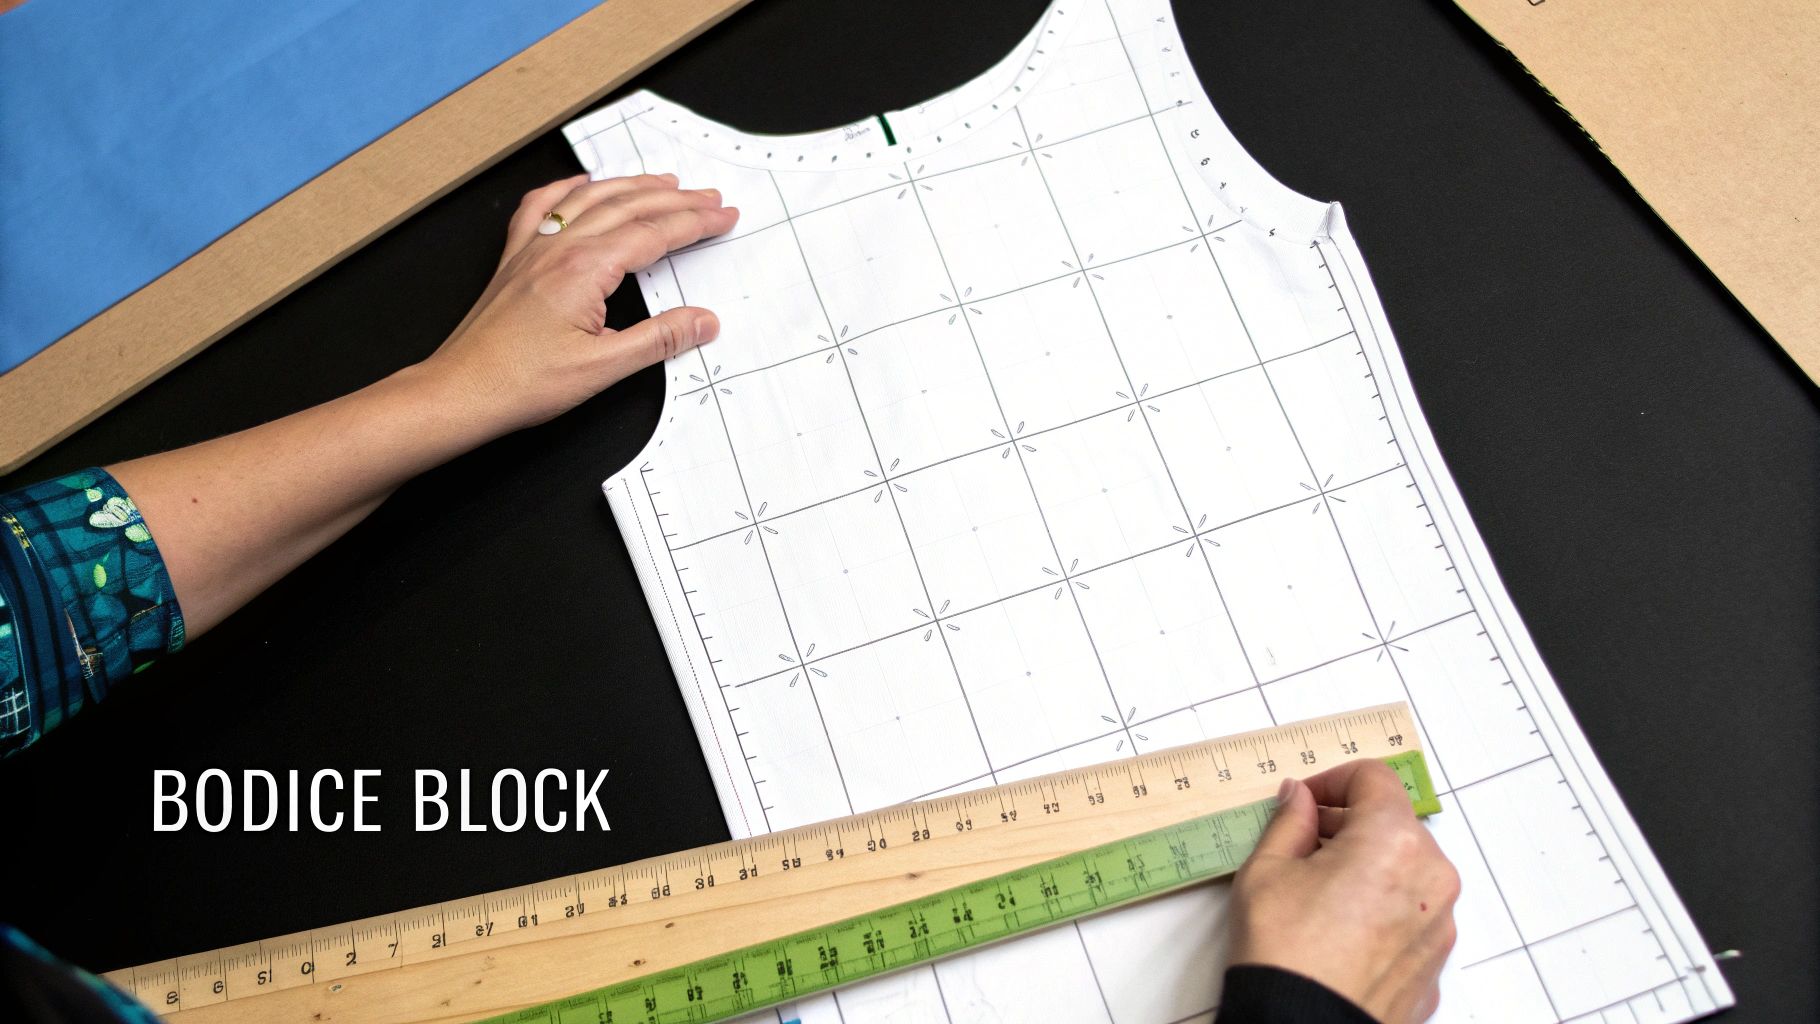
Don't let the rulers and pencils intimidate you. This process isn't about complicated geometry; it's just methodical plotting. We’re going to draft what's called a no-ease block, which means it will be exactly your body's size, with no extra room for movement or style. That all-important "breathing room" gets added in a later step.
From Measurements to Plotted Points
Before you can draw the curves of your body, you need a basic frame to work within. Here's a quick look at the absolutely essential measurements you'll need for this first step.
| Essential Measurements for a Bodice Block |
|---|
| Measurement Name |
| Full Bust |
| Back Waist Length |
| Shoulder to Shoulder |
| Bust Point Height |
With these numbers in hand, you're ready to put pencil to paper.
The first thing you’ll do is draw a foundational rectangle on your pattern paper. The height of this rectangle will be your back waist length, and its width will be half of your full bust measurement. This box is the canvas. Every other point—for the neckline, shoulders, armholes, and waist—will be plotted using this rectangle as a guide.
For example, to mark your shoulder point, you'll measure down a specific distance from a top corner and then measure across by half your shoulder-to-shoulder measurement. Each point you plot is a landmark, mapping out the unique geography of your body.
The real magic of learning to draft patterns is that "aha!" moment when you realize it's just a sophisticated game of connect-the-dots. And the best part? You get to decide where the dots go. Once you understand the why behind each point, you can move them around to create any design you want.
Shaping the Torso with Darts
A flat piece of paper doesn't magically curve around a three-dimensional body. That’s what darts are for. Darts are simply V-shaped tucks of fabric that pinch out excess material, creating the curves and contours needed to fit a human form. For a bodice, the two most important darts are the bust dart and the waist dart.
The bust dart is what makes room for your bust, preventing that dreaded pulling and straining of fabric across your chest. Its size is calculated from the difference between your high bust and full bust measurements. In the same way, waist darts cinch in the fabric at your natural waist, creating a flattering shape that follows your curves instead of hanging straight down.
- Bust Dart: This usually runs from the side seam toward the bust apex. It's the key to creating shape and contour over the chest.
- Waist Darts: Found on both the front and back pieces, these darts remove extra fabric between the bust and the hips, guaranteeing a close, defined fit at the waist.
Getting your darts right is the secret sauce for a professional-looking, truly custom garment.
Connecting the Dots and Finalizing the Shape
Once all your key landmarks—neckline, shoulder, bust, armhole, and waist—are plotted and your darts are drawn in, it's finally time to connect them.
Pull out your straight ruler for the shoulder and side seams. Then, grab your French curve to sketch in the smooth, graceful lines for your neckline and the armscye (that's the technical term for the armhole opening).
This is probably the most satisfying step, where you see all those disjointed points and lines finally come together into a recognizable bodice shape. Take your time with the curves. A beautifully drawn armscye not only looks better on paper but will make setting in a sleeve a whole lot easier later on.
And there you have it. This finished piece is your personal sewing foundation.
Giving Your Pattern Room to Breathe and Sew
Your sloper is an incredible tool—a perfect, second-skin map of your body. But let's be honest, you can't wear a second skin. Real clothes need room to move, stretch, and simply exist on a body that breathes and bends. This is where we turn that skin-tight block into a real, sewable pattern by adding ease and seam allowance.
Getting this part right is what separates a pattern that works from one that ends up as a frustratingly tight muslin.
Think of your sloper as the architectural blueprint. Now, we're adding the essential margins that make the structure livable and allow us to actually build it.
Wearing Ease vs. Design Ease: What's the Difference?
The term "ease" gets thrown around a lot, but it actually has two distinct functions. Nailing the difference is key to getting the exact fit and style you're picturing in your head.
- Wearing Ease: This is non-negotiable. It’s the absolute minimum space you need for basic movement. Without it, you’d feel like you're in a straightjacket. You literally couldn't lift your arms or sit down. For a standard woven garment that's meant to be close-fitting, you'll want about 2-3 inches (5-7.5 cm) of ease around the bust and hips.
- Design Ease: This is all about style. It’s the secret sauce that creates a specific silhouette. Design ease is what makes an A-line skirt flare, a cocoon coat voluminous, or a slouchy sweater, well, slouchy. This can be anything from an extra inch to a foot or more, depending entirely on the look you're going for.
A simple sheath dress, for example, might only have wearing ease. But a breezy linen top? That could easily have another 4-6 inches (10-15 cm) of design ease layered on top for that relaxed, flowy vibe.
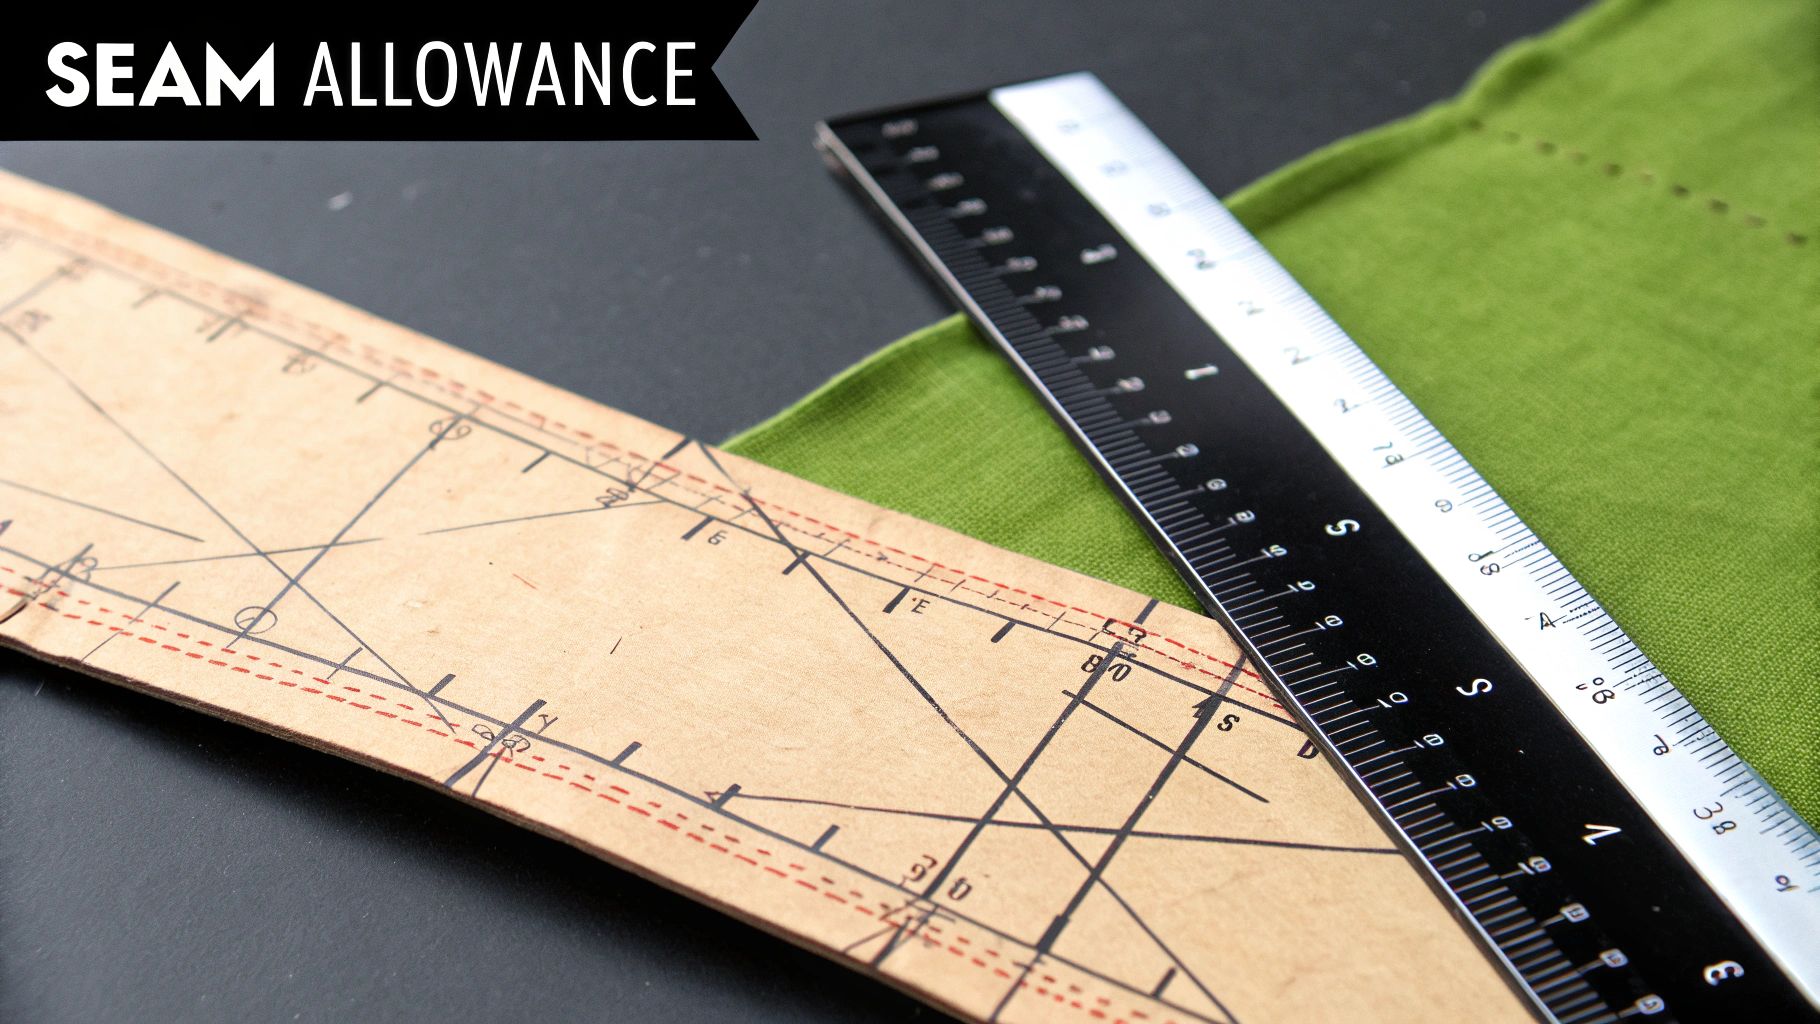
Adding Seam Allowance: The Final Frontier
Okay, you've added your ease and perfected the shape. The very last thing to do before you can even think about fabric is to add your seam allowance. This is the buffer zone around every pattern piece that gets tucked away inside the seams.
We've all done it—that sinking feeling when you realize you forgot to add seam allowances and your finished garment is two sizes too small. Don't let that be you.
A consistent, accurately drawn seam allowance is one of the biggest tells of a well-made garment. If your allowances are wonky or uneven, it's a nightmare to match up your pieces, and the final shape can get distorted.
Grab a seam gauge or a clear gridded ruler for this. Precision is your friend here. The industry standard is often 5/8 inch (1.5 cm), but you have complete control. I often change mine based on what I'm sewing.
- Most Seams: For your basic construction seams—side seams, shoulders, armholes—a 1/2 inch (1.25 cm) or 5/8 inch (1.5 cm) allowance is perfect.
- Curves (Necklines, Collars): For tightly curved areas, I always drop down to a 1/4 inch (0.6 cm). It makes sewing a smooth curve so much easier and reduces the bulk you have to trim away later.
- Hems: You'll need a much deeper allowance for hems to give you enough fabric to fold and finish cleanly. Plan for at least 1 to 2 inches (2.5 to 5 cm) here.
By methodically adding ease for the fit you want and seam allowance for construction, you've officially graduated from a simple block to a legitimate, ready-to-cut sewing pattern.
Turning Your Block into a One-of-a-Kind Design
You’ve put in the work to perfect your foundational block, and now the real fun starts. This is where you shift from a technical pattern maker to a creative designer, taking that basic sloper and coaxing it into a garment with its own unique style. The techniques we're about to cover are the heart and soul of custom pattern drafting.
Think of your block as a blank canvas. Even simple tweaks—like changing a neckline or moving a dart—can completely transform the final look. This is how you'll unlock the endless possibilities hiding in that simple paper shape and start making clothes that are truly you.
The Magic of Moving Darts
Darts aren't just functional tucks; they're one of the most powerful design tools you have. By moving them from one spot to another—a technique called dart manipulation or pivoting—you can radically change the style lines of a garment without messing up the perfect fit you worked so hard to achieve.
For example, that standard bust dart coming from the side seam can be swung up to the shoulder to create an elegant French dart. You could also split it into several smaller darts at the waist to create a different kind of shaping. This is the very same technique used to create princess seams, where all the dart shaping is cleverly absorbed into a long, flattering seam.
Let’s say you’re designing a simple sleeveless top. You could:
- Pivot the waist dart up to the armhole. This creates a cool, diagonal dart that adds a subtle, modern detail.
- Shift the side bust dart to the neckline. This can be turned into soft gathers or tiny tucks, adding volume and interest right at the front.
- Combine both darts into a single princess seam. This gives you that classic, clean silhouette that contours the body beautifully.
The trick is remembering that the volume of the dart—the amount of fabric it takes in—always stays the same. You’re just relocating it to create a different visual effect. This skill alone opens up a massive world of design potential. It's no wonder the global sewing supplies market, valued at around USD 5.24 billion, is projected to hit nearly USD 7.81 billion as more people get into personalized fashion. For more on these industry trends, you can check out the analysis over at 360iResearch.com.
Redrawing Necklines and Adding Designer Details
Beyond playing with darts, one of the easiest ways to make a big impact is by redesigning the neckline. Your basic block has a standard high crew neck, but that’s just a suggestion. Grab your French curve ruler, because you can redraw it into anything you want.
Fancy a classic V-neck? Just draw two straight lines from your shoulder points down to a new, lower point at the center front. If you're after a graceful scoop neck, use the gentlest curve on your ruler to connect the shoulder to the center front.
Designer's Tip: When you lower a neckline, especially at the front, you might notice it gapes a little. To fix this, you'll often need to create a tiny dart at the center front neckline and pivot it away into another dart. This removes that little bit of excess fabric so your new neckline lies perfectly flat against your chest.
This is also the point where you add the professional touches that take your design from a simple shape to a polished garment. You can draft facings to get a clean finish on your new neckline and armholes, or maybe add a button placket down the front. Every new element gets drafted right onto your manipulated block, building your custom design layer by layer.
Testing Your Pattern with a Muslin
I'm going to say something that might be the single most important piece of sewing advice you'll ever get: never, ever risk your beautiful fashion fabric on an untested pattern. This is a non-negotiable, golden rule. The secret to avoiding heartbreak and getting that perfect, bespoke fit every single time is making a muslin first.
https://www.youtube.com/embed/o6MIaasy3Ck
You might also hear it called a toile, but it's the same thing: a practice version of your garment made from cheap fabric. Think of it as a dress rehearsal. It’s your chance to see exactly how the flat pattern pieces come together on your three-dimensional body. This is where you'll catch and fix any fit issues—a gaping neckline, tight shoulders, weird pulling across the back—before you’ve even thought about touching your final fabric with scissors.
Honestly, skipping the muslin is the fastest way to a wadder (a sewing project that ends up in the trash) and a whole lot of frustration.
Choosing and Preparing Your Test Fabric
Your test fabric doesn't need to be fancy, but it does need to behave in a similar way to your final fabric. This is key. If you're planning a structured cotton dress, a basic, unbleached cotton muslin is perfect. But if your goal is a slinky rayon blouse, that same stiff cotton won't give you an accurate picture of the final drape. You'd be better off finding a cheap polyester that has a similar weight and flow.
A few tips from my own experience:
- Match the weight and drape. This is the most crucial part. Using a stiff, heavy canvas to test a pattern for a flowy silk camisole just won't work. The fit will be completely off.
- Don't bother with fancy finishes. You don't need to finish seams, press everything perfectly, or even hem your muslin. The goal here is a quick, down-and-dirty assembly to check one thing: the fit.
- Transfer your markings! Before you start sewing, make sure to transfer all the important pattern markings to your fabric. I'm talking dart points, notches, seam lines, and especially the waistline. These lines are your roadmap for figuring out what needs to change.
Reading the Fit and Making Adjustments
Once you have your muslin stitched together, try it on inside out. Why? Because this puts the seam allowances on the outside, making it so much easier to pinch, pin, and mark your adjustments right on the seam lines.
Stand in front of a full-length mirror. How does it feel? How does it look? Pay close attention to any tightness, pulling, or weird drag lines—they're all clues.
For example, do you see horizontal lines pulling across your bust? That’s a classic sign you need more room, probably through a Full Bust Adjustment (FBA). Are the shoulders slipping off? You'll need to shorten the shoulder seam. Vertical drag lines often point to length issues, telling you to either add or remove length somewhere.
A muslin isn't a failed garment; it’s a 3D instruction manual for your body. Every pull, wrinkle, and gape is a clear signal telling you exactly how to perfect your paper pattern.
This process is absolutely vital when you're drafting patterns for seasonal clothing, which is what most of us are doing. Search data shows a huge spike in interest for things like dress patterns right as spring fashion season kicks off. This just goes to show how much we want to get these timely projects right. If you want to dive deeper into that, you can explore how seasonal trends influence sewing on DreamCutSew.com.
Grab a marker and draw your corrections right onto the muslin. Don't be shy! Mark exactly where you need to add width or take something in. Once you're satisfied, carefully unpick the seams of your muslin. These adjusted fabric pieces have now become your new, perfected pattern. Lay them flat on top of your original paper pattern and transfer all those changes. Now, you can finally cut into your good fabric with complete confidence.
Frequently Asked Questions About Drafting Your Own Patterns
When you first start drafting your own sewing patterns, it's completely normal for a few questions to surface again and again. Honestly, even seasoned pros get tripped up on some of these details, so let's clear up some of the most common sticking points right from the get-go. Getting a handle on these concepts will make the whole process feel much less intimidating.
What's the Real Difference Between a Sloper and a Sewing Pattern?
This is easily the number one question I get, and it’s a great one because the distinction is crucial.
Think of a sloper (also called a block) as your personal body blueprint. It’s a super basic, custom-fit template that maps your unique shape. The key thing to remember is that it has absolutely no seam allowance and no "ease" for movement—it’s drafted to be like a second skin made out of paper.
A sewing pattern is what you develop from that sloper. It takes the blueprint and turns it into a functional guide for a real garment. This means adding all the essentials: seam allowances for sewing the pieces together, ease for comfort and movement, and any style details you want, like collars, pockets, or facings. The sloper is the pure foundation; the pattern is the final, practical guide for construction.
A sloper is a direct, skin-tight map of your body's measurements. A sewing pattern is that sloper plus seam allowances, ease for movement, and all the design details. Nailing this difference is the secret to drafting patterns that truly fit.
Can I Draft Patterns for Knit Fabrics?
You absolutely can, but it’s a completely different mindset. Drafting for knits is a unique skill because you're designing with the fabric's stretch, not just accommodating for it. Instead of adding room (ease), you'll often use negative ease, which means your pattern pieces are intentionally drafted a little smaller than your body measurements.
This approach lets the fabric stretch to create a snug, comfortable fit. To pull this off, you have to know the exact stretch percentage of your fabric and do a little math to adjust your measurements. I always tell people to get comfortable drafting for woven fabrics first. Mastering those fundamentals gives you the solid skill set you'll need before jumping into the wonderful, stretchy world of knits.
What Are the Most Common Mistakes People Make?
Over the years, I've seen a few classic mistakes trip people up more than anything else. If you can avoid these, you're already way ahead of the game.
- Rushing the Measurements: Taking inaccurate measurements at the beginning is like building a house on a crooked foundation. It will throw off every single step that follows.
- Forgetting Seam Allowance: This one is so easy to do when you're focused on the design, but it will result in a garment that's way too small to even get into.
- Skipping the Muslin (or Toile): I can't stress this enough. Not making a test version means you won't spot any fit issues until you've already cut into your beautiful (and expensive) final fabric.
Always, always double-check your numbers, and please, never skip the muslin. That one practice run will save you more time, money, and frustration than you can possibly imagine.
How Do I Do a Full Bust Adjustment (FBA)?
A Full Bust Adjustment, or FBA, is a standard alteration for anyone whose bust measurement is proportionally larger than their frame. When you're working with your own drafted bodice block, the best way to do this is with the "slash and spread" method.
You'll make a few strategic cuts into your paper pattern—usually from the armhole and waist towards the bust point—and then pivot the pieces apart. This "spreads" the pattern, adding the extra room you need right at the fullest part of the bust without making the shoulders or waist bigger. A crucial part of this is redrawing a larger bust dart, which is what gives the fabric the proper shape to fit smoothly over the body's curves.
At Famcut.com, we're passionate about helping you master every step of your sewing journey. Explore our resources and classes to build your skills.