


Drunkard path quilt pattern: A Modern Guide to Curved Piecing
The Drunkard's Path is a classic quilt block made from just two simple pieces—one with an inward curve (concave) and one with an outward curve (convex). Don't let its simplicity fool you. By just turning and arranging these blocks, you can create stunning secondary patterns, from mesmerizing circles to flowing, winding paths. This versatility is exactly why it's a favorite for both traditional and modern quilters.
The Timeless Appeal of the Drunkard's Path

Few quilt patterns have the deep history and sheer creative power of the Drunkard's Path. When you first see it, the block looks straightforward enough: just a simple quarter-circle. But once you get the hang of sewing that one curved seam, you unlock a whole world of design. It’s the perfect block for any quilter looking to move beyond straight lines and dip their toes into the wonderful world of curved piecing.
The real magic is in how you arrange the blocks. The Drunkard's Path quilt pattern is a true chameleon.
- Classic Rings: You can turn the blocks to form interlocking circles, which gives it a look similar to a traditional wedding ring quilt.
- Winding Paths: Orient the blocks to create a continuous, meandering line that dances across the quilt top.
- Modern Graphics: By strategically using bold colors and playing with negative space, you can create striking, contemporary designs that feel miles away from the traditional layouts.
This single block can truly adapt to whatever style you throw at it.
A Journey Through History
This pattern’s story is just as winding as the paths it can create. You can trace its roots all the way back to Ancient Egypt, where similar designs were found by archaeologists. The motif even shows up on Roman artifacts, which just goes to show its enduring appeal.
By the early 1800s, it had made its way to England, where it was known by names like Mill Wheel and Rob Peter to Pay Paul. It wasn't long before it crossed the Atlantic. The pattern really took off in the late 19th century with the American Temperance Movement. The Women's Christian Temperance Union (WCTU) used the design to symbolize the staggering path of a drunkard, giving the block its most famous name. You can read more about its fascinating story over on the AccuQuilt blog.
There’s another powerful story tied to this block. Some historians believe it may have been used as a secret code on the Underground Railroad. The theory is that quilts with this pattern were hung on clotheslines to signal to escaping slaves that they should follow an erratic, zigzagging route to throw off trackers. While the evidence is debated, the folklore adds a layer of resilience and courage to this iconic design.
By learning to sew this one curved block, you are not just making a quilt; you are connecting with centuries of artisans, activists, and storytellers who used this very same shape to express themselves.
Why This Pattern Endures Today
The Drunkard's Path continues to be a go-to for quilters, and for good reason. It’s the perfect introduction to sewing curves. Easing two opposing curves together can seem intimidating at first, but it’s a surprisingly meditative and rewarding process that teaches you so much about fabric control.
Plus, modern tools have made this pattern more accessible than ever. With acrylic templates and die-cutting systems, cutting precise curves is a breeze, which removes one of the biggest hurdles quilters used to face. This has opened the door for a new generation to put their own spin on the classic, using fresh fabrics and modern layouts to ensure the Drunkard's Path legacy continues for many more years to come.
Choosing Your Tools and Fabrics for Perfect Curves
Before you even touch your sewing machine, let's talk about setting yourself up for success. Getting those beautiful, flowing curves in a Drunkard's Path block is all about having the right tools and fabric from the get-go. A little bit of prep work here honestly makes the difference between a project you love and one that makes you want to tear your hair out.
High-quality quilting cotton is your best bet, hands down. It has a tight, stable weave that behaves beautifully, especially along those tricky bias edges of the curves where flimsier fabrics tend to stretch and fray. Think of it as your foundation – a solid one makes the whole process smoother.
Selecting the Perfect Fabrics
The real magic of a Drunkard’s Path quilt happens when you play with color and pattern. You'll get the most dramatic effect by choosing fabrics with high contrast between the convex (the "ball") and concave (the "L-shape") pieces. Think about pairing a vibrant solid with a busy print, or a deep, dark fabric with something light and airy.
- Fabric Weight: Stick with 100% quilting cotton. It’s made to take a good, crisp press and has enough body to handle the easing you’ll do when pinning the curves.
- Prints and Solids: Mixing it up can look amazing. For instance, if you're making a scrappy quilt, using the same solid for all your convex pieces can create a really cool, unifying thread that pulls the whole design together.
- Pre-washing: I know it's a pain, but this is a step you just can't skip. Pre-washing and pressing your fabric before cutting is your insurance policy against shrinkage and bleeding colors later on. You don't want a rogue red ruining your perfectly pieced top after all that work!
My Go-To Trick: When I'm tackling curves, a little spray starch is my secret weapon. A light spritz before pressing adds just enough stiffness to the fabric. This makes cutting more precise and sewing the curves together so much easier.
Choosing the right fabric is half the battle. Here’s a quick guide to help you decide what might work best for your project.
Fabric Selection Guide for Drunkard's Path Blocks
This table breaks down some common fabric types and how they behave with curves, helping you pick the perfect material for a successful project.
| Fabric Type | Best For | Handling Tips for Curves | Visual Effect |
|---|---|---|---|
| Quilting Cotton Solids | Beginners, achieving high contrast, modern designs. | Very stable. Use starch for extra crispness. Easy to mark for alignment. | Creates bold, graphic secondary patterns. |
| Quilting Cotton Prints | Scrappy quilts, hiding minor imperfections in seams. | Be mindful of directional prints. Fussy cutting can be time-consuming but effective. | Adds texture, movement, and a "busy" or traditional feel. |
| Batiks | Experienced quilters looking for rich color. | High thread count makes it crisp but can be tough to pin. Use very fine, sharp pins. | The dye process creates beautiful, saturated colors with subtle variations. |
| Chambray or Essex Linen | Adding texture and a rustic, modern look. | Prone to fraying. Starch is a must. Sew with a slightly shorter stitch length. | Offers a soft, textural quality that's very different from standard cotton. |
Ultimately, quilting cotton is the most reliable choice, especially for your first go. But as you get more confident, don't be afraid to experiment with other textures!
Essential Cutting Tools
Accurate cutting is everything for this block. I'm not exaggerating—even a tiny wobble when cutting the curve can cause puckers or throw off your block alignment later. You've got a couple of great options for getting this right.
A sharp rotary cutter is non-negotiable. I personally reach for my smaller 28mm rotary cutter for curves. The smaller blade gives me much more control as I navigate the tight arc of the template. And please, start with a fresh blade! It makes all the difference in getting clean cuts without dragging or snagging the fabric.
Templates vs. Die-Cutting Systems
When it comes to cutting the actual shapes, you have two main paths to choose from.
Some people swear by acrylic templates. They're affordable and give you the freedom to "fussy cut," which is great when you want to perfectly center a specific motif from your fabric. The downside is that it's a slower process, and you have to be super careful to stay accurate piece after piece.
The other option is a die-cutting system like an AccuQuilt GO!. These machines are a game-changer for speed and precision. You get perfect, identical cuts every single time, and many of the dies even have little notches to help with alignment. The trade-off is the initial investment in the machine and the specific dies, and it's not practical for fussy cutting.
If you're just dipping your toes into the Drunkard's Path, templates are a perfectly fine place to start. But if you fall in love with the block (and you just might!), a die-cutter can save you a ton of time and is definitely worth considering.
Pins, Markers, and Pressing for Success
Once your fabric is cut, a few simple tools will make piecing a breeze. Fine, sharp pins are your best friends for curves. I love using flower-head pins because they’re long, thin, and lie flat under the presser foot, which helps keep the fabric from shifting as you sew.
A good marking tool is also incredibly helpful. A water-soluble pen or a chalk pencil is perfect for marking the center points on your curved edges—a key step for getting everything lined up perfectly before you pin.
And finally, never underestimate the power of a good steam iron. Correct pressing is what takes a slightly lumpy, pieced block and turns it into a flat, professional-looking masterpiece. We’ll get into the nitty-gritty of pressing techniques in the next section.
Two Foolproof Methods for Sewing Curved Seams
Let’s be honest, sewing curves can look intimidating. Many quilters see that curved seam on a Drunkard’s Path block and think it's some advanced, secret technique. But the truth? It’s far more approachable than it looks. The key isn't a hidden trick; it's simply finding a method that clicks for you and giving it a little practice.
We're going to walk through two of the most reliable ways to piece these blocks: the classic, pin-heavy technique and a more modern, minimal-pin approach. Both will get you a beautiful, pucker-free block. Your favorite will just come down to your personal style and how you feel about using a lot of pins.
This flow chart gives you a bird's-eye view of the quilting process, from the first cut to the critical pinning stage.
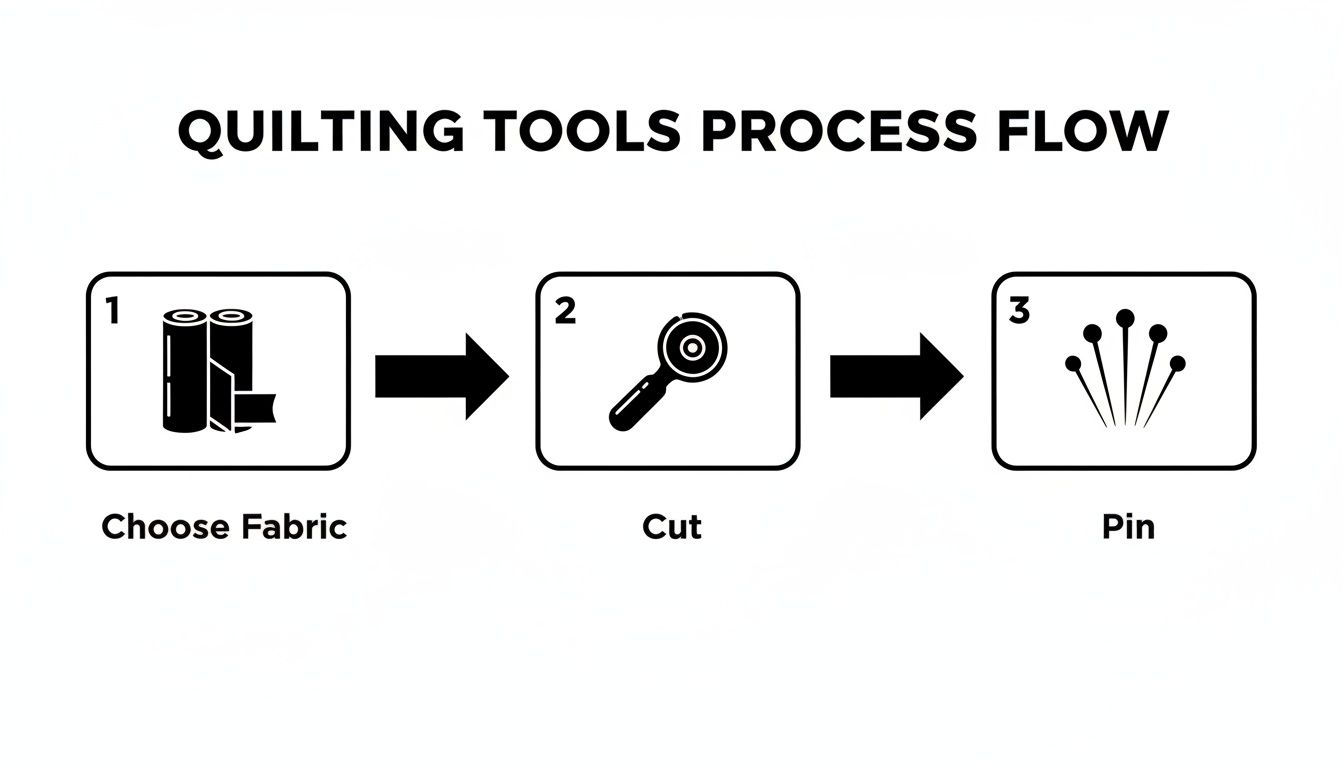
As you can see, what you do before you even get to the sewing machine matters. Careful prep work is everything, and the precision you put into cutting and pinning is what sets you up for success with curved seams.
The Classic Pinning Method
This is the tried-and-true technique that quilters have relied on for generations to tame curves. It’s all about control. If you're new to sewing curves, this method is your best friend—it builds confidence by ensuring the fabric behaves exactly as you want it to.
First, you’ll need to find the center of the curved edge on both your pieces—the convex ("ball") piece and the concave ("L-shape") piece. The easiest way is to gently fold each one in half and make a tiny crease with your fingers.
Place the pieces right sides together, matching up those center creases, and pop your first pin in. Now, bring the raw edges together at one end of the curve and place a pin, then do the same for the other end. You should have three anchor points holding things together.
From there, it's a matter of gently easing the rest of the fabric from the convex curve to fit the concave one. Add pins every half-inch or so. Don't be shy here; using ten to twelve pins per seam is perfectly normal. The whole point is to distribute that fullness evenly to avoid any tucks.
Pro Tip: Angle your pins perpendicular to the seam with the heads pointing out. This makes them a breeze to pull out right before they reach the needle, so you don't accidentally sew over one (we've all been there).
When you're ready to sew, I recommend shortening your stitch length to about 2.0 mm. Sew slowly. If your machine has a needle-down function, use it! It lets you stop and adjust the fabric without losing your spot. Keep the bottom concave piece flat against the machine bed and gently guide the convex piece on top, making sure those raw edges stay perfectly aligned as you go.
The Modern Minimal-Pin Approach
If the thought of all those pins makes you groan, this modern method might be for you. It relies more on feel and guiding the fabric by hand, but once you get the hang of it, it's so much faster. Many experienced quilters I know swear by this "no-pin" or "four-pin" technique.
You'll still want to mark the centers of your curves, but that's where the prep differs. Place your two fabric pieces right sides together, but only align the very beginning of the seam. Put a single pin there to hold it.
Take it to your machine and sew just the first couple of stitches to lock the seam in place. With your needle down, lift the presser foot. Now, match up the center marks of your two pieces, holding them in place with your fingers.
Use your left hand to guide the bottom (concave) piece and your right to gently ease the top (convex) piece into alignment as you sew toward the center. Stop every inch or so with the needle down to readjust, keeping the raw edges lined up just ahead of the needle. Once you hit the center, stop again, align the very end of the seam, and sew the rest of the way. The trick is to avoid stretching either piece—let the feed dogs do the work.
This method can feel clumsy at first, but it quickly becomes intuitive. It really teaches you how the fabric wants to move. It’s a great example of how quilting techniques evolve, just like the patterns themselves have. For instance, the Drunkard's Path quilt once served as a covert signal on the Underground Railroad. Its winding curves warned enslaved people of patrols with dogs, advising a zig-zag path to throw trackers off. Hung on a porch, the quilt's layout vividly illustrated this erratic path. This clandestine role was most prominent between the 1840s and 1860s, a powerful piece of American history. You can dive deeper into its story through the research of Martha Grimm Brady.
The Art of Pressing Your Seams
How you press your Drunkard's Path block is just as important as how you sew it. A good press is the difference between a block that lies flat and one that fights you every step of the way. You really have two choices: pressing to the side or pressing open.
- Pressing to the Side: This is the go-to for most quilters. For this particular block, it's best to press the seam allowance toward the concave (the "L-shape") piece. This helps the curve settle nicely and reduces bulk where your blocks will eventually join. First, "set" the seam with the tip of your iron, then flip it over and press from the right side.
- Pressing Seams Open: Some quilters are devoted to pressing seams open because it creates an exceptionally flat block. It can be a great choice for this pattern, as it splits the bulk evenly. This takes a bit more care, as you don't want to accidentally pull your stitches. If you go this route, turn your iron's temperature down a notch and press gently.
No matter which method you choose, always press, don't iron. That means lifting and placing the iron, not dragging it across the fabric. Dragging can stretch and distort the beautiful curve you just worked so hard to create.
Turning a Single Block Into Endless Designs
Once you've gotten the hang of piecing that basic Drunkard's Path curve, the real fun begins. The magic of this block isn’t just in conquering the sewing; it’s in seeing how that one simple unit can be twisted and turned into a breathtaking variety of quilt tops. A simple rotation is all it takes to completely change the entire feel of your project.
This is where you get to put on your quilt designer hat. Lay out your finished blocks on a design wall, the living room floor, or even your bed. Playing with the arrangement before you sew a single row together is the key to unlocking the block's true potential.
From Classic Rings to Winding Paths
Some of the most iconic Drunkard's Path layouts are instantly recognizable and, thankfully, surprisingly simple to create. Just a handful of blocks is all you need to start seeing these classic secondary patterns take shape.
- The Classic Wedding Ring Effect: This is the one everyone knows! Arrange four blocks so their convex curves all point toward the center, forming a perfect circle. When you repeat this 2x2 arrangement across the quilt, the circles link up, creating that timeless, elegant design.
- Solomon's Puzzle: If you’re after a more geometric, almost optical-illusion vibe, try this. Alternate the orientation of each block—one with the curve facing up and right, the next down and left. This creates a mesmerizing pattern of interlocking puzzle pieces that gives the quilt incredible movement.
- Falling Timbers: This layout achieves a beautiful sense of cascading motion. You orient all the blocks in a single column the same way, then make the next column a mirror image of the first. The result is a gorgeous, zigzagging path that seems to flow right down the quilt.
These are just the starting points. I've found that the simple act of turning one block ninety degrees can introduce a whole new dynamic. It's what makes this pattern so endlessly fascinating to play with.
The Power of Color and Value
Layout is more than just which way the blocks are facing; your color placement is your secret weapon. How you arrange your light, medium, and dark fabrics can make seams pop or disappear, completely transforming the final look.
Think about a simple two-color quilt. Red and white was a wildly popular combination historically. In fact, if you look at quilt records, late 19th and early 20th-century red and white Drunkard's Path quilts show up almost twice as often as blue and white ones. This was likely a practical choice—dyes from madder roots were vibrant and durable—rather than any symbolic link to the temperance movement. You can dive deeper into this history through the Quilt Index's fascinating research.
Let's imagine you're making a classic rings layout with red and white fabric:
- Option 1: Make all the convex ("ball") pieces white and all the concave ("L-shape") pieces red. You'll get bold, distinct white circles floating on a red background.
- Option 2: Flip it. Now you have punchy red circles on a clean white background.
- Option 3: Go scrappy. Use different shades of red for the concave pieces but keep the convex pieces a consistent white. This adds a ton of texture and depth while still letting the circular pattern shine.
By simply swapping your light and dark fabrics, you can make the background pop forward or recede. This is a fundamental concept in quilt design that the Drunkard's Path block is perfect for exploring.
Modern Takes on a Classic
The incredible versatility of the Drunkard's Path quilt pattern has made it a favorite among modern quilters who love to play with asymmetry and negative space. A modern layout might intentionally break up a repeating pattern to create something more improvisational or minimalist.
Picture a quilt top made almost entirely of a solid, deep charcoal gray. Then, imagine a single, graceful arc of Drunkard's Path blocks snaking its way from one corner to another. This strategic placement turns the blocks into a powerful design element, drawing your eye across that wide-open negative space.
Another modern approach is to create partial patterns. Instead of full, interlocking circles, you could piece just a few arcs or quarter-circles and let them float freely on the background. This technique gives the quilt a light, contemporary feel and really celebrates the simple beauty of that one perfect curve. The possibilities are truly only limited by your imagination.
Troubleshooting Common Curved Piecing Issues
Even with the best preparation, sewing curves can sometimes feel like a wrestling match. If you find yourself staring at a puckered seam or a block that just won’t lie flat, don’t worry—you’re not alone. Most issues with the Drunkard's Path quilt pattern are easy to diagnose and fix with a few small adjustments.
Let's walk through some of the most common hiccups you might encounter and, more importantly, how to solve them. Think of this as your go-to guide for turning frustration into a flawless finish.
Conquering Puckers and Tucks
The most frequent complaint I hear about sewing curves is puckering along the seam line. This is what happens when the fullness of that outer (convex) curve isn't eased in evenly to fit the inner (concave) curve. Basically, a little tuck gets stitched right into the seam, creating a bumpy, unprofessional look.
More often than not, the culprit is a lack of pinning, especially if you're new to this. Rushing the process without enough pins to hold the fabric steady is a recipe for puckers.
Here’s how to fix it:
- Pin More Than You Think You Need: If you used four pins, try eight. If you used eight, try twelve. I'm not kidding—don't be afraid to use a pin every half-inch to meticulously distribute that fabric.
- Slow Down: Speeding around the curve is a surefire way to pull the fabric unevenly. Ease off the foot pedal and use your machine's needle-down function to stop and readjust as you go.
- Check Your Tension: Sometimes, machine tension that’s a bit too tight can cause the fabric to bunch up. It’s always a good idea to test your stitch on a scrap first.
The goal is to gently guide, not force, the fabric. Let the machine's feed dogs do the heavy lifting while your hands simply keep the raw edges aligned just in front of the needle.
Solving Mismatched Block Sizes
So you've sewn your block, pressed it beautifully, but when you lay your ruler on top, it's too small or just a little bit wonky. This frustrating moment almost always points back to the very first step: cutting.
An inaccurate cut, even by a tiny 1/16th of an inch, can have a surprisingly big impact on your final block size. That curved bias edge is especially unforgiving and can stretch out of shape in an instant if you're not careful.
Common Causes and Quick Fixes
Another huge factor is your seam allowance. A scant quarter-inch seam is key for piecing, but if yours is a little too wide, it will literally eat into your block and shrink its finished dimensions.
- Stabilize Your Fabric: A light coat of spray starch or a starch alternative before cutting can work wonders. It gives the cotton just enough stiffness to prevent those bias edges from stretching and warping.
- Use a Sharp Blade: A dull rotary blade is your enemy. It will drag and distort the fabric instead of slicing cleanly through it. I always start a new project with a fresh blade for the best results.
- Verify Your Seam Allowance: Use a seam allowance guide or a specialty quarter-inch presser foot to keep your stitching consistent. Sew a test seam on some scraps and get out your ruler to make sure it's perfect.
Eliminating Distorted Curves
Does your finished curve look less like a smooth arc and more like a slightly flattened or pointy shape? This kind of distortion often comes from how the block is handled during pressing.
Dragging a hot iron across the seam can stretch those bias edges out of shape in a heartbeat. This is especially true right after sewing, when the heat and steam from the iron make the fabric extra pliable.
The solution is simple: always press, don't iron. Lift and place your iron firmly on the seam to set it, then gently press the seam allowance in the direction you want it to go. This simple change in technique preserves the beautiful, smooth curve you worked so hard to sew. By focusing on these little details, you’ll build the confidence to tackle any curved piecing challenge.
Answering Your Drunkard's Path Questions
Diving into a new quilt block always brings up a few questions, and with its signature curves, the Drunkard's Path is definitely one of those patterns. It's totally normal to feel a little hesitant about tackling those curves, but I promise they're more bark than bite.
Let's clear up some of the most common questions quilters have so you can get started with confidence.
What’s the Best Way to Cut Accurate Curves?
Precision is your best friend here, and the right tools make all the difference. For the most accurate cuts, you really can't beat acrylic templates or a die-cutting system.
If you're going the template route, carefully trace around them with a fine-point fabric marker. Then, using a sharp rotary cutter, cut right on your drawn line. A lot of us quilters swear by a smaller 28mm rotary cutter for curves; it just gives you so much more control and makes navigating those tight spots easier.
On the other hand, if you see a lot of Drunkard's Path blocks in your future, a die-cutting system like an AccuQuilt is a game-changer. It punches out perfectly cut pieces, often with helpful notches, every single time. This takes all the guesswork out of cutting and makes lining up your pieces a breeze.
How Much Extra Fabric Do I Need?
Those curves, as beautiful as they are, do create more waste than your standard straight-sided blocks. It’s always a smart move to buy about 15-20% more fabric than the pattern specifies.
Think of it as your quilting insurance policy. This little buffer gives you peace of mind and covers you for:
- Oops-a-daisy moments with the rotary cutter (we've all been there!).
- Having plenty of fabric to square up your blocks without stress.
- The freedom to change your layout or add a border later on.
And don't forget to pre-wash your fabric before you make that first cut! This gets any shrinkage out of the way upfront, ensuring your quilt top stays flat and true to size.
Pre-washing is non-negotiable. Trust me, you don't want to finish a beautiful quilt only to have it pucker and warp after the first wash because one fabric shrank more than another.
Can I Quilt This on My Home Machine?
You absolutely can! Quilting a Drunkard's Path on a domestic machine is a fantastic way to finish it, and your quilting design can really play up the gorgeous curves you've pieced. The key is to use a walking foot—it's essential for feeding all three layers of your quilt sandwich through evenly and keeping puckers at bay.
Need some ideas for quilting designs? Here are a few favorites:
- Stitch-in-the-Ditch: A classic for a reason. Simply quilting right in the seam lines makes your piecing pop and gives it a clean, defined look.
- Echo Quilting: This is one of my personal favorites. You stitch lines that echo the main curves, either inside the concave or convex pieces, which adds a beautiful ripple effect and a ton of movement.
- Free-Motion Fun: If you're feeling a bit more adventurous, organic designs like swirls, pebbles, or figure-eights look incredible against the structured geometry of the blocks.
The interplay between the sharp lines of the piecing and the soft, flowing quilting can create a stunning finish for your drunkard path quilt pattern.
At Famcut.com, we're quilters too, and we love helping you find the right tools and fabrics to make your vision a reality. Check out our collection of high-quality quilting supplies to get started on your next project. You can see everything we have to offer at https://famcut.com.