


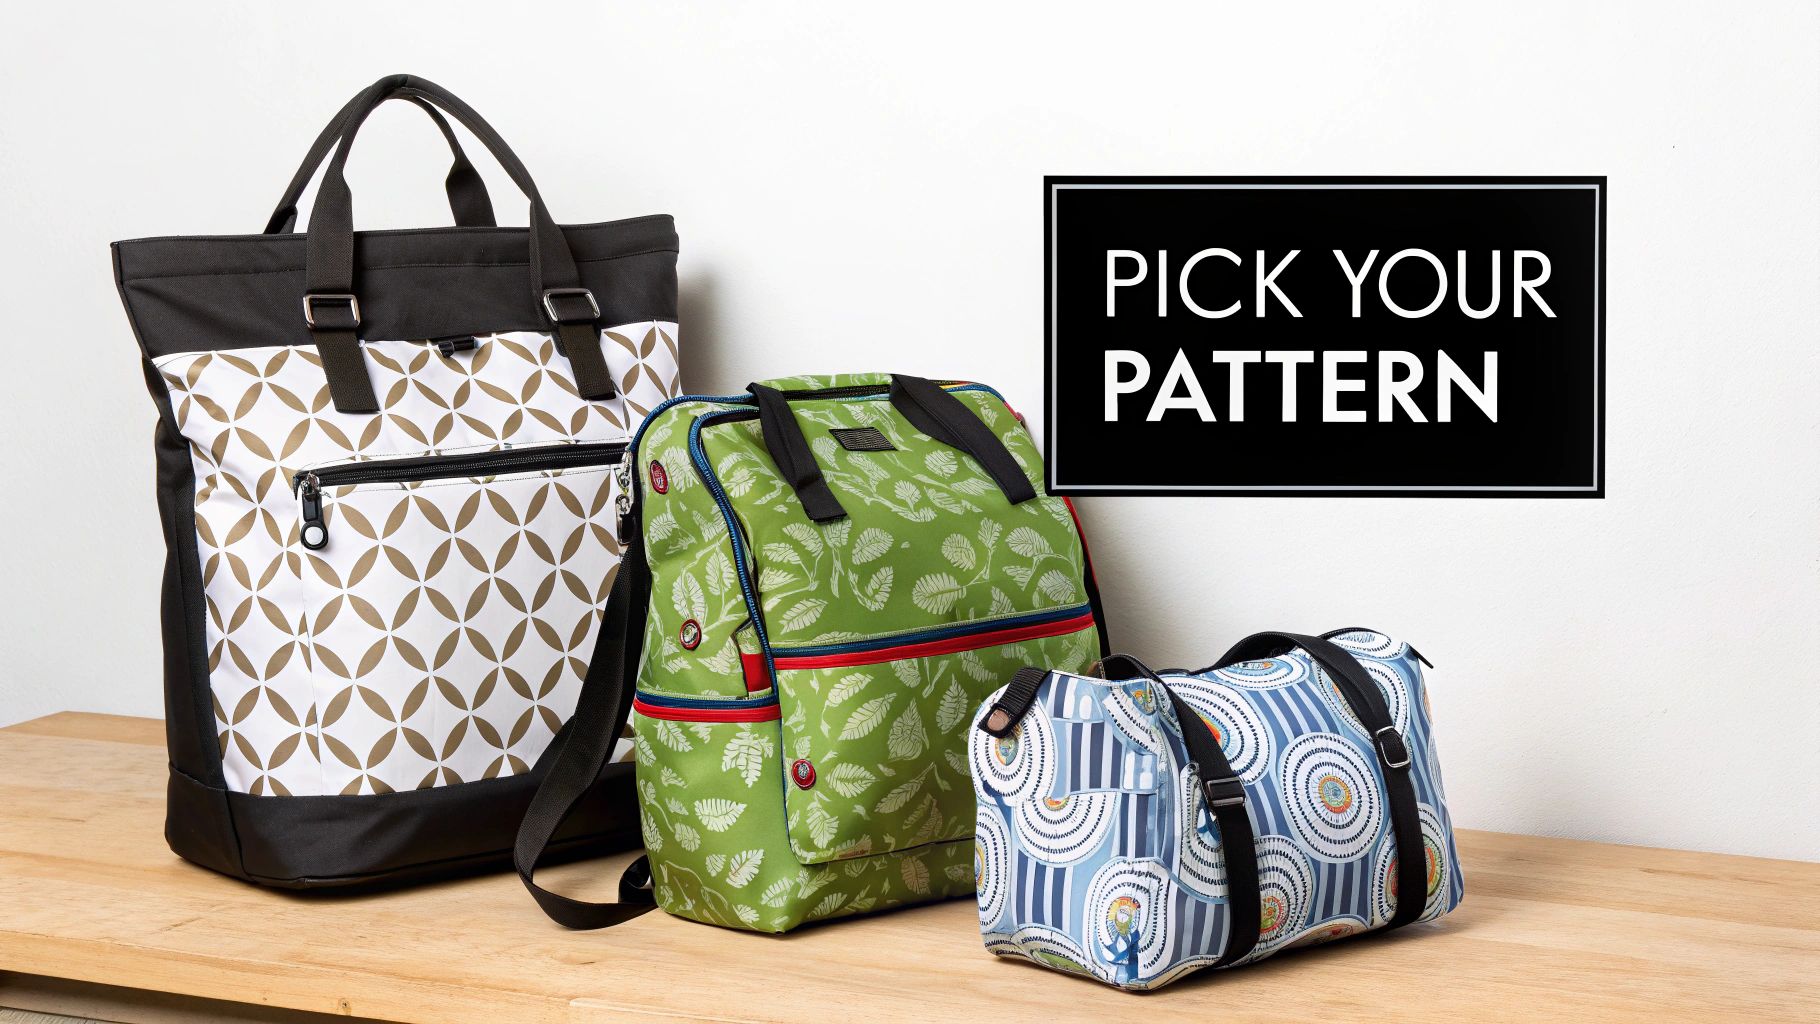
Sew Your Own Diaper Bag Patterns Like a Pro
Before you even think about cutting into that beautiful fabric, let's talk about the single most important decision you'll make: choosing the right diaper bag pattern. This isn't just about finding a cute design; it's about matching the bag's fundamental style—be it a backpack, tote, or messenger—to how you actually live your life. Get this right, and you'll create a bag that’s not only gorgeous but genuinely useful.
How to Choose the Right Diaper Bag Pattern
The first step toward your perfect handmade diaper bag starts with a simple question: "What does my typical day look like?" The answer is your road map. It will steer you toward a style that works with you, not against you. Before you commit to a pattern, it’s worth thinking about the qualities to look for in a diaper bag. Seeing what makes the best store-bought bags so great can give you some brilliant ideas for your own project.
Picture yourself in the real world. Are you navigating a crowded farmers' market with a stroller, needing both hands free for your toddler and your organic kale? Or are you mostly zipping around in the car, where you need to grab something from the passenger seat without a struggle? Each scenario points to a very different kind of bag.
Matching Pattern Style to Your Lifestyle
The three classic diaper bag styles each come with their own set of pros and cons. Let's break them down so you can pick a pattern for a bag that won't just end up gathering dust in a closet.
To help you decide, here's a quick comparison of the most common pattern styles. Thinking through these factors can save you a lot of headache (and seam ripping!) later on.
| Diaper Bag Pattern Style Comparison | | :--- | :--- | :--- | :--- | | Pattern Style | Best For | Key Features | Typical Sewing Difficulty | | Backpack | Parents on the go; long outings; babywearing | Hands-free convenience; even weight distribution; often has many compartments. | Intermediate to Advanced | | Tote | Quick trips; easy access to contents; stashing in the car | Large, open main compartment; easy to grab things quickly; stylish designs. | Beginner to Intermediate | | Messenger | City living; quick errands; those who want crossbody wear | Quick, one-handed access while worn; adjustable strap; balances accessibility with security. | Intermediate |
This table should give you a good starting point. The key is to be honest about what you truly need from a bag day-to-day.
Over the past 10 years, I've seen a huge shift in the sewing community—and the broader market—away from traditional totes and toward multifunctional backpack designs. This trend makes sense. Life is busy, and practicality wins. As you browse patterns, you'll notice many newer designs feature things like ergonomic straps and insulated pockets, features that were once considered premium but are now pretty standard.
Reading Pattern Reviews Like an Expert
Once you’ve settled on a style, it's time to vet specific patterns. Don't just get dazzled by the pretty cover photos. The real story of a pattern is always in the reviews.
Look for comments about the instructions. You’re searching for clues. Phrases like "the illustrations were a huge help" or "I really struggled with the zipper gusset" are pure gold. They tell you where the pattern shines and where it might trip you up.
Also, pay close attention to the difficulty level mentioned in reviews. If you see multiple seasoned bag-makers calling a pattern "a real challenge," you might want to save that one for your next project if you're just starting out.
A great pattern isn't just about a beautiful finished bag. It's about having an enjoyable, confidence-building experience along the way. Picking a pattern that matches your current skill set is the secret to avoiding a half-finished project of frustration.
Finally, scan for modifications. Did other sewists add slip pockets, change the straps, or resize the whole thing? These comments are fantastic for sparking your own customization ideas, and they can also point out areas where the original pattern might be a little lacking. Taking the time to choose the right pattern truly is the foundation of a successful sewing adventure.
Gathering Your Essential Sewing Supplies
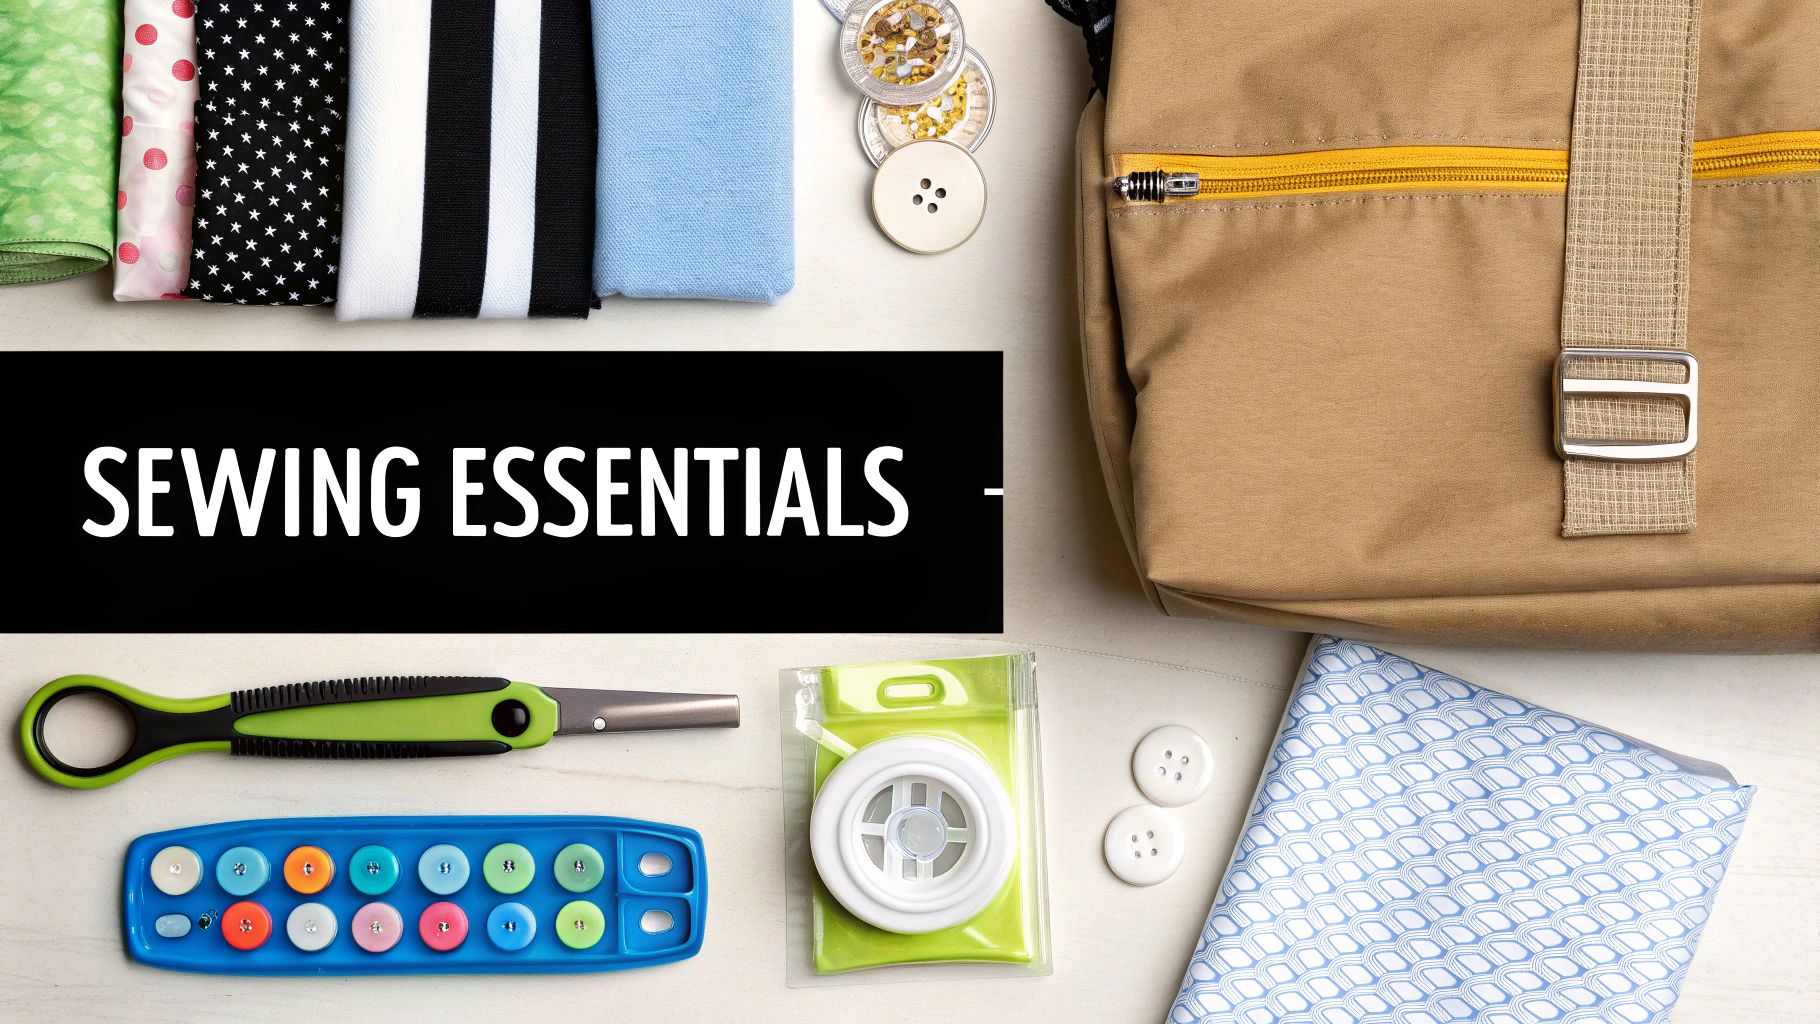
Alright, you’ve picked out your diaper bag pattern—now for the really fun part: gathering all the goodies to bring it to life. This is more than just a shopping trip. The materials you choose right now will be the difference between a bag that looks homemade and one that looks like it came from a high-end boutique.
A truly great bag is a team effort between fabric, structure, and hardware. Let's walk through what you'll need and, more importantly, why each piece is so critical for a bag that can actually handle the chaos of daily life.
Choosing Your Core Fabrics
The exterior fabric is your bag’s first impression and its first line of defense. You need something that can take a beating and, ideally, be cleaned easily. For beginners, I almost always recommend a medium-weight canvas or duck cloth. It’s incredibly forgiving to sew, has enough body to hold its shape, and can handle being dropped on the ground or tossed in the car without a second thought.
If you want to step it up a bit, look into laminated cotton or a lightweight oilcloth. These give you a fantastic, wipeable surface—a lifesaver when you're dealing with spills. Just a heads-up: you’ll need a special Teflon or walking foot for your machine, and you must use clips instead of pins to avoid leaving permanent holes. For the lining, you can't go wrong with standard quilter's cotton. It's light, easy to work with, and comes in a million different prints to give the inside a pop of personality.
The Secret Ingredient: Interfacing
Let's talk about the unsung hero of bag making: interfacing. This is the non-negotiable step that prevents a sad, floppy bag. If you want that professional, structured silhouette, you absolutely cannot skip this.
I can't stress this enough: your interfacing choices will have more impact on the final look and feel of your bag than almost any other supply. Don't be tempted to skip it or go with a lighter weight than the pattern suggests. The structure is everything.
Different parts of the bag need different kinds of support. Here’s a quick rundown of what I use and where:
- Fusible Foam: This is the heavy lifter. I use it on the main front, back, and bottom exterior panels to give the bag a thick, cushioned body that helps it stand up on its own. It's surprisingly lightweight, too.
- Fusible Fleece: A great alternative if you want a softer, less rigid feel. It gives quilter’s cotton some much-needed body and a lovely padded texture without making it stiff.
- Woven Interfacing (like Pellon SF101): This is my go-to for adding crispness without bulk. I apply it to all my lining pieces, pockets, flaps, and straps to keep them from stretching out and looking sloppy over time.
Selecting Dependable Hardware
Good hardware is like the jewelry for your bag—it adds function and that perfect finishing touch. Don't skimp here; quality metal parts will ensure your straps and closures can withstand constant use. Always double-check the sizes in your pattern, because even a slight difference can throw off the whole construction.
Key Hardware Components
- Zippers: Your main closure will likely need a #4.5 or #5 nylon coil zipper. These are beefier and more durable than the zippers you'd use for clothing. I love buying "zipper by the yard" because it's economical and I can cut exactly what I need for each project.
- Magnetic Snaps: These are fantastic for flaps and outer pockets because they're secure but easy to open with one hand. Pro tip: always reinforce the fabric behind the snap with a small scrap of fusible fleece or stabilizer to prevent it from tearing through.
- Rings and Sliders: If your pattern includes an adjustable crossbody strap, you’ll need a set of rectangular rings and a strap slider. D-rings are another common choice for attaching the strap tabs to the bag itself.
Finally, a couple of notes on your basic toolkit. Before you start, put in a fresh denim needle (size 90/14 or 100/16). It's built to punch through thick layers of fabric and interfacing without skipping stitches. And trust me on this—get yourself some wonder clips. They are a game-changer when you're working with bulky layers or fabrics like laminated cotton where pins would leave permanent marks.
Getting Your Fabric Ready to Cut
I can't stress this enough: solid prep work is the foundation of a great sewing project. Taking your time here will save you a world of headaches later. It’s the difference between pieces that line up beautifully and a frustrating assembly process. This is where you set the stage for a bag that looks truly professional.
First things first, get all your fabrics in the wash. Seriously, don't skip this. Cotton and canvas, the workhorses of bag making, are infamous for shrinking. Imagine pouring hours into a gorgeous bag, only for it to get all wonky and puckered after its first wash. You want to pre-shrink it now, treating it just like you will the finished bag.
After everything is dry, give it a good press with a hot, steamy iron. You want a completely smooth, flat surface to work with. This simple step makes your cutting far more accurate and has a massive impact on the quality of your finished bag.
Nailing the Perfect Cut
Now for the fun part: laying out your pattern pieces. Think of it as a game of fabric Tetris—your goal is to arrange everything to minimize waste. Always, always pay attention to the grainline, which is the arrow you'll see on each pattern piece. This arrow needs to be perfectly parallel to the selvage (the finished, non-fraying edge of your fabric).
Why does this matter so much? Aligning with the grainline keeps the fabric's threads running in the strongest direction, preventing unwanted stretching. This is absolutely key to making a sturdy bag that won't sag or lose its shape over time.
For the cutting itself, you've got a couple of great options:
- Fabric Scissors: A sharp, dedicated pair of sewing shears will do the job just fine. Use long, confident strokes for the cleanest edges. Try to keep the fabric flat on your table as you cut to avoid distorting the piece.
- Rotary Cutter and Mat: This is my go-to for bag making. A rotary cutter lets you slice through multiple layers at once with incredible accuracy. It's a huge time-saver, especially when you need identical exterior and lining pieces.
I’m a huge advocate for the rotary cutter. The precision you get is just fantastic, particularly for the long, straight cuts common in diaper bags. It guarantees that matching pieces are exactly the same size, which is a lifesaver when you're trying to line up seams perfectly.
Fusing Interfacing Like You Mean It
Applying interfacing is probably the most important step in this whole prep phase. It’s what gives your bag its body, structure, and durability. The secret here is a combination of high heat, steam, and a little bit of patience. You're aiming for a permanent bond, free of any bubbles or wrinkles.
Start by trimming your interfacing so it's a tad smaller than your fabric piece—just inside the seam allowance. This little trick is a game-changer for reducing bulk in your seams later.
Place the rough, gluey side of the interfacing onto the wrong side of your fabric. Cover it with a damp press cloth (any scrap of cotton will do). Now, press your iron down firmly on one spot for a good 10-15 seconds. The key is to press, not iron. Don't glide the iron around. Lift it, move to an overlapping section, and press again. Continue this until the whole piece is fused.
Once you're done, let the piece cool down completely on a flat surface before you even think about moving it. This gives the adhesive time to cure and create that strong, crisp bond that will make your diaper bag look store-bought.
Assembling Your Diaper Bag with Confidence
This is the moment all that prep work pays off. You've got a neat stack of cut and interfaced fabric, and now we get to turn it into a real, three-dimensional bag. Don't worry, we'll break the construction down into manageable stages. It's less like a complex puzzle and more like watching a great plan come together.
The secret to a stress-free assembly is building your bag in logical sections. Instead of trying to wrangle the whole thing at once, you’ll focus on smaller components first and then bring them together at the end.
Building from the Inside Out
I always recommend starting with the pockets—all of them. Tackling the exterior pockets and the interior lining pockets first is a smart move. You're still working with flat, easy-to-handle pieces of fabric, which makes it the perfect warm-up before you get to the main event.
Whether you're making simple slip pockets, zippered welt pockets, or those handy insulated bottle holders, attaching them to the main panels now is infinitely easier than trying to wrestle them into place after the bag has sides. Plus, it gives you a quick win and a real sense of progress right from the start.
Mastering the Main Body Construction
With the pockets in place, it’s time to build the bag's main exterior. This usually means sewing the front and back panels to the side panels (often called a gusset) and the base. The biggest challenge for most people is getting those curves and corners to look clean and professional.
To get those satisfyingly sharp corners, here are a few tricks I swear by:
- Clip your corners: Before turning, snip the seam allowance diagonally right at the corner, getting close to—but not through!—the stitching.
- Trim your curves: For any curved seams, cut small V-shaped notches into the seam allowance. This helps the fabric lay flat without bunching up.
- Use a point turner: A simple chopstick works wonders, but a proper point turner tool can help you gently poke out those corners for a crisp, store-bought finish.
Pay special attention to where the straps connect to the bag. These are major stress points that will take a ton of abuse. I always reinforce these anchor points by sewing over them several times, usually in a square with an "X" through it. This ensures they can handle the daily grind without tearing.
A well-made bag is a durable bag. Taking an extra minute to double-stitch the strap attachments is one of the most important things you can do to guarantee your handmade bag lasts for years, not just months.
Installing the Top Zipper
For a lot of sewers, the top zipper is the most intimidating step. It really doesn't have to be. The secret is to break it down. Most diaper bag patterns with a recessed zipper or a top zipper panel treat it as a self-contained unit. You’ll actually build the entire zipper panel first, and then it's as simple as stitching that finished unit into the top opening of the bag.
Wonder clips are a lifesaver here, especially compared to pins. They can hold bulky layers together without shifting or distorting the fabric. Just go slowly, make sure you're using a zipper foot on your machine, and focus on keeping that stitch line straight and even. A beautifully installed zipper is a true hallmark of a quality handmade bag.
The diagram below shows the foundational prep work that makes this assembly stage go so much smoother.
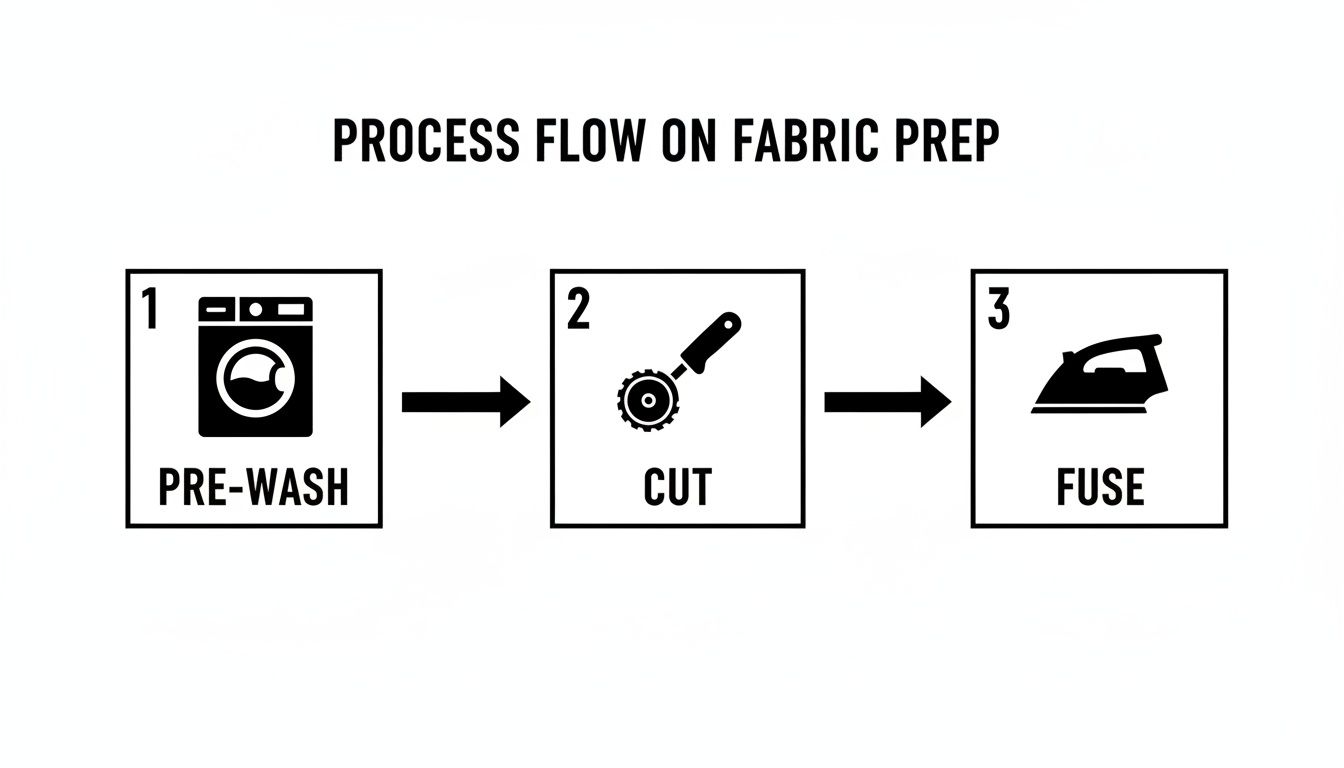
This simple workflow—pre-wash, cut, and fuse—is what guarantees every piece is stable and accurately sized, which is absolutely essential for a headache-free assembly.
Assembling the Lining and Birthing the Bag
Once the exterior is done, you'll basically repeat the entire process with your lining pieces. You're creating a second, slightly smaller "bag" that fits inside the first. Just remember to follow your pattern’s directions and leave a 6-8 inch gap unsewn in the bottom seam of the lining. This little opening is the key to the final, magical step.
And now for the fun part: "birthing" the bag. You’ll place the finished exterior bag (right-side out) inside the lining bag (which is still inside-out). The "right sides" of the fabric should be facing each other. Pin or clip those top raw edges together and sew all the way around the opening.
Finally, you reach through that gap you left in the lining, grab the exterior, and start pulling everything through. For a moment, it’s going to look like a wrinkly, hopeless mess, but just keep pulling. Soon enough, the entire bag will be right-side out.
This final step connects to a broader trend in the diaper bag market. The choice of materials, from exterior prints to antimicrobial linings, is becoming a key strategy for brands. This focus on pattern diversification with performance fabrics is driving consumer choice and market growth. You can discover more insights about this trend and how it affects diaper bag design on Maximize Market Research.
Once it’s birthed, give the whole bag a good press, topstitch around the top edge for a crisp, professional finish, and then sew the opening in the lining closed. And just like that, your beautiful, custom diaper bag is complete.
Adding Custom Touches and Professional Finishes
Alright, the main construction is done. You've got a fully formed bag sitting in front of you, and that’s a huge accomplishment! Now for the fun part—this is where we take it from a well-made project to something truly special that reflects your personal style. These finishing touches are what will make people do a double-take when you tell them you made it yourself.
Even the smallest details can completely transform the look and feel of your bag, giving it that high-end, boutique quality. Let’s walk through a few of my favorite ways to add that extra polish, from quick wins to more advanced techniques.
Simple Ways to Personalize Your Bag
You don't need to be a master bag-maker to add a ton of personality. Some of the most impactful details are actually quite simple to pull off, and they're a great way to put your unique stamp on the project.
A machine-embroidered monogram or a fun little appliqué is a fantastic starting point. Tucking a monogram onto an outer pocket or adding a sweet animal design makes the bag feel instantly custom. It’s also the perfect excuse to dive into that scrap bin and use up some of your favorite fabric remnants.
Another game-changer? Upgrading the hardware. Simply swapping out the plastic sliders and rings recommended in a pattern for some quality metal hardware adds a surprising touch of luxury. You can find all sorts of decorative zipper pulls online that can tie your whole design together. It's a small change with a big impact.
Leveling Up with Advanced Finishes
Feeling a bit more ambitious? If you’re ready to really flex your sewing muscles, a few advanced techniques will give your diaper bag a ridiculously professional structure and polish. These are the details that truly rival what you'd find in a high-end store.
I absolutely love adding piping to the exterior seams. It’s essentially a fabric-covered cord that you tuck into the seams, and it works wonders to define the bag’s shape. The crisp, clean lines it creates, especially around the top opening or along a gusset, are just beautiful.
For a detail that’s both functional and stylish, install some metal bag feet. These little studs on the bottom of the bag keep the fabric off dirty surfaces, protecting all your hard work. They’re much easier to install than they look and instantly make your bag seem more durable and thoughtfully crafted.
Topstitching isn't just for looks—it's a critical structural element. A clean, straight line of stitches defines edges and reinforces seams, giving the entire bag a crisp, professional finish. It’s a dead giveaway of quality craftsmanship.
Speaking of quality, nailing your topstitching is probably the most important finishing detail of all. Slow down, take a deep breath, and lengthen your stitch to around 3.0-3.5 mm. This single step helps seams lie flat, adds a ton of strength, and delivers that sharp, polished look we're all after.
Ensuring Long-Lasting Durability
Let's be real—a diaper bag is going to get a lot of wear and tear. To make sure your handmade creation is up for the challenge, you have to reinforce the key stress points. I’m talking about the handle and strap anchor points, which are almost always the first places a bag starts to fail.
Using a rivet press (or a hand-setting tool) to attach your handles is a massive upgrade over just sewing them on. Rivets create a super strong mechanical bond that thread alone can't match, and they add a cool, industrial-chic vibe. If you don't want to mess with rivets, be sure to sew a reinforced box with an "X" through the middle wherever a strap connects to the bag body. This is a non-negotiable step for making a bag that’s built to last.
Before you call it done, think about what other features might make your life easier. I've put together a few common ideas to get you started.
Customization Ideas for Your Diaper Bag
| Customization | Skill Level | Impact on Function | Impact on Style |
|---|---|---|---|
| Insulated Bottle Pockets | Intermediate | High - Keeps bottles warm or cool for longer. | Minimal - Mostly an internal feature, though can be external. |
| Key Fob Leash | Beginner | High - No more digging for keys at the bottom of the bag! | Minimal - A hidden but incredibly useful feature. |
| Padded Tech Sleeve | Intermediate | High - Protects a tablet or small laptop. | Minimal - Internal and doesn't affect the bag's outward look. |
| Contrasting Topstitching | Beginner | Low | Medium - Adds a pop of color and visual interest. |
| Custom Zipper Pulls | Beginner | Medium - Can make zippers easier to open. | High - A small detail that adds a lot of personality. |
| Removable "Mess" Pouch | Intermediate | High - A waterproof pouch for soiled clothes or snacks. | Low - An internal accessory. |
These are just a handful of ways to tailor your bag to your specific needs. Mixing and matching these ideas will help you create a final product that's not only beautiful but perfectly suited to your daily adventures.
Common Questions About Sewing Diaper Bag Patterns
Even with the best diaper bag patterns in hand, you're bound to hit a few snags. It happens to all of us. Maybe your sewing machine is groaning in protest at thick layers, or your finished bag looks a little... sad and deflated. Don't worry, these are common hurdles. Let's walk through some of the most frequent questions I get and find the right answers to get you back on track.
What Is the Best Fabric for a Beginner?
For your first go at a diaper bag, choosing the right fabric can make all the difference. You want something that will work with you, not against you.
My top recommendation is to stick with a medium-weight canvas or a high-quality quilter's cotton for the exterior. Canvas is a fantastic choice because it already has a bit of structure, which makes it much more forgiving to work with. Quilter's cotton is a dream to press and comes in an endless variety of fun prints, but you absolutely must pair it with a sturdy interfacing like fusible fleece or foam to give the bag the body it needs.
For the lining, you can't go wrong with standard quilter's cotton. It’s lightweight, easy to handle, and won't add unnecessary bulk.
I strongly suggest you steer clear of trickier materials like faux leather, vinyl, or laminated cottons for your first bag. These often require a special Teflon foot, specific needles, and techniques that can add a layer of frustration you just don't need right now. Let's build your confidence first!
How Do I Stop My Machine from Struggling with Thick Layers?
This is easily the number one question I hear from bag makers. Pushing through multiple layers of fabric, interfacing, and webbing for straps can feel like asking your home machine to perform a miracle. The good news is, it's totally possible with a few key adjustments.
Here's my checklist for tackling bulky seams:
- Use the Right Needle: This is non-negotiable. Swap out your universal needle for a brand new, sharp Jeans or Denim needle in a size 90/14 or 100/16. These needles are specifically designed to pierce thick, dense fabric without breaking or skipping stitches.
- Lengthen Your Stitch: Bump up your stitch length to 3.0 mm or even 3.5 mm. A longer stitch gives the machine's feed dogs more room to grab and pull the bulky layers through smoothly.
- "Walk" the Machine: When you get to an especially thick spot, like where straps join a seam, take your foot off the pedal. Instead, turn the handwheel toward you to manually create each stitch. This gives you absolute control and prevents the needle from deflecting or snapping.
- Use a Hump Jumper: This little plastic gadget is a game-changer. It levels the presser foot when you approach a thick seam, preventing skipped stitches and ensuring the fabric feeds evenly. In a pinch, a folded piece of cardboard placed under the back of the foot works too!
My Bag Looks Floppy What Did I Do Wrong?
A floppy, unstructured bag is almost always an interfacing issue. Diaper bag patterns depend on the right interfacing to give them the structure to stand up on their own and look polished, not like a shapeless tote. If your bag is slouchy, it's a good bet that the interfacing you used was too lightweight, or you might have skipped it on a few key pieces.
The secret to a professional-looking bag is using the right stabilizer. The main exterior panels need something robust, like a fusible foam (Pellon Flex-Foam is a popular one) or a thick fusible fleece. Pockets and flaps also need support from a mid-weight woven interfacing to give them crispness and durability.
If you've already finished the bag, you could try inserting a stiff, removable bag bottom made from plastic canvas or foam board to help it hold its shape. For your next project, trust the pattern's interfacing recommendations—they are truly the key to getting that polished, store-bought look.
Once you have your beautiful, sturdy bag completed, the fun part begins: filling it! After all that hard work, you might be wondering what to pack. For a practical guide, check out this resource on a comprehensive newborn diaper bag checklist.
At Famcut.com, we're passionate about empowering your creative journey with the best supplies, patterns, and classes. Explore our collection and start your next sewing adventure today. Find everything you need at https://famcut.com.