


7 Easy Baby Quilt Patterns for Beginners in 2025
Welcome to the wonderful world of quilting! Creating a baby quilt is one of the most rewarding projects for a new sewer, a handmade gift filled with love, warmth, and personality. Your project embodies the spirit of unique gifts for new mothers, offering a personalized touch that store-bought items often lack. While intricate patterns and precise piecing can feel intimidating, making a quilt doesn't have to be complicated.
That's why we've compiled this ultimate guide to baby quilt patterns for beginners. We are breaking down seven simple, stylish, and completely achievable patterns designed to build your confidence and help you master the fundamentals.
This listicle focuses on designs that prioritize basic techniques like straight-line sewing, simple cutting, and easy assembly. Forget complexity; our goal is to get you creating a beautiful, modern quilt that looks like it was made by a pro. Whether you have a weekend or a few afternoons, you'll find the perfect project to start your quilting journey. Let's dive in and find the perfect pattern for your first cozy creation.
1. Simple Square Patchwork Quilt
The Simple Square Patchwork is the quintessential first project for anyone exploring baby quilt patterns for beginners. This timeless design is built from equally-sized fabric squares sewn together in a simple grid, making it an ideal starting point for mastering foundational quilting skills. It requires only straight-line sewing, allowing you to focus on crucial techniques like achieving a precise 1/4-inch seam allowance, pressing seams effectively, and basic quilt top construction.
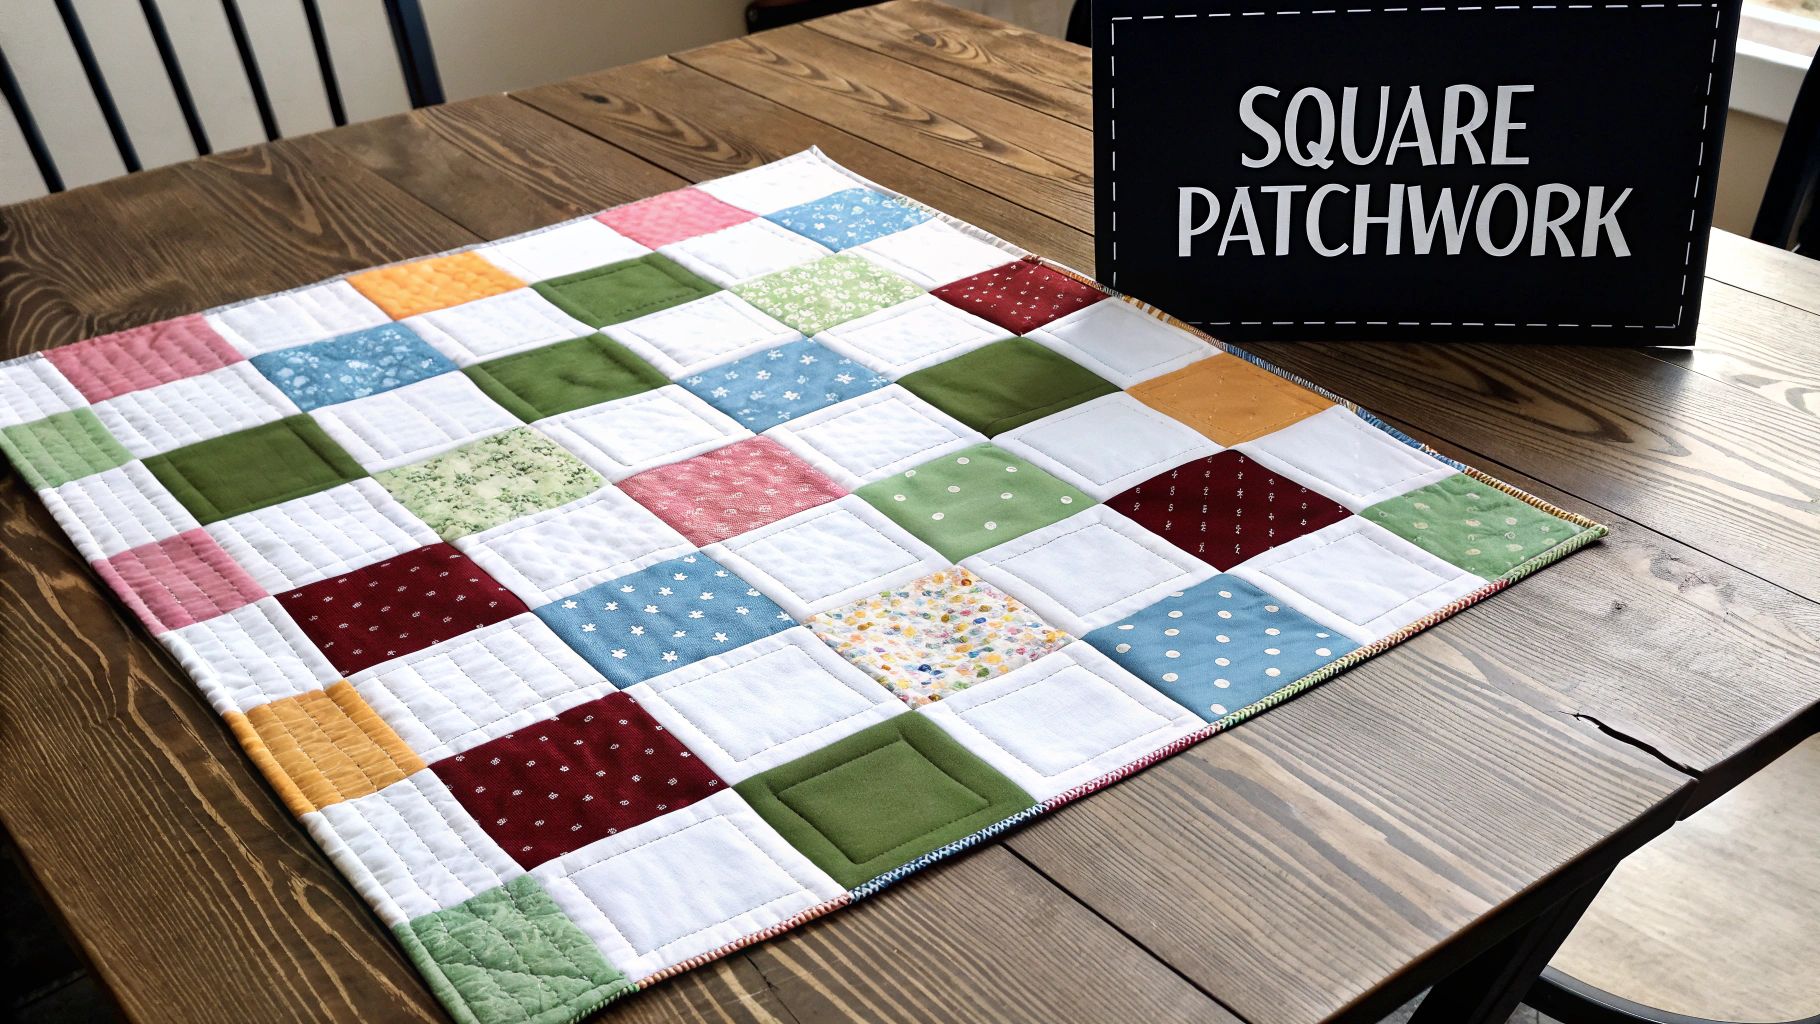
This pattern’s beauty lies in its simplicity and versatility. You can create a visually stunning quilt just by thoughtfully arranging your fabric squares. The grid layout provides a perfect canvas for showcasing beautiful fabric collections, creating color gradients, or using up leftover scraps in a charming, scrappy design.
Why This Pattern is Perfect for Beginners
The Simple Square Patchwork design minimizes complexity, which builds confidence. Since you are working with identical shapes, there is no intricate cutting or complex piecing involved. This focus on basics helps you develop the muscle memory needed for more advanced projects later on. The pattern is also incredibly forgiving, and minor imperfections are less noticeable in the final product.
Actionable Tips for a Perfect Patchwork
To ensure your first patchwork quilt is a success, follow these specific, actionable tips:
- Use Pre-Cuts: Start with a "charm pack" which contains pre-cut 5x5 inch squares. This eliminates the stress of cutting fabric accurately and ensures all your pieces are perfectly uniform from the start. Major fabric producers like Moda Fabrics offer coordinated charm packs that make color selection foolproof.
- Plan Your Layout: Before sewing a single stitch, arrange all your squares on a design wall or a large, clean floor space. This allows you to visualize the final design, adjust color placement, and ensure you love the arrangement.
- Press Seams Strategically: Press the seams of each row in alternating directions. For example, press all seams in row one to the left, row two to the right, row three to the left, and so on. This "nesting" technique helps your seams lock together perfectly when you sew the rows, reducing bulk and creating crisp, clean intersection points.
- Try Chain Piecing: To save time and thread, use the chain piecing method. Sew two squares together without cutting the thread, then immediately feed the next pair through your machine. This creates a long "chain" of connected pairs that you can snip apart later. This technique, heavily popularized by quilting instructors like Jenny Doan of Missouri Star Quilt Company, is a game-changer for efficiency.
2. Strip Quilt (Jelly Roll Race)
The Strip Quilt, famously known as the "Jelly Roll Race," is a favorite among baby quilt patterns for beginners due to its incredible speed and simplicity. This method involves sewing pre-cut 2.5-inch fabric strips (a "Jelly Roll") end-to-end to create one super-long strip. This strip is then folded and sewn together lengthwise multiple times, magically forming a dynamic, striped quilt top in a fraction of the time of traditional piecing.
The charm of this pattern is its "unplanned" appearance, which creates a random and modern look. It’s an exciting process where the final arrangement of colors and prints is a delightful surprise. Because the construction is so straightforward, quilters can often complete a baby-sized quilt top in about an hour, making it perfect for a last-minute baby shower gift.
Why This Pattern is Perfect for Beginners
The Jelly Roll Race eliminates the need for precise cutting and intricate block assembly. The only skill required is sewing long, straight seams, which is excellent practice for maintaining a consistent seam allowance. This pattern is exceptionally forgiving; the random nature of the design means minor sewing imperfections are virtually invisible. It’s a high-impact, low-stress project that delivers a beautiful quilt with minimal effort.
Actionable Tips for a Perfect Strip Quilt
To make your Jelly Roll Race quilt a stunning success, keep these specific tips in mind:
- Use a Jelly Roll: Start with a pre-cut "Jelly Roll" from manufacturers like Riley Blake Designs or Moda Fabrics. This ensures all 40-ish strips are a uniform 2.5 inches wide and come from a coordinated fabric collection, taking the guesswork out of color matching.
- Press Seams Open: As you sew the long strip, press your seams open instead of to one side. With so many seams coming together, pressing them open helps to distribute the bulk evenly, resulting in a flatter and more professional-looking quilt top.
- Install a Walking Foot: A walking foot is a beginner's best friend for this project. It feeds the top and bottom layers of fabric through your sewing machine at the same rate, preventing the long strips from stretching, shifting, or puckering.
- Watch a Visual Guide: This pattern is easier to understand by watching it done. The viral tutorials by Jenny Doan of Missouri Star Quilt Company are the gold standard for this technique and provide clear, step-by-step visual instructions that make the process foolproof.
3. Four-Patch Baby Quilt
The Four-Patch Baby Quilt is a fantastic step up from simple squares and serves as a foundational block in traditional quilting. This classic pattern consists of four fabric squares sewn together into a 2x2 grid, creating a small checkerboard block. These simple blocks are then assembled, often alternating with plain fabric squares, to form the quilt top, making it one of the most versatile baby quilt patterns for beginners.
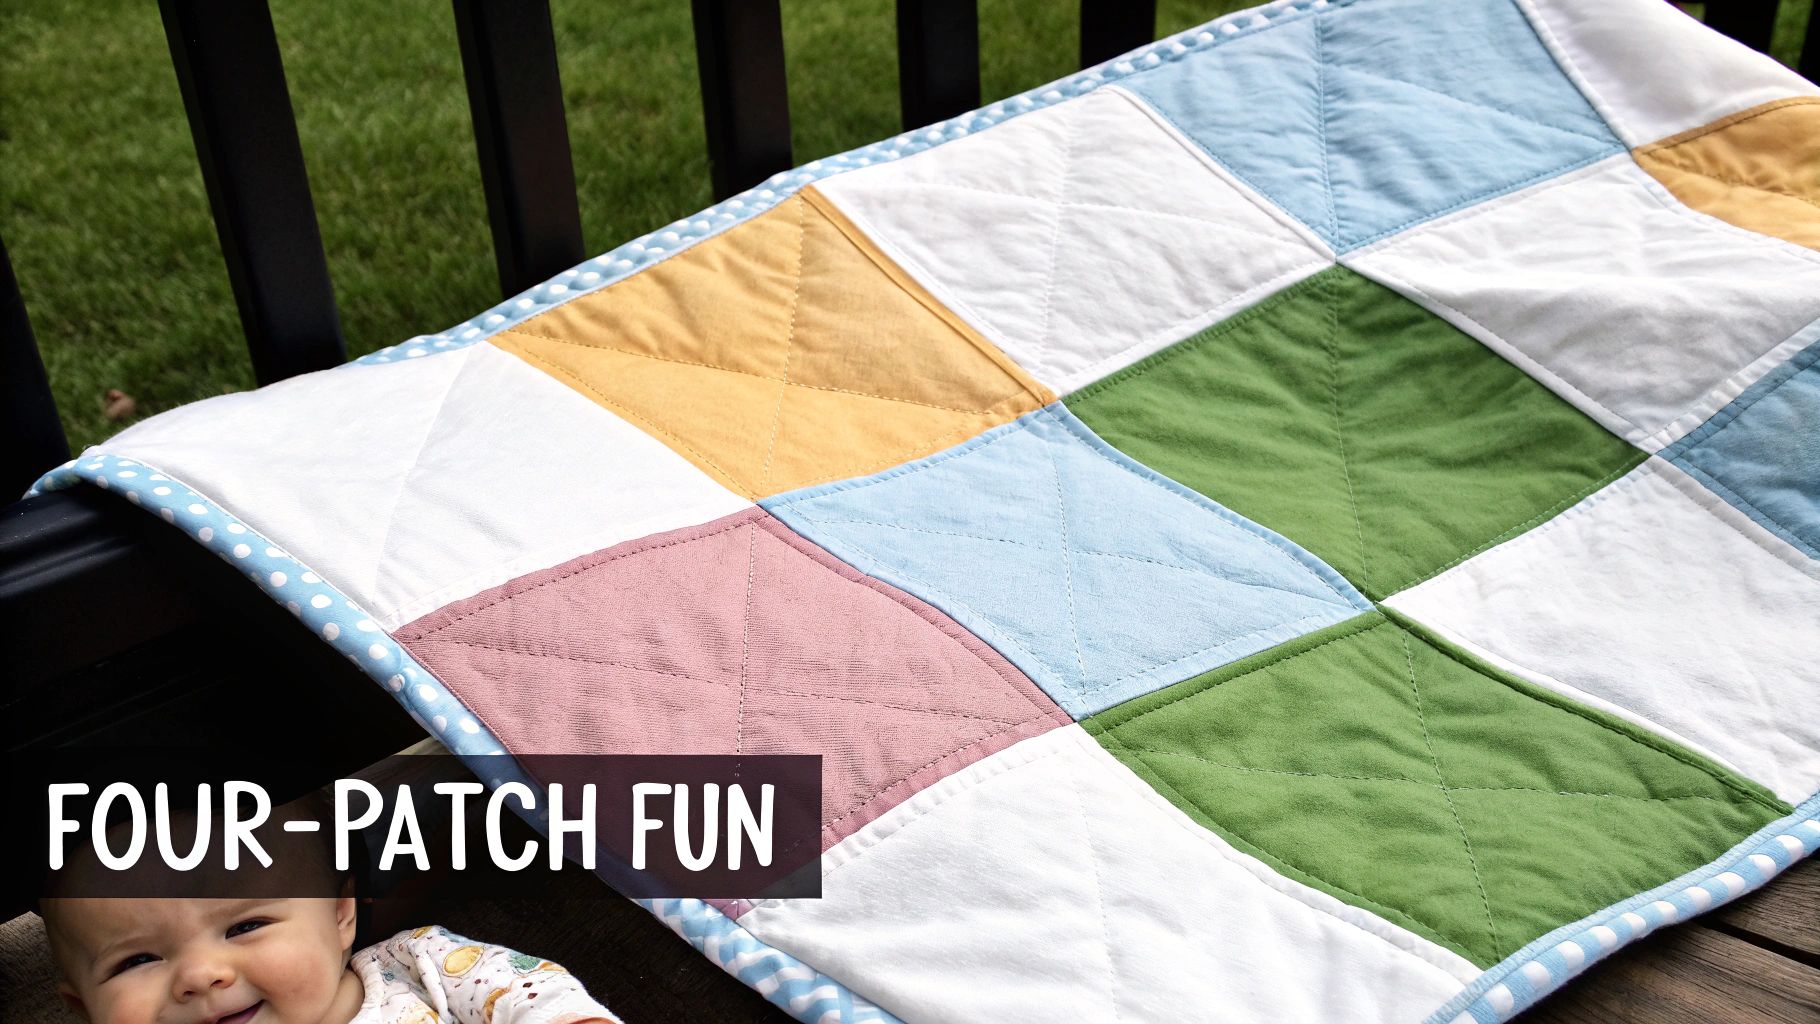
This pattern introduces the crucial skill of block construction without overwhelming a new quilter. The repetition of creating identical four-patch units helps you master seam alignment and precise pressing, which are essential for more intricate designs. The final quilt can look surprisingly complex, especially when blocks are arranged on point or combined with sashing strips.
Why This Pattern is Perfect for Beginners
The Four-Patch pattern builds confidence by breaking down the quilting process into small, manageable steps. Assembling a single four-patch block feels like a mini-accomplishment, motivating you to continue. This design is also an excellent way to practice nesting seams, a key technique for achieving perfectly matched points where the corners of your squares meet. It is the ideal project for transitioning from basic patchwork to block-based quilting.
Actionable Tips for a Perfect Four-Patch
To ensure your four-patch blocks are sharp and your quilt top lies flat, focus on these specific techniques:
- Try Strip Piecing: For maximum efficiency, use the strip piecing method popularized by Eleanor Burns' "Quilt in a Day" series. Sew two long fabric strips together, press, and then cut the joined strip into smaller segments. This technique guarantees your blocks are perfectly sized and significantly speeds up the piecing process.
- Press Seams Open or To One Side: When sewing the first two squares of your block, press the seam toward the darker fabric to prevent it from showing through the lighter fabric. When you join the two pairs to complete the block, press the final seam open to reduce bulk at the center intersection.
- Nest Your Seams: To get perfect center points, make sure the middle seams of your two pairs are pressed in opposite directions. When you place them right sides together, the seams will "lock" or nest into each other, preventing them from shifting as you sew.
- Cut All Squares at Once: Before you begin sewing, cut all the squares needed for your entire quilt. This batch-cutting approach ensures consistency in size across all blocks, which is critical for a smooth, flat final quilt top. A rotating cutting mat can make this process even faster and more accurate.
4. Simple Rail Fence Quilt
The Simple Rail Fence is a classic design and one of the most rewarding baby quilt patterns for beginners. This pattern creates the illusion of woven fence rails by arranging simple striped blocks. Each block is made by sewing three or four fabric strips together lengthwise. These long strip sets are then cut into squares, which are rotated to create a dynamic zigzag or basketweave effect across the quilt top. It’s a perfect beginner project because it relies solely on straight seams but produces a visually complex and impressive result.
The magic of the Rail Fence pattern is how easily it creates movement and texture. By simply alternating the orientation of your blocks (vertical, horizontal, vertical), you can achieve a sophisticated design. This pattern is fantastic for using up jelly rolls (pre-cut 2.5-inch strips) or for showcasing a trio of coordinating fabrics, such as a high-contrast modern palette or a soft, pastel baby theme.
Why This Pattern is Perfect for Beginners
The Rail Fence quilt builds on the skills of the simple patchwork by introducing strip piecing, a highly efficient technique. You sew long strips together first, which means fewer individual seams and more time spent on perfecting straight lines. The cutting process is also straightforward, as you simply slice the strip sets into squares. This method minimizes repetitive piecing and helps you produce a finished quilt top much faster, boosting your confidence.
Actionable Tips for a Perfect Rail Fence
To achieve a beautiful and well-constructed Rail Fence quilt, focus on these specific tips:
- Choose Contrasting Fabrics: For the most dramatic effect, select three fabrics with varying values: one light, one medium, and one dark. This contrast is what makes the "woven" pattern pop. An ombre or gradient fabric collection also works beautifully.
- Master Strip Piecing: Sew all your long fabric strips together into "strip sets" before doing any other cutting. Press all seams in one direction to keep the strip set flat and smooth. This foundational technique, a staple in traditional American quilting, makes the entire process faster and more accurate.
- Cut Your Blocks Carefully: Once your strip sets are sewn and pressed, use a rotary cutter and a square ruler to cut them into uniform blocks. Accuracy here is key to ensuring your final quilt top lies flat.
- Plan the Rotation: Before sewing the blocks together, lay them all out on a floor or design wall. Arrange them in an alternating vertical and horizontal pattern. To avoid confusion, place a pin or a small piece of painter's tape on the top edge of each block to maintain its correct orientation as you move it to your sewing machine.
5. Disappearing Nine Patch
The Disappearing Nine Patch is a magical and rewarding project for those searching for baby quilt patterns for beginners that look more complex than they are. The process starts with a simple nine-patch block, a 3x3 grid of fabric squares. This basic block is then strategically cut into quarters and rearranged, magically transforming into an intricate, sophisticated design.
This pattern's appeal lies in its "wow" factor. It allows new quilters to create a visually stunning quilt top that appears to require advanced skills, yet it only relies on sewing straight seams and making a few precise cuts. The transformation is exciting and almost addictive, making it a favorite among quilters who want impressive results without the complexity.
Why This Pattern is Perfect for Beginners
The Disappearing Nine Patch builds on the foundational skills learned in simple patchwork but introduces the concept of cutting and rearranging blocks. This teaches precision cutting in a low-stakes way while delivering a high-impact visual. Because the initial construction is so simple, it allows beginners to focus on accurate seam allowances and pressing, which are crucial for the "disappearing" effect to work perfectly.
Actionable Tips for a Perfect Disappearing Nine Patch
To achieve that stunning, complex look with ease, follow these specific, actionable tips:
- Choose High-Contrast Fabrics: The magic of this pattern is most dramatic when you use fabrics with high contrast. Pairing a dark or bold print with a light or solid background fabric will make the secondary patterns pop after you cut and rearrange the blocks.
- Use a Large Square Ruler: After sewing your nine-patch block, you will cut it in half vertically and horizontally. A large square quilting ruler is essential for this step to ensure your cuts are perfectly straight and centered, which is critical for the final design to line up correctly.
- Press All Seams Before Cutting: Before making any cuts, give your completed nine-patch block a final, thorough press. This ensures the block is perfectly flat and your seams are set, preventing any shifting or distortion while you cut.
- Photograph Your Layout: Once you cut your original block into four smaller units and rearrange them, take a quick photo with your phone before sewing. This serves as a vital reference, ensuring you sew the new, more complex blocks together in the correct orientation. This simple step, often recommended by modern quilters, prevents frustrating mix-ups.
6. Coin Quilt (Stacked Coins)
The Coin Quilt, often called Stacked Coins, is a fantastic project for beginners looking to create a modern and visually dynamic baby quilt. This pattern involves sewing rectangular fabric pieces, or "coins," into long vertical or horizontal columns. These columns are then sewn together to form the quilt top, creating a clean, graphic look reminiscent of stacked coins. The construction relies entirely on straight seams, making it a perfect next step after mastering basic squares.
This pattern's charm comes from its streamlined simplicity and its ability to showcase fabric collections beautifully. You can create an ombre effect by arranging fabrics from light to dark, a rainbow progression with solid colors, or a delightfully scrappy quilt using leftover fabric strips. The strong linear design is contemporary and highly appealing for modern nursery decor.
Why This Pattern is Perfect for Beginners
The Coin Quilt is exceptionally forgiving and builds skills in a low-stress way. Since the coins are arranged in random-looking stacks, there is no need for precise point matching between columns. This allows you to focus on sewing straight lines and managing long strips of fabric, two essential skills in quilting. The design is also ideal for using pre-cut "jelly rolls" (2.5-inch strips), which simplifies the cutting process significantly.
Actionable Tips for a Perfect Coin Quilt
To ensure your stacked coins quilt comes together beautifully, focus on these specific tips:
- Vary Your 'Coins': For a more organic and less rigid look, cut your rectangular coins to slightly different lengths while keeping the width consistent. This adds visual interest and makes the quilt even more forgiving, as promoted by modern quilt designers like Alison Glass.
- Press Seams Methodically: As you sew the coins together to create a column, press all the seams within that single column in the same direction (e.g., all to the right). Then, for the next column, press all its seams in the opposite direction (all to the left).
- Nest Your Column Seams: This alternating pressing direction allows you to "nest" the seams when you sew two columns together. The seams will lock into place, reducing bulk and helping you achieve a flatter, more professional-looking quilt top without having to match any points.
- Pin Generously: Long strips of fabric, especially those made of many small pieces, can stretch or warp as you sew. Before sewing two columns together, lay them flat and pin them every few inches to ensure they feed through your machine evenly and your finished quilt top is square.
7. Simple Half-Square Triangle Baby Quilt
The Simple Half-Square Triangle (HST) quilt introduces one of the most fundamental and versatile units in quilting. This design is built from squares made of two equal-sized triangles, but modern methods eliminate the need to cut tricky individual triangles. Instead, you sew two fabric squares together, cut them diagonally, and press them open to create two perfect HST units.

Arranging these simple units unlocks a world of design possibilities, from classic pinwheels and zig-zagging chevrons to intricate star patterns. Mastering the HST is a gateway skill that opens up countless other baby quilt patterns for beginners and beyond, making it an essential technique to learn early in your quilting journey.
Why This Pattern is Perfect for Beginners
The HST quilt teaches precision without being overly complex. The process of creating and trimming HSTs hones your skills in accurate sewing and cutting, which are crucial for all quilt-making. Because the construction is repetitive, you can quickly build confidence and rhythm. The pattern allows for incredible creativity with just one simple block, making it an exciting next step after mastering basic squares.
Actionable Tips for a Perfect HST Quilt
To create crisp points and a beautiful design, focus on these specific techniques:
- Make Two at a Time: The most efficient beginner method involves drawing a diagonal line on the wrong side of your lighter fabric square. Place it right-sides-together with a darker square and sew a 1/4-inch seam on both sides of the drawn line. When you cut on the line, you will have two identical HST units. This technique was popularized by quilting pioneers like Eleanor Burns to speed up the process.
- Starch Your Fabric: Before cutting, generously apply spray starch to your fabric and press it. This adds stiffness and stability, preventing the fabric from stretching along the bias edge (the diagonal cut), which is notoriously unstable. This simple step makes sewing and handling the units much easier.
- Press Seams Thoughtfully: To reduce bulk where points meet, press your seams toward the darker fabric. This allows the seams to "nest" together when you join your blocks, just like in a simple patchwork quilt. Alternatively, you can press seams open for an exceptionally flat quilt top.
- Trim for Perfection: After pressing, your HST units will be slightly larger than needed. Use a square ruler with a diagonal line to trim each unit down to its precise final size. This step, often called "squaring up," is the single most important action for ensuring all your points match up perfectly in the final quilt.
7 Baby Quilt Patterns Comparison Guide
| Quilt Pattern | 🔄 Implementation Complexity | 💡 Resource Requirements | 📊 Expected Outcomes | ⭐ Key Advantages | ⚡ Ideal Use Cases |
|---|---|---|---|---|---|
| Simple Square Patchwork Quilt | Very low - straight-line sewing, grid layout | Basic fabric squares or charm packs | Classic, cohesive baby quilt, beginner practice | Extremely beginner-friendly, forgiving pattern | Beginners learning fundamental sewing |
| Strip Quilt (Jelly Roll Race) | Very low - sew long strips, simple cuts | Pre-cut jelly roll strips (2.5-inch wide) | Fast, modern scrappy quilt top | Extremely fast, minimal measuring, hides flaws | Quick quilts, scrap busting, beginner speed |
| Four-Patch Baby Quilt | Low - sewing 2x2 blocks, simple layout | Two contrasting fabrics, basic squares | Classic checkerboard design | Teaches blocking, forgiving, quick blocks | Beginners practicing block assembly |
| Simple Rail Fence Quilt | Low-medium - strip piecing, block rotation | 3-4 strips per block, coordinating fabrics | Dynamic woven effect, optical illusion | Visual impact with simple seams, fast via strip piecing | Showing off novelty fabrics, zigzag patterns |
| Disappearing Nine Patch | Medium - basic 9-patch + extra precise cutting | Two contrasting fabrics | Complex-looking dynamic designs | Dramatic results from simple blocks | Beginners ready for intermediate challenge |
| Coin Quilt (Stacked Coins) | Low - sewing rectangular strips into columns | Many small rectangle scraps or fabric cuts | Modern linear, scrappy style | Scrap-friendly, no pattern matching | Scrap quilts, modern baby quilts |
| Simple Half-Square Triangle | Medium - HST units require accurate seams and trimming | Two contrasting fabrics, rulers | Versatile, geometric, and dynamic designs | Builds essential quilting skills, highly versatile | Advancing beginners, versatile pattern use |
From Beginner to Quilter: Your Journey Starts Now
You've just walked through seven fantastic baby quilt patterns for beginners, each a perfect starting point for your creative journey. We've explored everything from the classic elegance of a Simple Square Patchwork to the clever and dynamic Disappearing Nine Patch. The core lesson from these patterns is clear: quilting is an accessible and deeply rewarding craft, available to anyone with the desire to create.
The path from novice to confident quilter is paved with fundamental skills. Each pattern in this list, whether it's the straightforward Strip Quilt or the slightly more intricate Half-Square Triangle design, is built upon the same essential techniques. Mastering accurate cutting with a rotary cutter, maintaining a consistent quarter-inch seam allowance, and pressing your seams carefully are the non-negotiable pillars of quality quilting. These are the skills that will serve you well on every single project you undertake from this day forward.
Your Actionable Next Steps
Feeling inspired? Here’s how to channel that energy into a finished quilt:
- Choose Your Pattern: Don't overthink it. Pick the one design that sparked the most joy for you. Was it the simple symmetry of the Rail Fence or the playful look of the Stacked Coins quilt? Trust your instincts and start there.
- Gather Your Materials: Select a fabric collection that you love. Working with colors and prints that make you happy is a powerful motivator. Don't forget the essential tools: a sharp rotary cutter, a quality self-healing mat, and a clear acrylic ruler.
- Embrace the Process: Remember that every quilt is a journey of small steps. Focus on one block at a time, one seam at a time. Celebrate the small victories, like a perfectly nested seam or a precisely cut square. Don't be afraid of mistakes; your seam ripper is a tool, not a sign of failure.
This journey of creating a baby quilt is about more than just sewing fabric together. It's about channeling your creativity into a tangible gift of warmth and love. As you gain confidence, you might find yourself drawn to other handmade projects. As you embark on your quilting journey, you might also consider exploring other simple DIY projects for your baby, which can be just as rewarding. The skills you build today will open up a world of creative possibilities.
The beauty of these beginner-friendly baby quilt patterns is their power to transform simple fabric into a cherished heirloom. Your first quilt is a milestone, a testament to your patience and newfound skill. Imagine the pride you'll feel when you wrap a precious little one in a soft, cozy quilt made entirely by you. That moment is closer than you think.
Ready to ensure every cut is perfect? For the precision required in quilting, visit Famcut.com. Their premium rotary cutters and self-healing mats provide the accuracy you need to bring your beautiful baby quilt patterns for beginners to life.